Acuity Call Booking and Sales Integration

Follow the written steps below to integrate Acuity with HYROS. Both Sales and Calls are tracked in a very similar way for this integration.

1- Login into your Acuity dashboard and go to https://secure.acuityscheduling.com/preferences.php?action=integrations

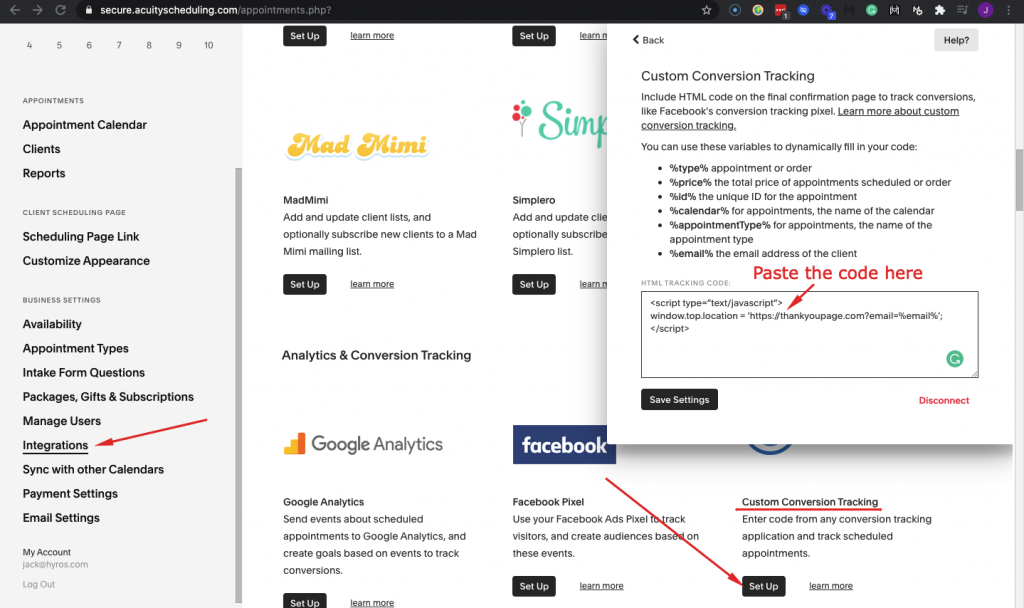
2- Pick CUSTOM CONVERSION tracking from the list of integration. A code input box should appear.

3- Alter the URL of the page in the code below to your thank you page. Then paste it in the code input box that appeared.

<script type="text/javascript">
window.top.location = 'https://yoururl.com?email=%email%';
</script>

BE SURE TO REPLACE THE yoururls.com with your actual thank you page URL.

Here is what you should see inside Acuity:
Please follow the exact same process, but use this code instead of the code above in the custom conversion tracking settings:

<script>
var bookedAppointmentName = "%appointmentType%";
console.log(bookedAppointmentName)
if( bookedAppointmentName == "Appointment Type 1" ){window.top.location = 'https://yoururl.com?email=%email%';
}else if( bookedAppointmentName == "Appointment Type 2" ){
window.top.location = 'https://yoururl.com?email=%email%';
}
</script>

This is designed to redirect leads to a specific page based on the appointment type of the call booking. When adding this code, please add the appointment type name and associated thank you pages as shown below.

You’ll see where to adjust the appointment type name in red and where to adjust the associated thank you page for leads to be redirected to in blue:

To find the correct appointment type names, please check your appointment types setting inside your Acuity business settings:

Have more than 2 appointment types and thank you pages?

Please also note that the code above is just for 2 appointment types and associated thank you pages, however you can add to this code as much as like depending on how many appointment types you have. Just copy and the last section that you see underlined here:

Then paste it immediately after the final }. It should look something like this:


<script>
var bookedAppointmentName = "%appointmentType%";
console.log(bookedAppointmentName)
if( bookedAppointmentName == "Appointment Type 1" ){window.top.location = 'https://yoururl.com?email=%email%';
}else if( bookedAppointmentName == "Appointment Type 2" ){
window.top.location = 'https://yoururl.com?email=%email%';
}
else if( bookedAppointmentName == "Appointment Type 3" ){
window.top.location = 'https://yoururl.com?email=%email%';
}
</script>

You can continue doing this for as many appointment types as you like. Once you have done this for all of your appointment types, move on to the next steps.

4- Ensure the Universal code is in the header of your thank you page

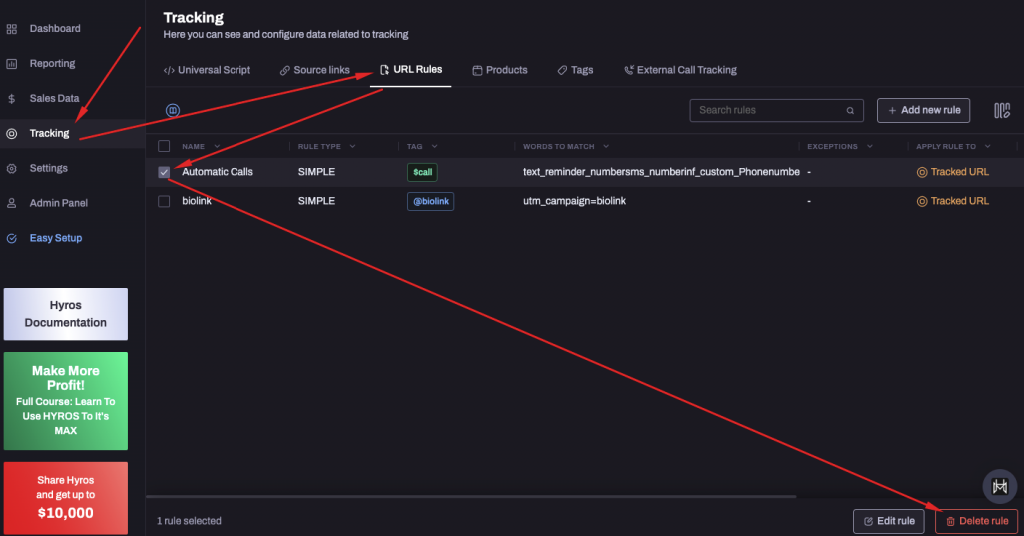
5- Then in Hyros, remove the “Automatic Calls” URL rule by going to your URL rules settings in your tracking tab as shown here:
6 – Finally, please integrate with Acuity by going to the Acuity integration in your integration settings and following the prompts to log in and connect Acuity with Hyros.

By default the Calendly, Acuity and Oncehub integrations will track all call events. Use this guide if you want to track only a specific event or group of events from the integration.

This guide uses the example of Calendly, but you can follow the exact same steps for all 3 integrations.

1. Navigate to https://app.hyros.com/settings/integrations

2. Click “Scheduling Platforms”

3. Select your call integration and click “configure” (you can follow these steps with either Acuity, Calendly or Oncehub)

4. Click the edit icon on your integration.

5. Click “Add type” here

6. Select the specific call events that you would like to track from the dropdown, anything you don’t select will not be tracked

7. Click “Save type values”

If you make any sales via acuity, or any events require the lead to make a purchase, then Hyros will register this as a sale in Hyros.

If you do not want these events to be shown in Hyros, then go to the Acuity integration settings and toggle on “discard sale events”:

Hyros will then ignore any events that are sales, and only track calls from Acuity.

This integration will send call data to Hyros in a more accurate manner than the URL rules. Please make sure you have removed the URL rule to track calls as per step 5, otherwise you will be tracking duplicate calls.

Testing Your Call and Sales Tracking

Book a test call as if you were a lead, you should be redirected to the thank you page you added in step 3, with your email inside the URL, which should look something like this.

If you see something wrong such as no email in the URL, or the redirect does not happen at all and you remain on the call booking page, please see the drop downs below:

First, please go back to step 3 and ensure that the tracking code is installed correctly. If you have confirmed that it is, then it may be a permissions issue with Acuity.

You may be able to confirm this by going to the console tab in your developer tools, to get there follow the instructions below:


Then you should see an error message that says something like “The current window does not have permission to navigate the target frame to…” as the one in the screenshot below does:

If you see this then there are 2 current workarounds to enable the redirect:

1) Add a peice of code to the Acuity Embed code to enable the redirect

This is the optimal workaround because you do not have to make any funnel changes. First, copy the code below:

sandbox="allow-forms allow-modals allow-orientation-lock allow-pointer-lock allow-popups allow-popups-to-escape-sandbox allow-presentation allow-same-origin allow-scripts allow-top-navigation allow-top-navigation-by-user-activation"

Then find your Acuity embed code and paste the above code inbetween the <iframe and src as shown below:

So <iframe src="https://app.acuityscheduling.com/schedule.... becomes the following:

<iframe sandbox="allow-forms allow-modals allow-orientation-lock allow-pointer-lock allow-popups allow-popups-to-escape-sandbox allow-presentation allow-same-origin allow-scripts allow-top-navigation allow-top-navigation-by-user-activation" src="https://app.acuityscheduling.com/schedule....

Now re-add the new Acuity embed code, reload the page and try again. You should be redirected after booking a call to the thank you page you set in step 3.

2)Add the Acuity form to it’s own page, so it’s not embedded on any other form.

The permissions issue only occurs when it’s embedded on a page, so if you just show leads the direct Acuity form rather than the embedded version, the redirect should work.

However if you don’t want to make funnel changes we suggest following the first option.

If the redirect works but you do not see the email correctly on the thank you page URL, then it is most likely an issue with the code added in step 3.

Go back to step 3 and check the code installed, and ensure the email UTM is present after the thank you page URL, as you can see underlined here:


If everything appears correct, then go into your Hyros account and make sure the call booking appears in your calls section HERE.

You will also be tracking any sales made via Acuity. Please run a test payment, and make sure it appears in your sales data tab. Please note that if the test payment is for a value of $0 then it will still show under calls, as Hyros reads events from acuity with a value of $0 as a call.

This is still a successful test and will mean that sales will be tracked correctly once we see any tracked with a value above $0.

This concludes the setup.