Adding the Facebook Pixel Manually for Event ID Deduplication

WARNING: This guide should be used as an advisory documentation, but as this is specifically related to Facebook’s own pixel setup, we can not be held responsible if anything changes or there are errors from Facebook’s end when adding the pixel manually.

Although we will do our best to ensure this is kept up to date at all times, please make sure you review Facebook’s documentation in detail to confirm the most up to date information regarding adding the Facebook pixel manually for you specific business.

Please follow this guide if you need assistance with adding the Facebook pixel manually in order to include the event ID for deduplication purposes, as per the main offline conversion setup guide HERE.

Standard Setup

Step 1 – adding the base code from the pixel

As we are going to be adding these events manually in order to add the event ID, please make sure you are not tracking your standard events manually using these methods contained in your pixel settings or elsewhere. These should be turned off:

Please also ensure you have not added the pixel using any automated pixel integration software

In your pixel overview, you will need to add the pixel code manually. First go to overview and select “add events”. Click “From a new Website” and choose to Install the code manually when prompted:

Then inside the Events Manager onboarding, copy the base code in the step labelled “Install base code”:
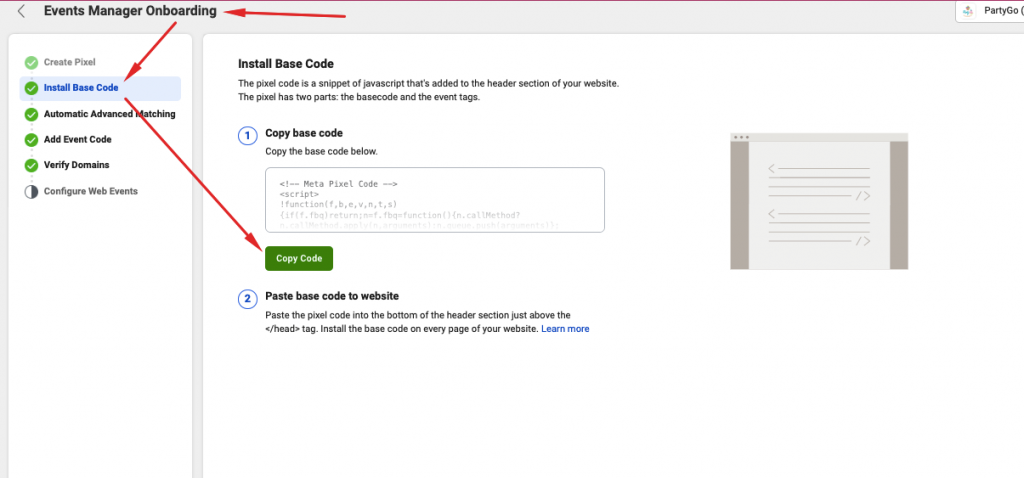
You should also follow all other steps in the Events Manager Onboarding section EXCEPT FOR “ADD EVENT CODE”. Because we are adding the events manually we do not need to add events in this way.

The base code then needs to be installed on ALL pages of your site in the <head> code. Because this part is installed on every page, and it needs to be placed in the same section as our Universal Script. We suggest adding it in the directly below where you added the Hyros Universal Script during the Initial Setup, which may vary depending on your funnel setup.

If you need a reminder on where this is, please reach out to the onboarding team or the support team on we can assist you further depending on what software you are using.

Also please note that this is NOT the same thing as adding event tracking, but we need the base code in order to track events. You can read more about how the structure of the Facebook pixel works HERE. Here is a screenshot from their documentation outlining the basic structure of Facebook’s pixel:

1 – Your website’s original code. The Facebook pixel code should be placed between the <head></head> tags.
2 – The Pixel Base Code
3 – The Standard Event Code

Step 2 – Adding Event Tracking

Page view

This is added automatically with the base code on every page, so no need to do anything here.


Lead and Add to Cart

For some business types, such as a Shopify businesses, it will not be possible to add the basic Lead and ATC codes to the correct pages because you can only adjust the code at theme level.t

If you add the Lead/ATC event to your theme, it will be added and tracked on all pages of your site. We want the event to typically be applied as soon as an email is submitted or ATC button is clicked instead.

For this, we use the following customized code for Shopify for both events:

<!-- Trigger Lead & AddToCart -->
<script type="text/javascript">
window.onload = function(){ 
  function validateEmail(email) {
      const re = /^(([^<>()\[\]\\.,;:\s@"]+(\.[^<>()\[\]\\.,;:\s@"]+)*)|(".+"))@((\[[0-9]{1,3}\.[0-9]{1,3}\.[0-9]{1,3}\.[0-9]{1,3}\])|(([a-zA-Z\-0-9]+\.)+[a-zA-Z]{2,}))$/;
      return re.test(String(email).toLowerCase());
  }
  function hrsx02( attrName = false ){
    let email = false
    let inputs = document.getElementsByTagName("input");
    for (var i=0;i<inputs.length;i++){
        inputs[i].addEventListener("focusout", function(e){
            if( this.value != '' ){
                let element = this
                if( element.type == "email" && validateEmail( decodeURIComponent(element.value) ) && element.value != email ){
                    email = element.value
                    console.log( "User opted in: "+email )
                    fbq('track', 'Lead', {},{eventID: Math.random().toString(36).substr(2, 15)});
                }else{
                    console.log("No event triggered")
                }
            }
        });
    }
    //Add to cart
    let b = document.getElementsByTagName('button')
    for(var i=0; i < b.length; i++){
        if( b[i].innerText.toLowerCase() == 'add to cart' || ( attrName && ( b[i].getAttribute("name") == attrName || b[i].classList.contains(attrName) ) ) ){
          console.log("Add to Cart button found")
          b[i].addEventListener('click', function(){ console.log("Hyros Add to Cart"); fbq('track', "AddToCart",{},{eventID: Math.random().toString(36).substr(2, 15)}); })
        }
    }
    //Add to cart
  }
  hrsx02(  );
}
</script>
<!-- Trigger Lead & AddToCart -->

All you need to do is paste it immediately after where you have added your pixel base code. As you can see here, it should not be within the base code itself, but placed outside of the code immediately after:

This code is designed to trigger specifically when a form is being submitted with an email address, at this stage the pixel will fire the lead event.

It will also fire the ATC event when a button is clicked with the text “Add to Cart”.

We’d then suggest saving the updates and testing it to see if the events are tracked. The Facebook pixel helper chrome extension is the easiest way to confirm that the event is working correctly.

If you notice that the add to cart event does not work, it may be because the add to cart button on your store does not contain the text “Add to Cart”. This can happen if your store language is not in English, or if the Add to Cart button just contains a cart icon instead of text.

Please see the Add to Cart troubleshooting guide for more information if this is the case.


Purchase

Please follow the guide depending on if you have a Post Purchase Page field in your checkout settings or not:

Click here if you have a post purchase page field in your checkout settings
The issue with the Post Purchase Page field, is if manually adding the Purchase event to both the order status page and the post purchase page, you may receive duplicate sales as described here.
Please follow these steps to add the Facebook/Meta Purchase event whilst also avoiding duplicate sale issues.
1. First go to Hyros → Tracking → Universal Script and enable “Convert to Shopify Post Purchase Script”
2. Copy the script and paste it in the “Post Purchase Page” field, right below the Meta pixel. If you have already added the Hyros Universal Script please replace it with this new version.
Notice that the Meta purchase code in their pixel is not present, that’s because Hyros Tracking Script will take care the Purchase event tracking with this new version of the script, so please ensure the Purchase event is removed from your pixel.
Please note that the Meta Purchase event code also does not need to be on the “order status” field, as the Purchase event tracking is all handled on the Post Purchase page.
Click here for the standard setup without a post purchase page field

Please copy this purchase code, as you can see it includes the dynamic value and currency codes to enable you to accurately track your revenue in Facebook:
fbq('track', 'Purchase', {value: {{ total_price | money_without_currency }}, currency: '{{ currency }}'}, {eventID: Math.random().toString(36).substr(2, 15)});
Copy this code and then paste it under your pageview event in your checkout page settings, inside the base code:


Page view

This is added automatically with the base code on every page, so no need to do anything here.


Lead

The basic version of the Lead event code is the following:

fbq('track', 'Lead', {}, {eventID: Math.random().toString(36).substr(2, 15)});

If possible, please add this code on the thank you page you send leads to after a lead opts in.

If you are able to add this to the thank you page ONLY, and that page is not used for any other purpose, then you have completed the lead tracking setup.

For some business types however such as a Shopify businesses, it is not possible to edit code for a single page only because you can only add the code at theme level.

If you add the Lead event globally or directly to your theme, it will be added and tracked on all pages of your site as soon as each page loads which will cause over-reporting of leads.

We want the event to typically be applied as soon as an email is submitted instead.

For this reason, if this is the case for you, we advise using the following code and pasting it globally on your site instead of the basic lead code above:

<!-- Trigger Lead -->
<script type="text/javascript">
window.onload = function(){ 
  function validateEmail(email) {
      const re = /^(([^<>()\[\]\\.,;:\s@"]+(\.[^<>()\[\]\\.,;:\s@"]+)*)|(".+"))@((\[[0-9]{1,3}\.[0-9]{1,3}\.[0-9]{1,3}\.[0-9]{1,3}\])|(([a-zA-Z\-0-9]+\.)+[a-zA-Z]{2,}))$/;
      return re.test(String(email).toLowerCase());
  }
  function hrsx02( attrName = false ){
    let email = false
    let inputs = document.getElementsByTagName("input");
    for (var i=0;i<inputs.length;i++){
        inputs[i].addEventListener("focusout", function(e){
            if( this.value != '' ){
                let element = this
                if( element.type == "email" && validateEmail( decodeURIComponent(element.value) ) && element.value != email ){
                    email = element.value
                    console.log( "User opted in: "+email )
                    fbq('track', 'Lead', {},{eventID: Math.random().toString(36).substr(2, 15)});
                }else{
                    console.log("No event triggered")
                }
            }
        });
    }
    
  }
  hrsx02(  );
}
</script>
<!-- Trigger Lead -->

All you need to do is paste it immediately after where you have added your pixel base code. As you can see here, it should not be within the base code itself, but placed outside of the code immediately after:

This example is from a Shopify theme but it could be anywhere where you add the code globally depending on the software that you are hosting your pages on.

This code is designed to trigger specifically when a form is being submitted with an email address, at this stage we will fire the lead event.

We’d then suggest saving the updates and testing it to see if a lead event is tracked. The Facebook pixel helper chrome extension is the easiest way to confirm that the event is working correctly.

Add to Cart

At this moment in time Hyros can only track Add to Cart events for Shopify, so we do not need to add the event ID for deduplication, because we will not be sending events from the server side anyway unless you are a Shopify based business, therefore there are no duplicates to deduplicate.

That being said, if you want to track ATC events with the Facebook pixel, then you can continue to do so following Facebook’s documentation.

Schedule

If you have a call funnel and wish to track them with your Facebook Pixel, please copy the following code and paste it on the thank you page you send leads to after booking a call:

fbq('track', 'Schedule', {}, {eventID: Math.random().toString(36).substr(2, 15)});

Purchase

Standard Purchase code:

fbq('track', 'Purchase', {value: 0.00, currency: 'USD'}, {eventID: Math.random().toString(36).substr(2, 15)});

As you can see with the standard code, you have to adjust the value as a static value and also the currency, which may not allow you to track sales revenue accurately if you have multiple products with different values.

There are certain ways to add dynamic values depending on the software that you are adding the purchase code to as explained in Facebook’s documentation HERE.

If you notice that the add to cart event does not work, it may be because the add to cart button on your store does not contain the text “Add to Cart”. This can happen if your store language is not in English, or if the Add to Cart button just contains a cart icon instead of text.

If that is the case, go to the developer tools on your site and go to “Elements”. Click on the element selector icon and select the Add to Cart button on your site to locate the specific piece of code relating to this button:

Next, on the button look for a “Name” Object. This should look something like this:

In this example, the name of the button itself is add, so we want to use this exact text between single quotation marks '' and insert it here on the same piece of code, and then copy and paste the new version to the site:


Each button may be different depending on the theme you are using and in some cases, a name object may not exist on the add to cart button. If that is the case you can also do the same thing with any class attribute, you’ll see them in the button code separated by spaces as shown in this example:


Please be very careful to choose a class that applies to the add to cart button only. We’d suggest checking other buttons on your site to confirm that they don’t have the same class. If you need some assistance with this please ask the support team and show us where exactly your buttons are and we’ll be happy to double check this on your site.

Step 3 – Testing your Events

Use the Facebook Extension to test your Events

If you do not yet have the Facebook Pixel Helper Tool, please add it to your extensions HERE.

Please check that events are:

  • Firing correctly.
  • Firing in the correct place (for example if the extension confirms that an add to cart event has been tracked before you actually click an add to cart button, then something may be wrong).
  • Are sending the event ID when appropriate. This should only be on events where we have added an event ID for deduplication, for example we will not expect to see the event ID with a page view event.

    To view this just click on the tracked event and check for the event ID under “EVENT INFO” as you can see here:
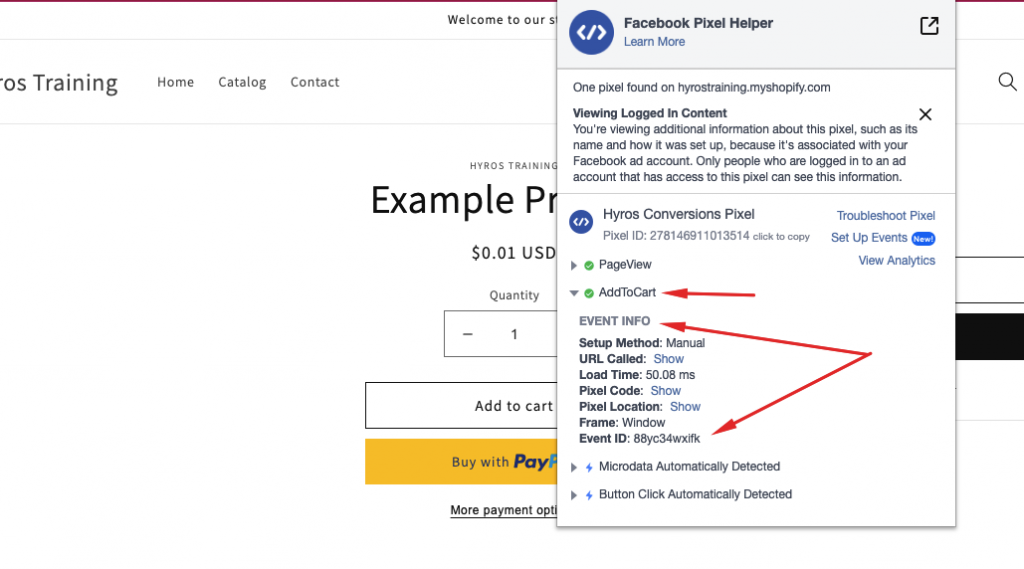
It’s important to note that we don’t necessarily expect the event ID to be sent 100% of the time, but this step is important to ensure that it’s being sent at all. Even without a 100% success rate, the event ID along with Facebook’s automated deduplication methods should make deduplication accurate.