Adjusting Tracking Domains

Why Adjust your Domain?

Although Hyros is the best tracking software on the market, our tracking capabilities can still be limited when users utilize anti-tracking software.

Issues with this should be rare, but they will vary depending on your unique business and audience.

This feature was designed to minimize the damage of anti-tracking software so you can track as accurately as possible. This will allow you to adjust the universal tracking script to your own custom domain, minimizing the damage of ad-blocking tools to your tracking.

Should I use Multiple Domains?

If you have different businesses which you wish to track completely separately, having a unique domain per business/site will be fine.

HOWEVER, please keep in mind that we can NOT track a single journey across multiple tracking domains. If leads go through multiple pages where you have added our universal script with multiple different custom domains on those scripts, this will break tracking.

If you are unsure if leads go through different sites/businesses throughout their journey, we would advise just using a single custom tracking domain across all of your pages to be safe.

Don’t know where your domain is hosted? If you don’t recall where your domain is hosted, you can quickly check here by entering your domain name.

Step 1 – Configuring your Tracking Domain in Hyros

First, inside your True Tracking settings, go to the tracking domains tab. Click “Add domain”.

Enter your custom Domain. Please take the following in mind when entering your domain:

  • The domain you use must NOT be already in use in another part of your business.
  • You CAN use a subdomain of your existing parent domain. For example, if your business is hosted at customdomain.com, you can set your tracking domain to t.customdomain.com.
  • Avoid using keywords like “track” or “tracking” for your subdomains to lower the chances of getting your domain blacklisted by crawlers.

Step 2 – Setting up your CNAME in your DNS Provider

Once you have chosen your domain, you will be given the following information:

  • Domain (the same one you just set up)
  • Type (CNAME)
  • Target (A unique target for your tracking domain)

It should look like this:

Copy this information and use it to set up a new DNS record of the type CNAME.

When setting up your DNS record, please be aware that the “name” or “host” field will be the pre-fix to the existing domain.

So in the example above the domain is “t.hyros.com”, meaning in the name/host field you will just need to enter “t” as the name when setting up the CNAME record.

If the domain is “www.hyros.com” then the name will be “www”.

You can see further steps on setting up the CNAME for each specific domain provider here:

If your Clickfunnels domain is hosted on another platform, such as NameCheap or GoDaddy, then you will need to manage the DNS settings there. Otherwise, follow the steps below.

Inside your Clickfunnels Dashboard:

  • Go to Profile account and select Account Settings
  • Then, in the menu on the left, click Domains
  • Choose your domain
  • Add CNAME record

Once you’ve finished following the steps above, your DNS should look like the image below:

If the domain is hosted here and you have a cloudflare nameserver in another Domain registrar/provider, then the settings will need to be configured here instead of the domain provider.

If this is the case, then inside Cloudlfare select your website:

Then select “DNS”, click “Add Record” and use the information from Hyros to add the CNAME record, please also turn off the proxy, otherwise Hyros or any other tool will not be able to verify the CNAME:

Now please move on to the next step.

If your site is hosted on Hostgator or any of the other sites mentioned, then the DNS management will most likely be done via cPanel.

Please note that this example specifically uses cPanel hosted on a Hostgator account, however the processor should be very similar for all sites.

If you see the HostGator name server here, then the site is hosted on HostGator and you can manage the DNS In cPanel:

If you see another Nameserver that is not HostGator, then you will need to manage the DNS settings on that host platform, such as Cloudflare.

Assuming you are hosting on HostGator: go to “Domains” and then “Zone Editor” in cPanel:

Then click “+CNAME Record” and add the Name and CNAME given to you in your Hyros account from the previous step:

Once created, you should also be able to see the CNAME record when you click “manage” on that specific domain.

Now please move on to the next step.

Please note that this is a Domain Registrar that allows you to manage DNS and host elsewhere. If it is hosted elsewhere, such as on Shopify or Cloudflare, then the DNS management needs to be done on their side.

If this is not the case, then first select your domain and select “Manage DNS” as shown here:

Then select “Add” and use the information povided by Hyros to add the DNS record:

Now please move on to the next step.

You can only modify the DNS in namecheap when the domain points to default Name Servers like this:

When something else is saved under “nameservers” such as CloudFare’s or cPanel’s name server then the management is done inside Cloudfare/cPanel etc, so please go to the steps for them instead.

It will look something like thise if you are hosting the domain elsewhere:

If the name server is not changed (for example Shopfy does not require you to change name servers) then go to the “Advanced DNS” section on the domain you are setting up to add a new record:

Now please move on to the next step.

First of all, please note that if your Shopify domain is hosted on another platform, such as NameCheap or GoDaddy, then you will need to manage the DNS settings there.

You can check this inside Shopify by going to your “domains” setting tab, then under the domain name you will see it say “managed by Shopify” if it is hosted on Shopify.

If that’s the case, select “domain settings” and “edit DNS settings”” as shown here:

Then, select “add custom record” and then add your CNAME record using the information provided from Hyros in the first step:

Now please move on to the next step.

First of all, please note that if your WPX domain is hosted on another platform, then you will need to manage the DNS settings there.

If the domain is hosted on WPX, then select “Edit DNS” and create a new record for your domain. Then using the details you made inside of Hyros, create the CNAME record:

Then move on to the next step.

Step 3 – Verifying the CNAME Record

Once you have done this, go to the domain in your tracking domains tab in Hyros and click “continue”, then “I’ve configured the CNAME Record”. This will start the verification process for your domain.

Please allow some time for the domain to verify, this can take anywhere from a few seconds to up to 24 hours depending on the domain provider.

beenhere

Initial Setup Tip

If your domain doesn’t verify immediately, you can continue the initial setup using the Hyros default script whilst you wait, and then swap it over later. The default script still works!

If after waiting for 24 hours you still are not able to verify the CNAME record, please Google’s dig tool to verify that the CNAME record exists. 

To use it correctly, select “CNAME” and then add the full domain with the name included in the “Name” field.

For example if the “name” you used to add the CNAME record was “t” and the full domain is “t.test.com” then enter “t.test.com”.

Please see the screenshot below for another example:

If you do not see the CNAME record as shown here, this means it’s likely that the CNAME record was not added correctly.

If you do see the CNAME record here but you can not verify the CNAME inside of Hyros, then it is possible there is an issue inside Hyros. Please reach out to the support team for further assistance in this case.

After the domain is verified in Hyros, you can move on to the next steps in the guide.

Step 4 – Using your Custom Tracking Script

Once the domain has been verified you will be able to copy the script directly from the tracking domains tab, or from the tracking script tab. Please ensure you select the custom domain before copying the script as shown here:

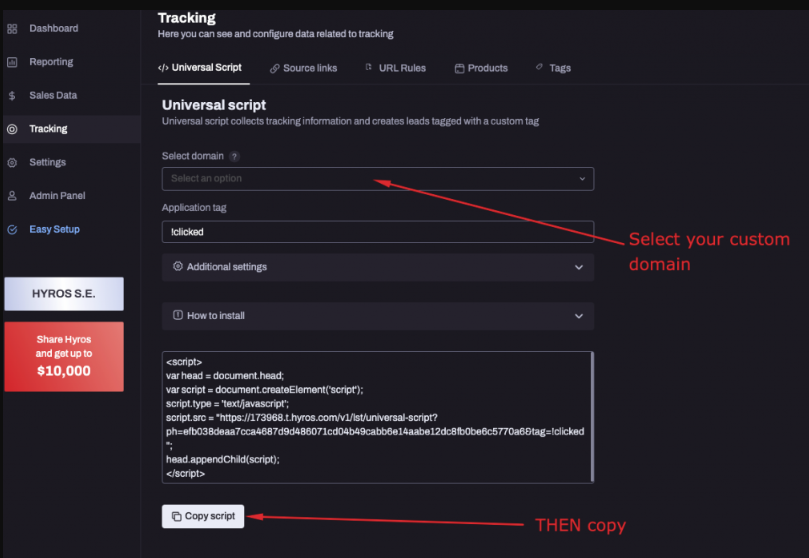
Then just paste the script in-between the <head></head> code of your funnel pages as per our standard setup guides. If you already have the standard universal script installed, then replace it with the one containing your custom domain.