Magento

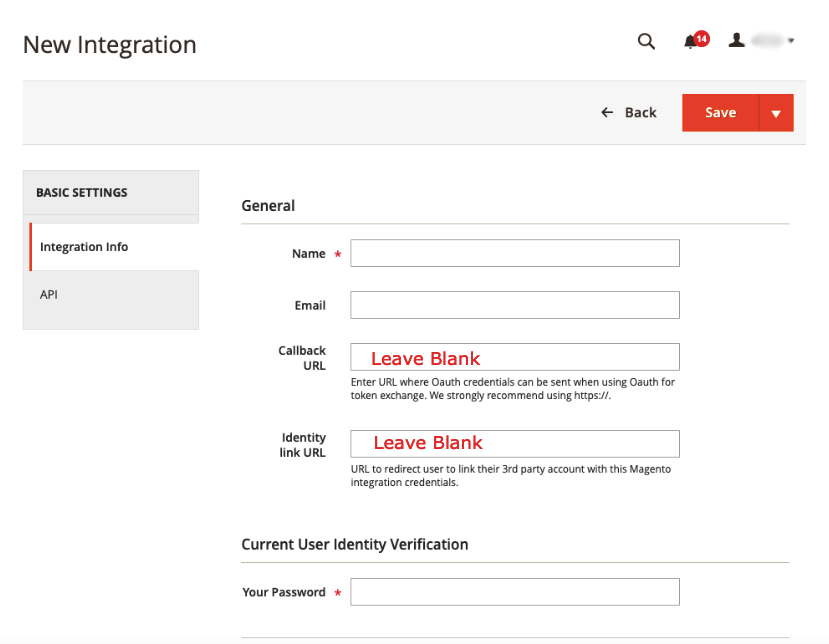
Step 1 – Create the Integration inside Magento

The callback URL and Identity link URL must be left blank:

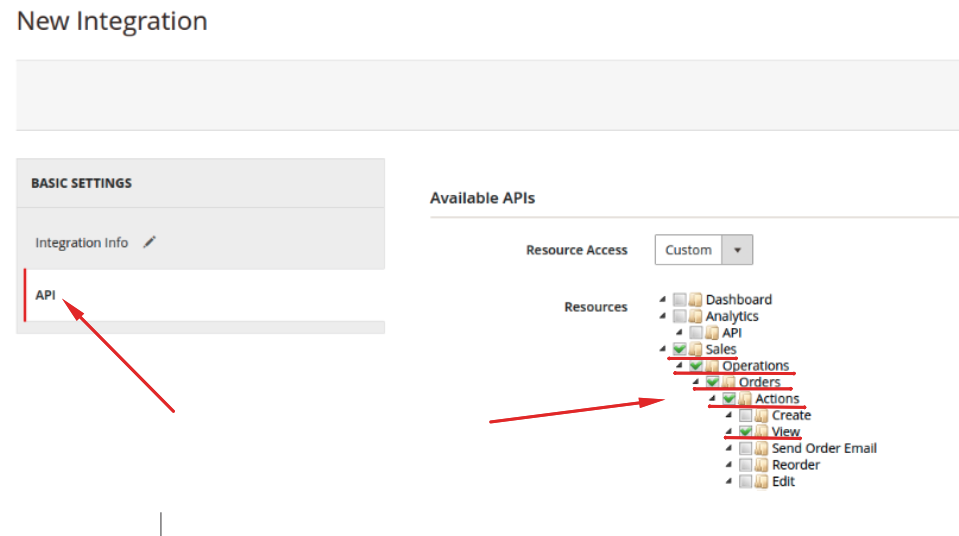
Step 2 – Adjust API Settings

Click API and enable to following resources exactly as shown below:

Step 3 – Create Integration Inside Hyros

Using the store URL and access token inside your magneto account, go inside your hyros account integration settings and click on Magento, or click HERE. Create the integration and then copy the webhook, you will need this for later.

Step 4 – Install Webhook Extension

Magento does not support webhooks natively therefore you will need to install an extension in order to continue integrating Magento in Hyros. There are two options:

Install this extension to your store: https://www.mageplaza.com/magento-2-webhook/

If you are not sure exactly how to install an extension, please follow THIS GUIDE set out by Magento.

Install this extension to your store: https://github.com/mageplaza/magento-2-webhook

Note: If you proceed with the free version, please keep in mind that you need assistance from a developer or developer experience complete the installation of the extension.

Video Guide:

Written guide:

To be able to install the free extension you need to have access to the console by SSH

The commands to run are the following:

  1. composer require mageplaza/module-webhook
  2. php bin/magento setup:upgrade
  3. php bin/magento setup:static-content:deploy

While you executes 1. some problems may arise:

  1. composer require mageplaza/module-webhook

You can find the Access key by going to: My Profile -> Access Keys. You can create a new Access Key or use an existing one. Example below:

The Public Key corresponds to the Username and the Private key to the Password.
  • If an error like this occurs

Here you should edit the file named composer.json located in the root of the folder extension. Open composer.json file and add “canonical”: false to Magento’s repository, as follows:

Step 5 – Configure the Webhooks in the System Tab

In the System tab, configure the webhook for the events. You will need to create the “invoice” event, “refund” event and the “new customer” event. Each of the above webhooks, should have a separate webhook inside Magento.

For this step, please note that you will need to go back and forth with Magento and Hyros to create the webhooks. Inside Hyros, go to Integrations->Magento ->Settings->Integrations->Magento .

Inside the Magento integration inside Hyros, copy the webhook as explained below:

Once you copied the webhook, go into your Magento account to Manage Hooks and click on Add new button and select Order:

Once you have selected Order, fill in the fields with the following data:

Payload url: Paste the Webhook you just copied earlier.
Method: Post
Authentication: Basic
Content-type: Application/json
Body: Each event has its own body (see below)

For the body, go back to your Magento integration inside Hyros and click “get bodies” as shown below, and copy the Invoice Event link:

Once you copied the Order event link, go back to Magento and paste it inside the Body section. The final configuration should be similar to this:

If your configuration looks like the image above, Webhook 1 – Order Event is completed. You can save the changes.

Inside the Magento integration inside Hyros, copy the webhook as explained below:

Once you copied the webhook, go into your Magento account to Manage Hooks and click on Add new button and select New Credit Memo:

Once you have selected New Credit Memo, fill in the fields with the following data:

Payload url: Paste the Webhook you just copied earlier.
Method: Post
Authentication: Basic
Content-type: Application/json
Body: Each event has its own body (see below)

For the body, go back to your Magneto integration inside Hyros and click “get bodies” as shown below, and copy the Refund Event link:

Once you copied the Refund Event link, go back to Magento and paste it inside the Body section. The final configuration should be like this:

If your configuration looks like the image above, Webhook 2 – Refund Event is completed. You can save the changes.

Inside the Magento integration inside Hyros, copy the webhook as explained below:

Once you copied the webhook, go into your Magento account to Manage Hooks and click on Add new button and select New Customer:

Once you have selected New Customer, fill in the fields with the following data:

Payload url: Paste the Webhook you just copied earlier.
Method: Post
Authentication: Basic
Content-type: Application/json
Body: Each event has its own body (see below)

For the body, go back to your Magneto integration inside Hyros and click “get bodies” as shown below, and copy the New Customer Event link:

Once you copied the New Customer Event link, go back to Magento and paste it inside the Body section. The final configuration should be like this:

If your configuration looks like the image above, Webhook 2 – Refund Event is completed. You can save the changes.

Step 6 – Add the Universal Script to your pages

Please copy ensure that the following Universal Tracking Script is attached in the header code of your website pages:

Step 7 – Allow OAuth Access tokens to be used

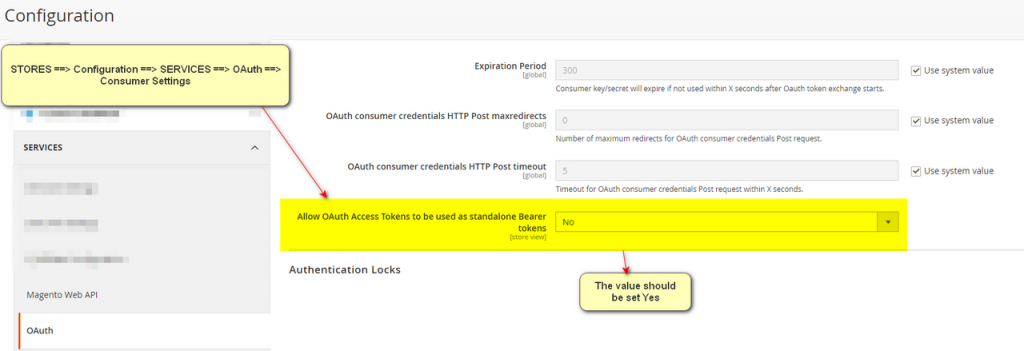
To enable OAuth Access Tokens in your configuration, navigate to the “Stores” section and click on “Configuration”. In the configuration settings, locate the “Services” dropdown and choose “OAuth” from the options. Within the “OAuth” settings, find the “Consumer Settings” option and set the value for “Allowing OAuth Access Tokens” to “Yes”. This will enable OAuth Access Tokens in your configuration.

This concludes the setup. We recommend running a test on your end using our testing app HERE. If you are not able to run a successful test please reach out to the support team.