This document will guide you through setting up a standard funnel.
The best way to use this document is to complete the steps in the order they are given and then perform the test at the end.
If you need any help tag your onboarding manager. We are always here to help!
Step 1: Setting up your Custom Tracking Domain
Step 1 – Configuring your Tracking Domain in Hyros
First, inside your True Tracking settings, go to the tracking domains tab. Click “Add domain”.
Enter your custom Domain. Please take the following in mind when entering your domain:
The domain you use must NOT be already in use in another part of your business.
You CAN use a subdomain of your existing parent domain. For example, if your business is hosted at customdomain.com, you can set your tracking domain to t.customdomain.com.
Avoid using keywords like “track” or “tracking” for your subdomains to lower the chances of getting your domain blacklisted by crawlers.
Step 2 – Setting up your CNAME in your DNS Provider
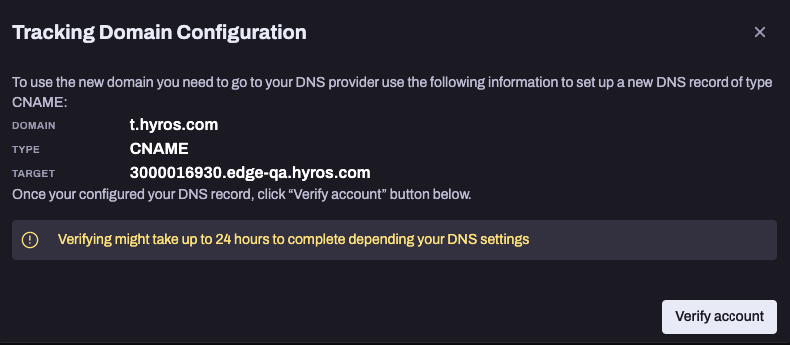
Once you have chosen your domain, you will be given the following information:
Domain (the same one you just set up)
Type (CNAME)
Target (A unique target for your tracking domain)
It should look like this:
Copy this information and use it to set up a new DNS record of the type CNAME.
When setting up your DNS record, please be aware that the “name” or “host” field will be the pre-fix to the existing domain.
So in the example above the domain is “t.hyros.com”, meaning in the name/host field you will just need to enter “t” as the name when setting up the CNAME record.
If the domain is “www.hyros.com” then the name will be “www”.
You can see further steps on setting up the CNAME for each specific domain provider here:
Clickfunnels
If your Clickfunnels domain is hosted on another platform, such as NameCheap or GoDaddy, then you will need to manage the DNS settings there. Otherwise, follow the steps below.
Inside your Clickfunnels Dashboard:
Go to Profile account and select Account Settings
Then, in the menu on the left, click Domains
Choose your domain
Add CNAME record
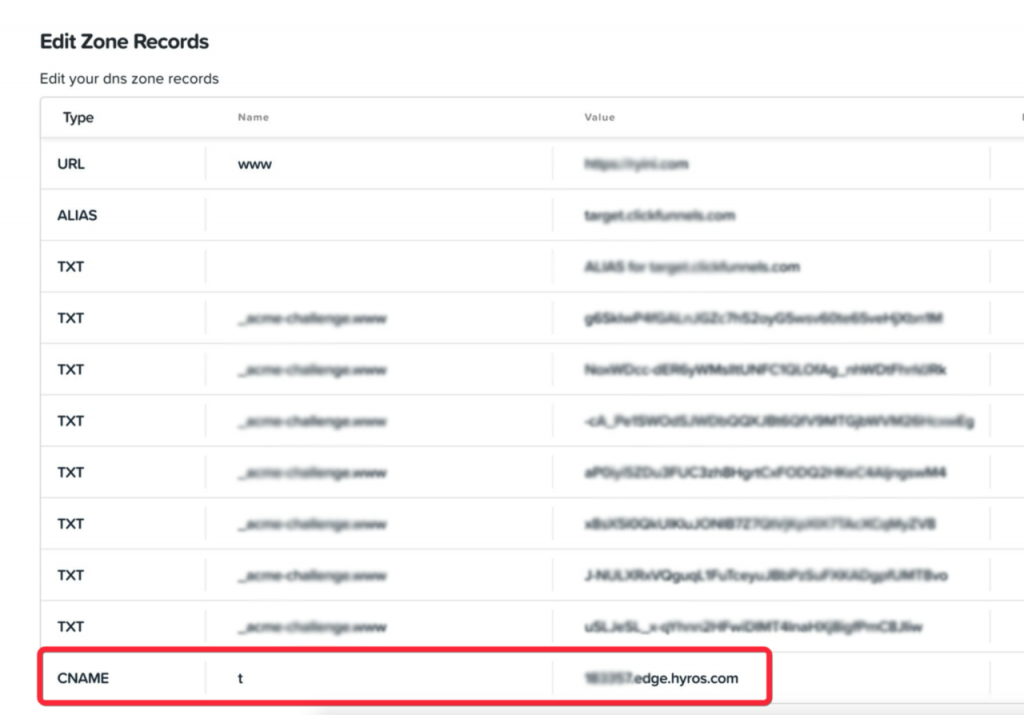
Once you’ve finished following the steps above, your DNS should look like the image below:
CloudFlare
If the domain is hosted here and you have a cloudflare nameserver in another Domain registrar/provider, then the settings will need to be configured here instead of the domain provider.
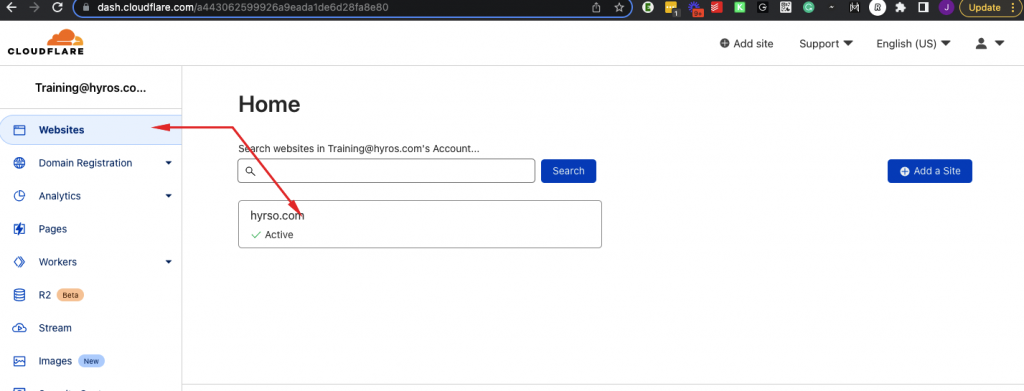
If this is the case, then inside Cloudlfare select your website:
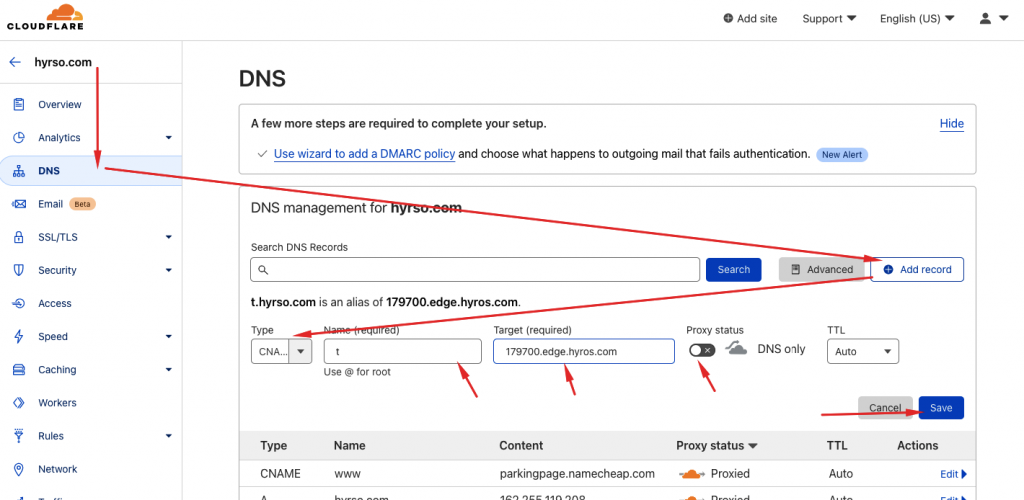
Then select “DNS”, click “Add Record” and use the information from Hyros to add the CNAME record, please also turn off the proxy, otherwise Hyros or any other tool will not be able to verify the CNAME:
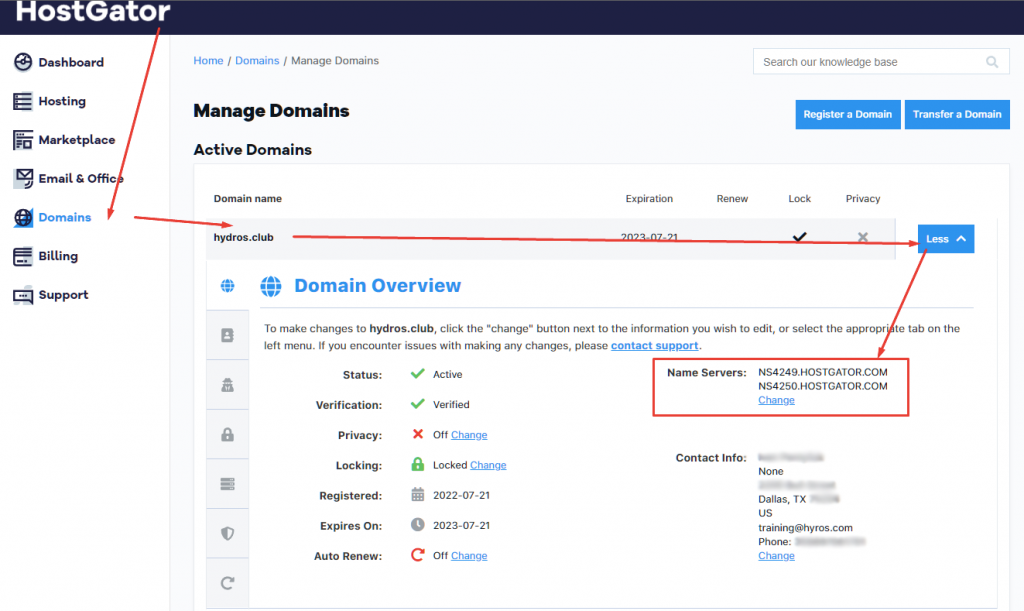
If your site is hosted on Hostgator or any of the other sites mentioned, then the DNS management will most likely be done via cPanel.
Please note that this example specifically uses cPanel hosted on a Hostgator account, however the processor should be very similar for all sites.
If you see the HostGator name server here, then the site is hosted on HostGator and you can manage the DNS In cPanel:
If you see another Nameserver that is not HostGator, then you will need to manage the DNS settings on that host platform, such as Cloudflare.
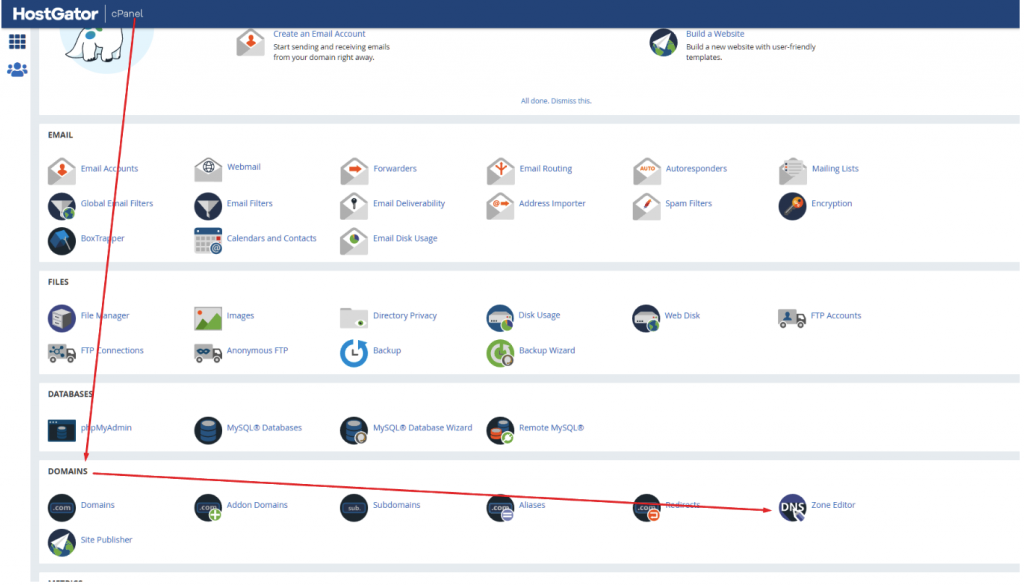
Assuming you are hosting on HostGator: go to “Domains” and then “Zone Editor” in cPanel:
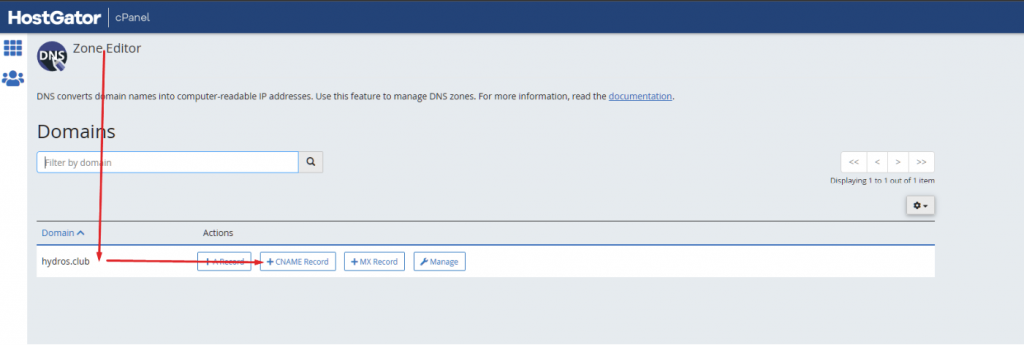
Then click “+CNAME Record” and add the Name and CNAME given to you in your Hyros account from the previous step:
Once created, you should also be able to see the CNAME record when you click “manage” on that specific domain.
Now please move on to the next step.
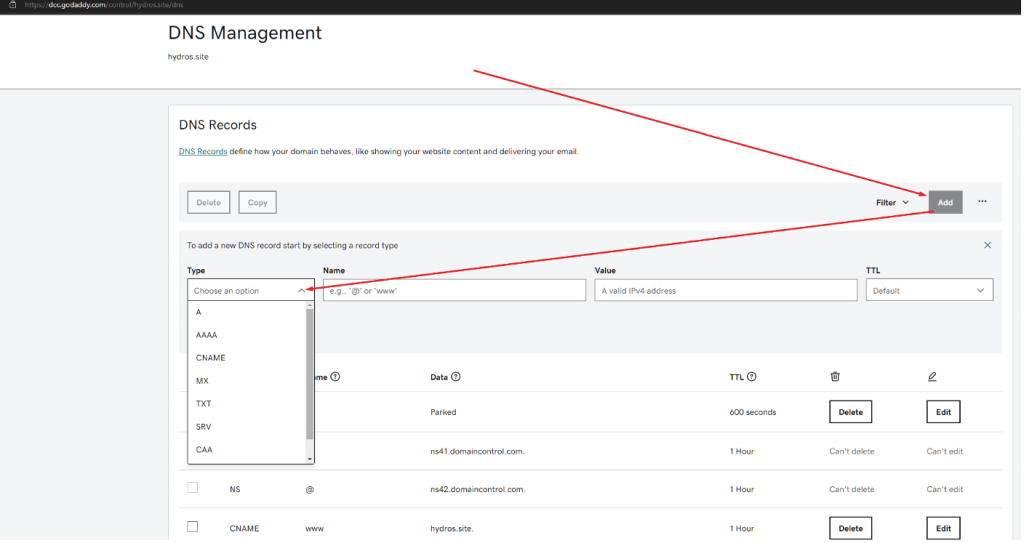
GoDaddy
Please note that this is a Domain Registrar that allows you to manage DNS and host elsewhere. If it is hosted elsewhere, such as on Shopify or Cloudflare, then the DNS management needs to be done on their side.
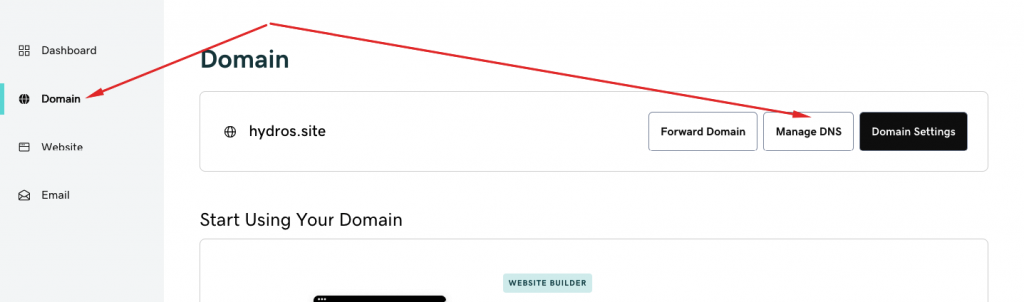
If this is not the case, then first select your domain and select “Manage DNS” as shown here:
Then select “Add” and use the information povided by Hyros to add the DNS record:
Now please move on to the next step.
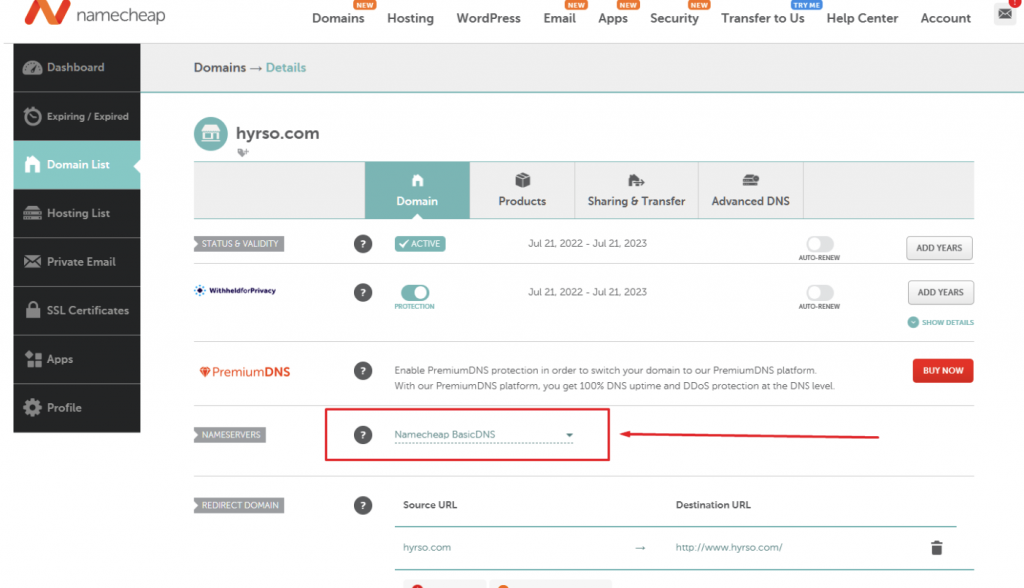
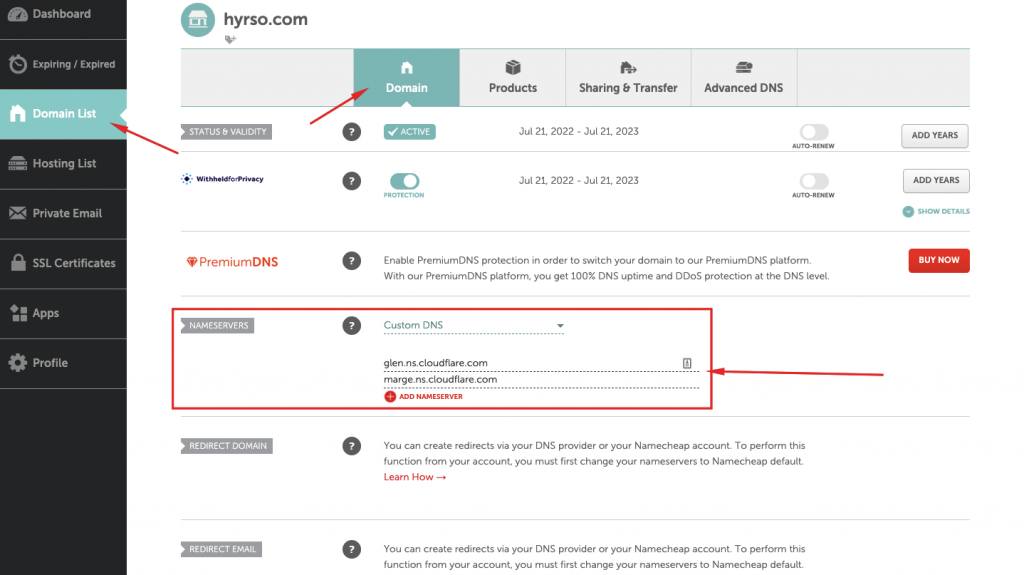
NameCheap
You can only modify the DNS in namecheap when the domain points to default Name Servers like this:
When something else is saved under “nameservers” such as CloudFare’s or cPanel’s name server then the management is done inside Cloudfare/cPanel etc, so please go to the steps for them instead.
It will look something like thise if you are hosting the domain elsewhere:
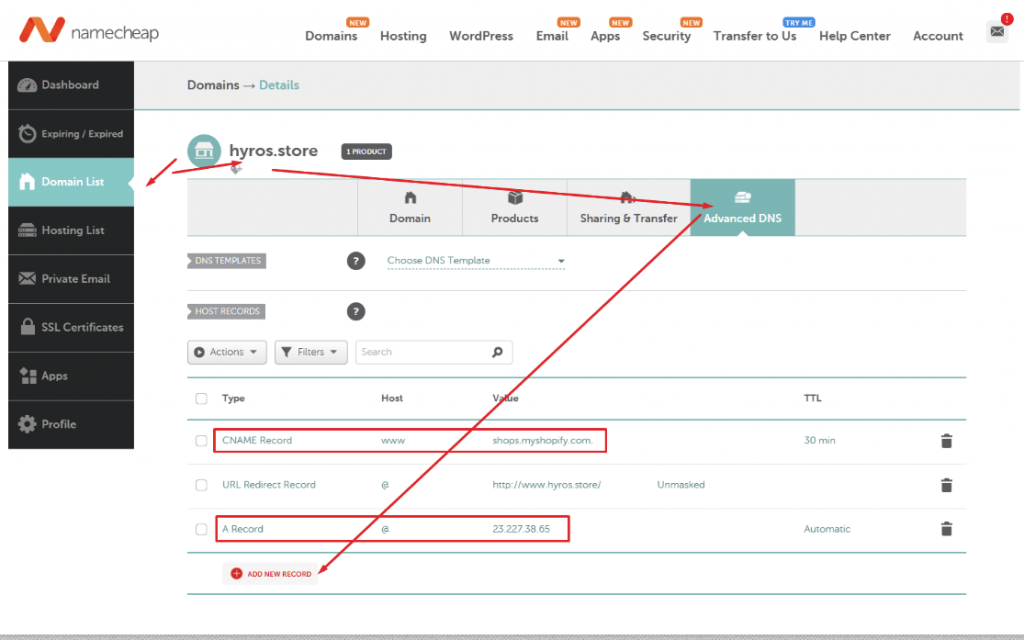
If the name server is not changed (for example Shopfy does not require you to change name servers) then go to the “Advanced DNS” section on the domain you are setting up to add a new record:
Now please move on to the next step.
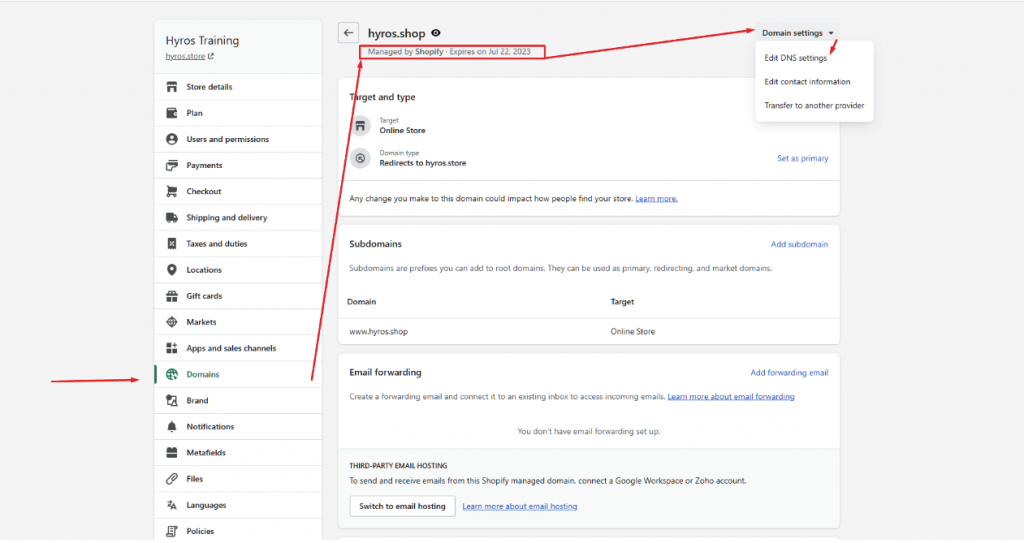
Shopify
First of all, please note that if your Shopify domain is hosted on another platform, such as NameCheap or GoDaddy, then you will need to manage the DNS settings there.
You can check this inside Shopify by going to your “domains” setting tab, then under the domain name you will see it say “managed by Shopify” if it is hosted on Shopify.
If that’s the case, select “domain settings” and “edit DNS settings”” as shown here:
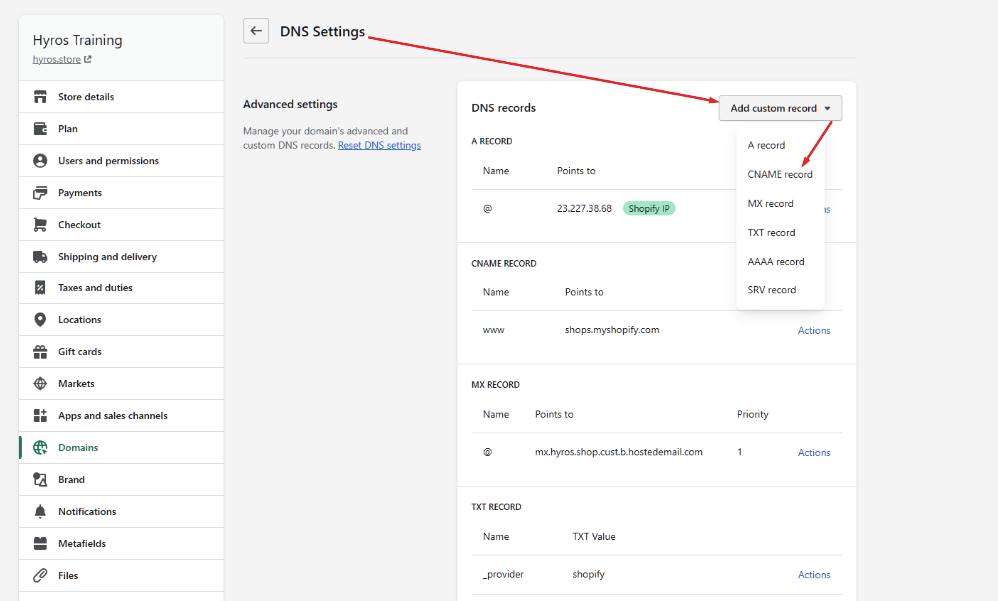
Then, select “add custom record” and then add your CNAME record using the information provided from Hyros in the first step:
Now please move on to the next step.
WPX
First of all, please note that if your WPX domain is hosted on another platform, then you will need to manage the DNS settings there.
If the domain is hosted on WPX, then select “Edit DNS” and create a new record for your domain. Then using the details you made inside of Hyros, create the CNAME record:
Then move on to the next step.
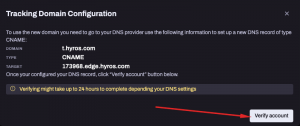
Step 3 – Verifying the CNAME Record
Once you have done this, go to the domain in your tracking domains tab in Hyros and click “continue”, then click “Verify Account”. This will start the verification process for your domain.
Please allow some time for the domain to verify, this can take anywhere from a few seconds to up to 24 hours depending on the domain provider, which is why we suggest completing this step first. That way you can continue with the rest of the setup whilst you wait for the domain to verify.
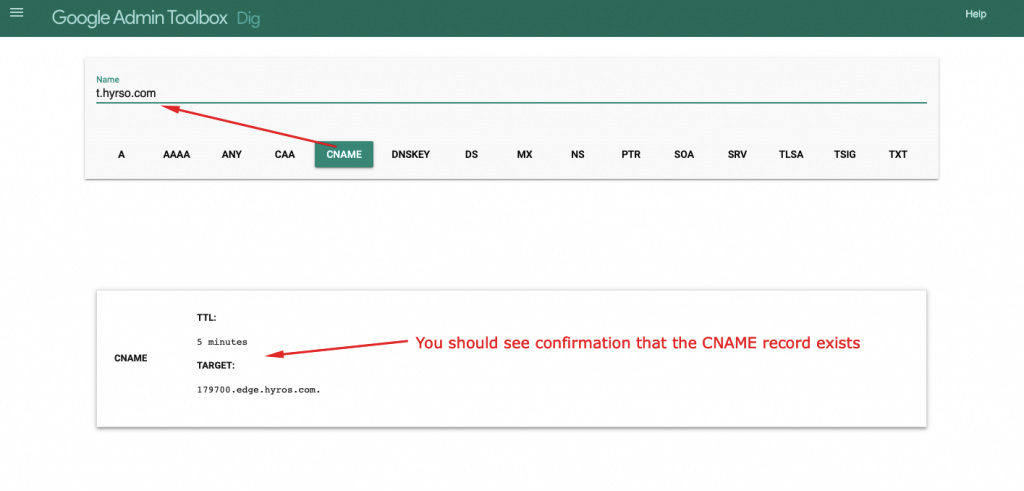
If after waiting for 24 hours you still are not able to verify the CNAME record, please Google’s dig tool to verify that the CNAME record exists.
To use it correctly, select “CNAME” and then add the full domain with the name included in the “Name” field.
For example if the “name” you used to add the CNAME record was “t” and the full domain is “t.test.com” then enter “t.test.com”.
Please see the screenshot below for another example:
If you do not see the CNAME record as shown here, this means it’s likely that the CNAME record was not added correctly.
If you do see the CNAME record here but you can not verify the CNAME inside of Hyros, then it is possible there is an issue inside Hyros. First, please try simply deleting the domain inside Hyros and re-adding it, and clicking “verify account” again.
If this does not work, then please reach out to the support team for further assistance in this case.
If the domain is not verified when you begin adding the universal tracking script later in the initial setup process, you can use the default script to begin with, which we recommend swapping with your unique domain script once verified for optimal tracking.
Step 4 – Using your Custom Tracking Script
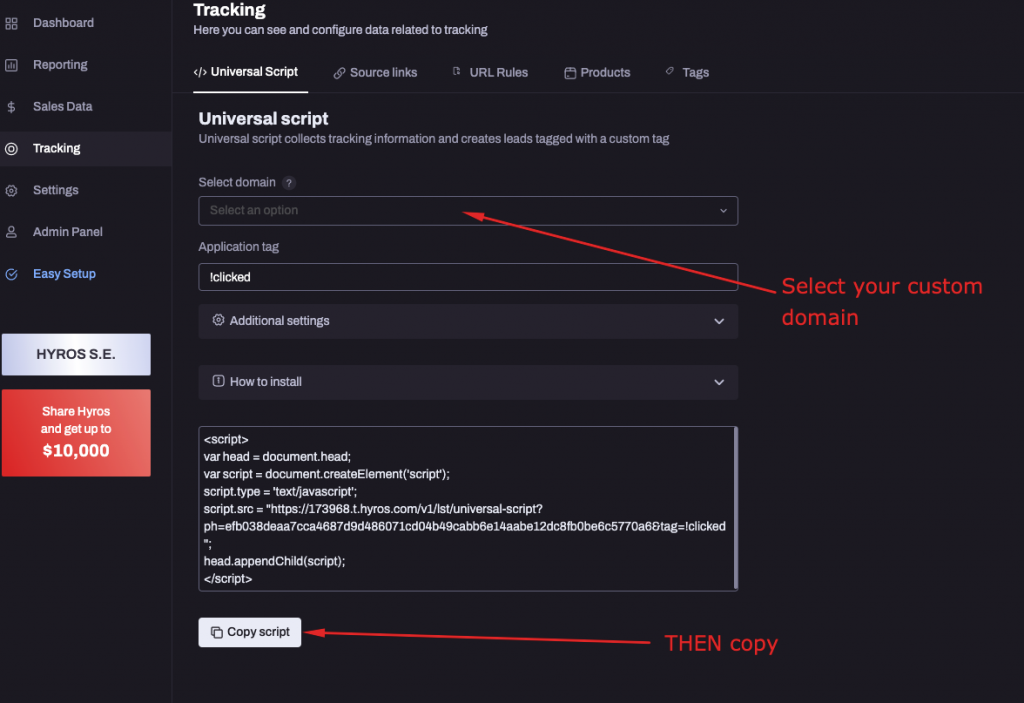
Once the domain has been verified you will be able to copy the script directly from the tracking domains tab, or from the tracking script tab.
Please ensure you select the custom domain before copying the script as shown here:
Then just paste the script in-between the <head></head> code of your funnel pages as per our standard setup guides.
You will also be able to access it directly on the embedded script throughout this guide. It will look just like this, as you can see you have the option to select a custom domain before copying the script:
If you need to wait for your domain to be verified, please move on to the next steps and just use the default universal tracking script when prompted. Then later we advise swapping the default script with your unique domain script once verified for optimal tracking.
Step 2 : Setting Up Your Ads
Bing
This will guide you through the process of integrating your Bing ads with Hyros:
Please note that if you already use existing parameters at a specific level, you must place the parameters at the same level. Otherwise, please follow the steps mentioned in the documentation below.
First: Watch this IF YOU IMPORT ADS FROM GOOGLE OR FACEBOOK
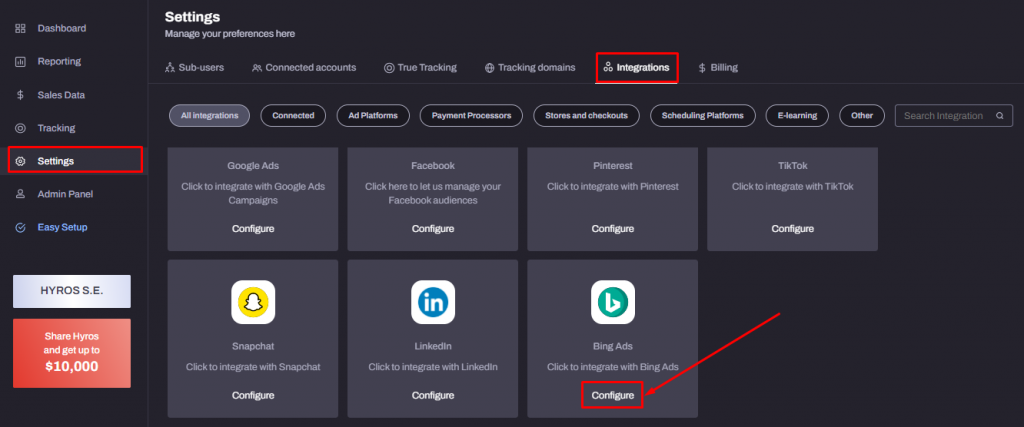
Step 1- Please go to Hyros > Settings > Integrations and click on the Configure link below Bing Ads:
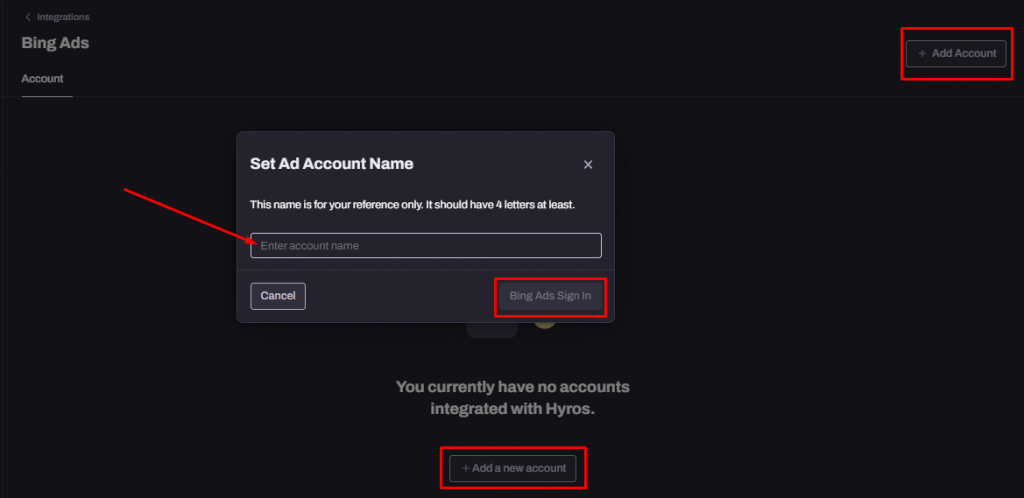
Click on +Add Account to start the process, give a name or a nickname to your account, click on Bing Ads Sign in and follow the prompts:
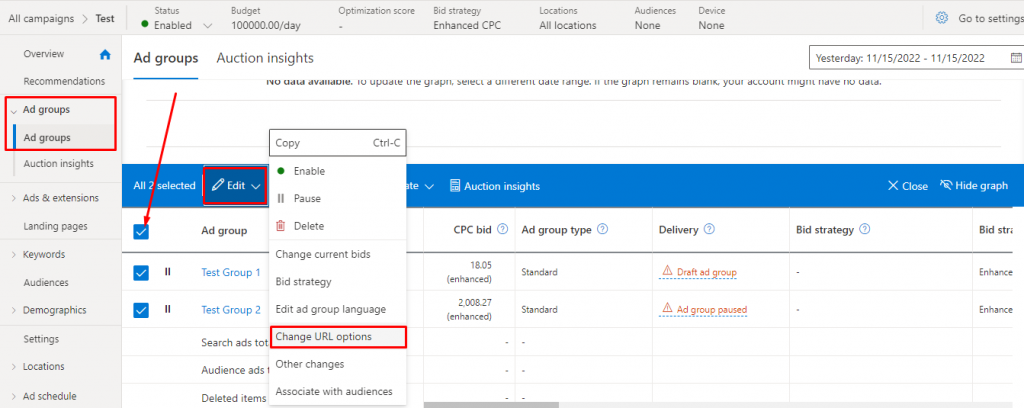
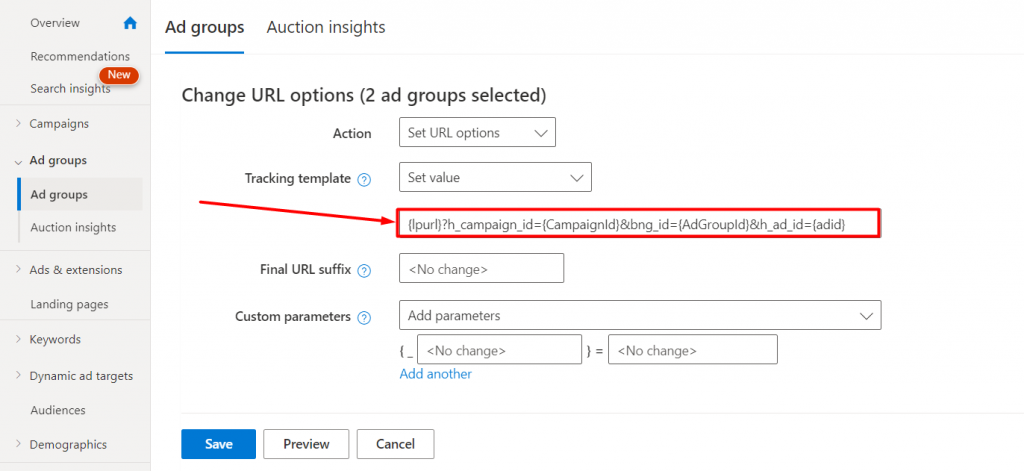
Step 2 – Please access your Bing Ads account and click on Ad Groups, select all your ad groups and click on Edit, after that please click on Change URL options:
Please add the Hyros tracking script for Bing to the Tracking template field. The script to use is:
If there are no existing UTMs in the tracking template field we need to add a landing page redirect script {lpurl}? at the beginning of our code.
If other UTMs are present please connect our tracking code at the end of the existing UTMs through an ampersand sign (&) as shown in the example below:
Click on Save to complete this step of the process.
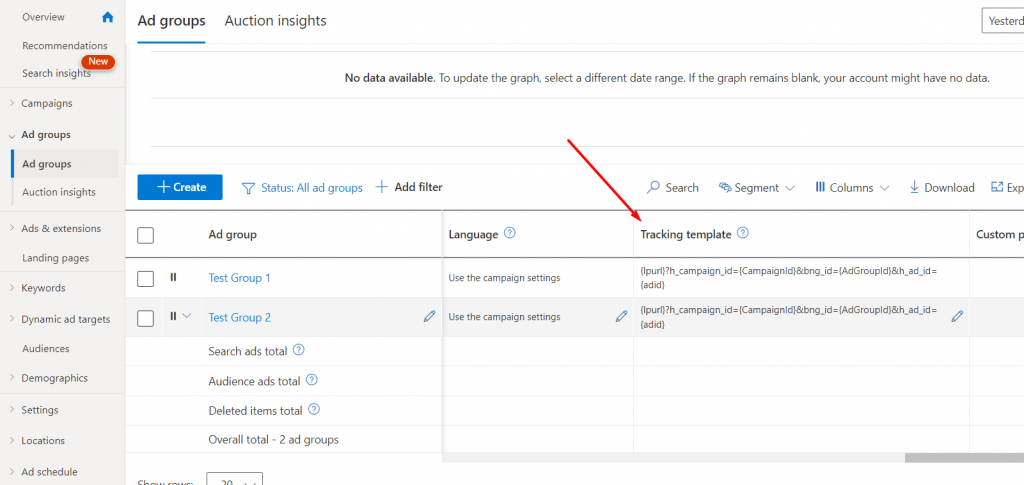
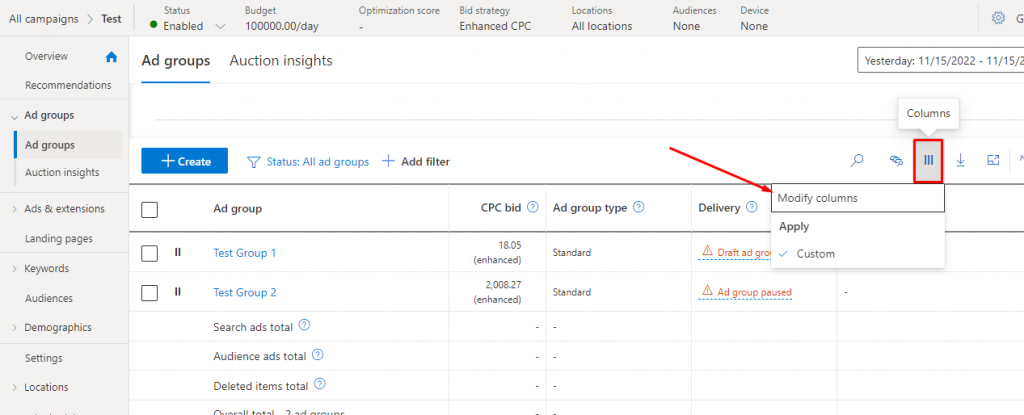
Step 3 (Optional) – To confirm the tracking script has been added to all our Ad Groups please scroll to the Tracking Template column:
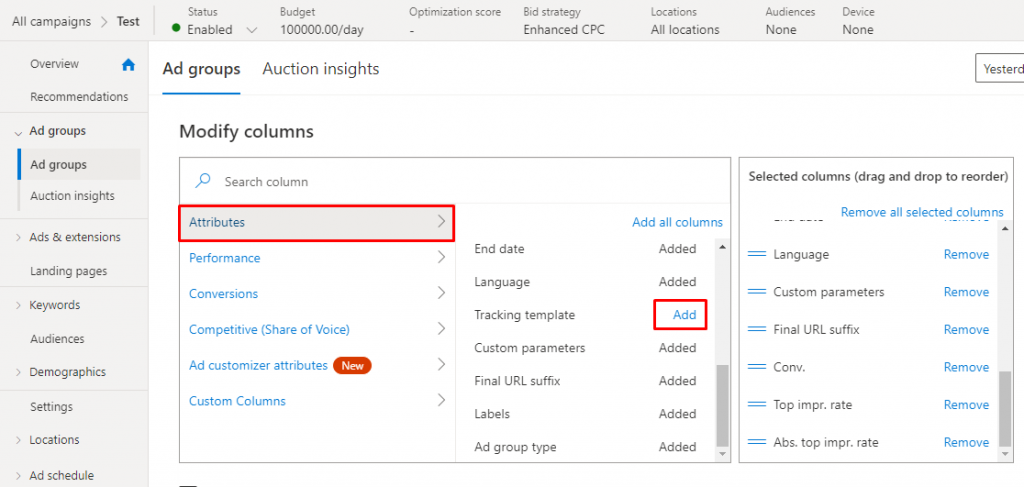
If this column is not visible please activate it from Columns > Modify Columns > Attributes and then click on Add next to Tracking Template.
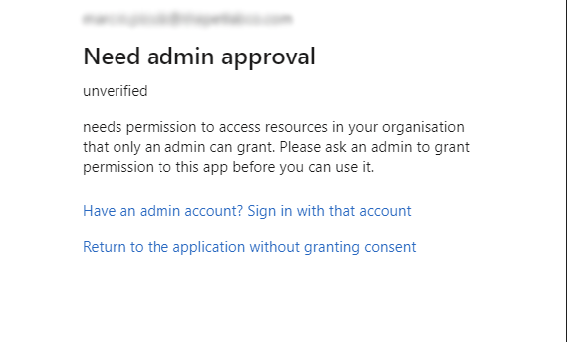
“Need admin approval” Error
Please follow this guide if you are trying to integrate with Bing and see an error similar to this:
The most common cause of this error is simply not using an account that has “admin” or “super admin” access to the bing ads account that you want to track with.
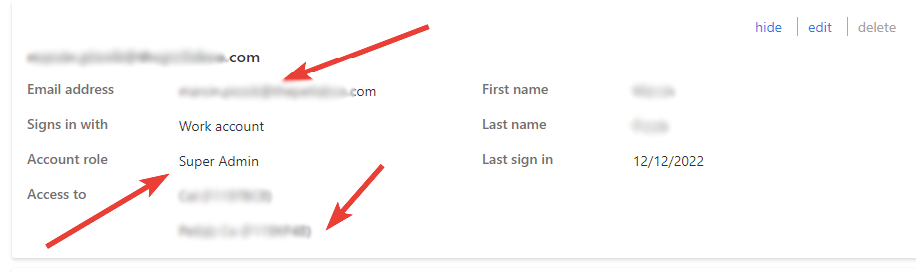
Please check your account and ensure that you see “Super Admin” Under the Account Role tab and that this access is given to the same account email that you are using to create the integration. It should also have access to all of the ad accounts that you are trying to track with under the “Access to” section as seen here:
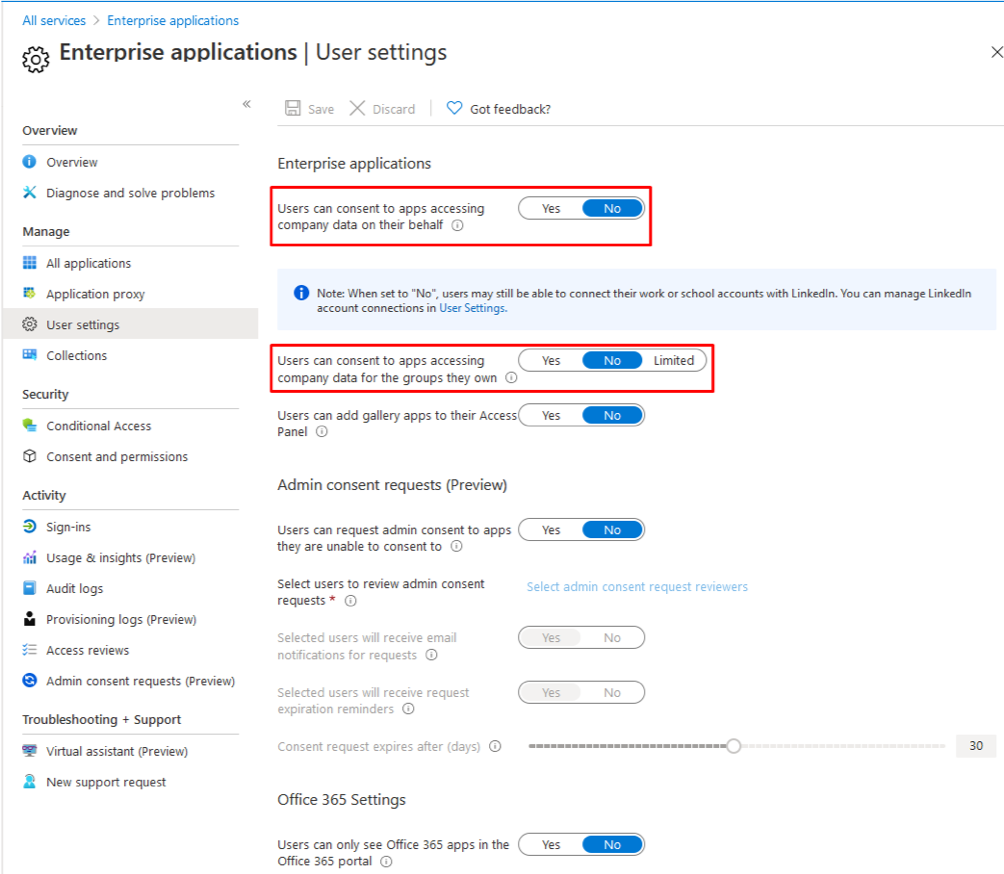
If you have checked this and are sure that the account you are using has the correct access, then there may be a different error here:
The error is caused by User permission settings in corporate MS Azure Active Directory. Specifically, the option “User can consent to apps accessing company data on their behalf” is set to “No”, along with the setting for accessing the groups’ data, as shown here:
There are 3 ways of resolving this issue:
Solution 1 – allow the end users to register consent for Apps on their own.
Log in to Azure AD using Admin credentials
Go to Enterprise applications → User settings
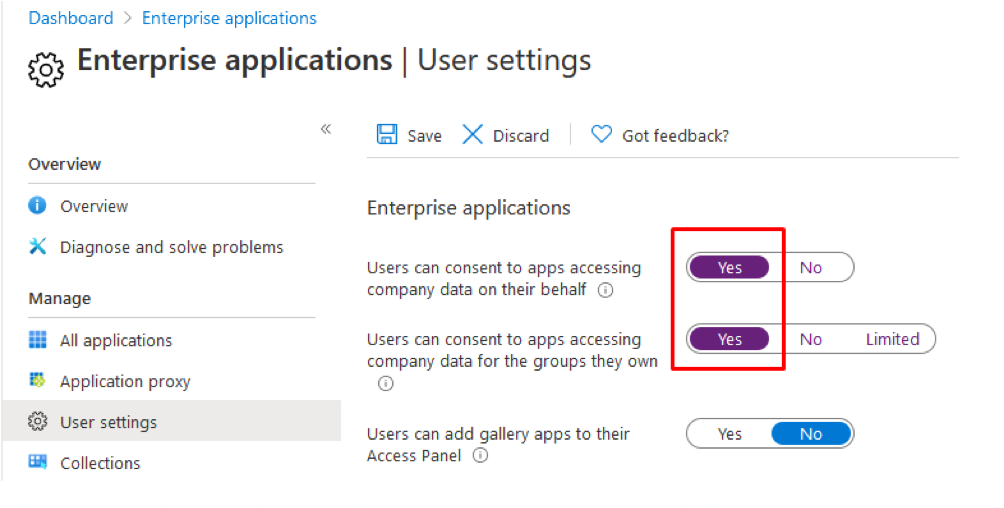
Switch the setting “User can consent to apps accessing company data on their behalf” to Yes
Enabling of the setting “User can consent to apps accessing company data for the groups they own” is optional.
Solution 2 – Grant Admin Consent for a Specific Application
Type “Hyros” in the search field to find the App and select it.
In the App security settings, open the “Permissions” tab and click “Grant Admin Consent for {Company Name}”.
Log in with Office 365 Admin credentials and click “Accept” in the “Permissions requested” dialog that appears.
Refresh the page with Permissions for the application you’ve just registered consent for.
The list of consent permissions will be displayed in the Admin Consent tab on the Applications page.
After that, all the users should be able to integrate with Bing inside Hyros.
Solution 3 – Grant Access to Hyros via the Local Office 365 Admin Account
The local Office 365 Admin can register consent for the App on the initial log-on. This method requires the Office 365 Admin to integrate in Hyros.
Setup actions to be performed by the Admin (Notice that this is not a Bing Ads admin, this is the admin of the Office 365 Subscription).
Integrate with Office 365 Admin credentials in Hyros
In the following “Permissions Requested” dialog window: select the checkbox “Consent on behalf of your organization” and click Accept
If the authorization is successful, a successful notification will appear. Now the consent to use the App has been granted for the whole organization and all end users in it are allowed to integrate Hyros with Bing.
If the Office 365 subscription admin does not want to have an integration using their credentials, the previously created integration can be deleted and replaced now with anyone in that organization.
Facebook Ads
Facebook Ads Video Set Up Guide
Note 1 : Updating ads will reset the learning phase, may reset engagement, and will require Facebook to review and re-approve your ads. This should not dramatically effect ad performance. The ROI gained/saved from tracking ads will greatly outweigh and justify the re-learning.
Note 2: Although Facebook’s behaviour is unpredicatable, if you want to reduce the chances of social proof being reset, follow THIS GUIDE instead of the first step in the video, which covers adding the parameters. You will still need to follow this guide for the rest of the setup.
Note 3: This will NOT work for Messenger Ads, please reach out to support if you are using messenger ads.
Note 4: Do you already use the Wicked reports or TripleWhale URL parameters? You can go directly to the Wicked Reports/TripleWhale section at the end of this article.
Please note that if you already use existing parameters at a specific level, you must place the parameters at the same level. Otherwise, please follow the steps mentioned in the documentation below.
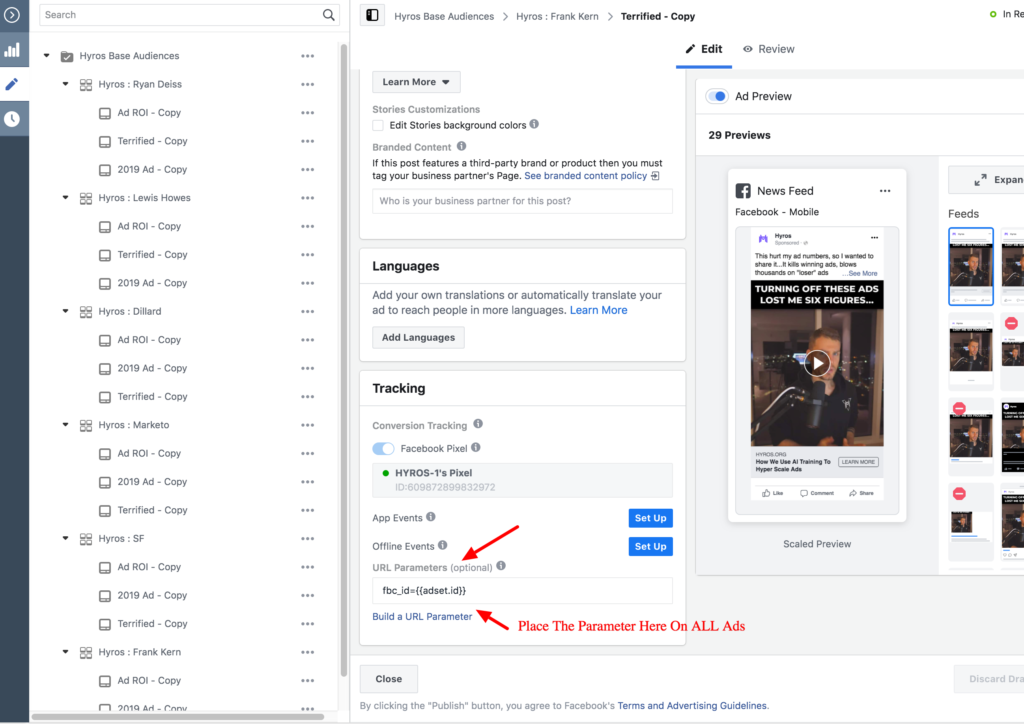
To track your Facebook ads take the parameter below and paste it in the tracking url parameter area of EVERY ad in your Facebook ad accounts and hit publish.
At the moment, due to Facebook’s current limitations, we are unable to directly link sales from Facebook Shops to specific ads displayed on the platform. For now, the sales from your Shops according to Facebook will be available within our Shop Reported Result metric available in your reports.
This completes the setup for Facebook, please see below for any other optional steps:
———————————————–
Written Guide
Step 1 : Place this URL parameter in the tracking area of EVERY ad in your ad account : fbc_id={{adset.id}}&h_ad_id={{ad.id}}. (Seen at 0:25 in the video above)
This will place tracking on ALL links, even those in the content of the ad when clicked.
IF you already have UTMs or parameters in your tracking area add our url parameter with an “&” sign.
Example : utm1&fbc_id={{adset.id}}&h_ad_id={{ad.id}}
Step 2 : Create a preview link like in the video above at (1:43). Click the link and ensure that your link has our tracking parameter and the campaign ID in the link. It should appear cleanly in the URL.
The url below is an example of a clean parameter. It should appear exactly like it does below.
If your final url is not showing the parameter or is messy use the trouble shooting guide below.
NEXT : Integrate with your Facebook account here. This will be able to access all ad accounts you have admin access too.
Optional Steps
1) Manually Importing Ads and Ad Sets
This is especially useful if you have any awareness campaigns where a call to action button isn’t present or traffic isn’t being sent to your landing page.
Normally, as soon as a click event is tracked from an ad, the ad and ad set is automatically imported into Hyros along with the ad/ad set costs and other relevant information. However, if there is no click event to be tracked, you will need to import the ad and ad set manually into hyros in order to receive the costs from that ad/ad set.
NOTE: This will NOT enable you to track view through conversions or associate any ads without a call to action button with purchases. It WILL allow you to track the costs associated with the ad set.
To configure this, simply go to your Facebook integration and click “Import Ads and Ad Sets”:
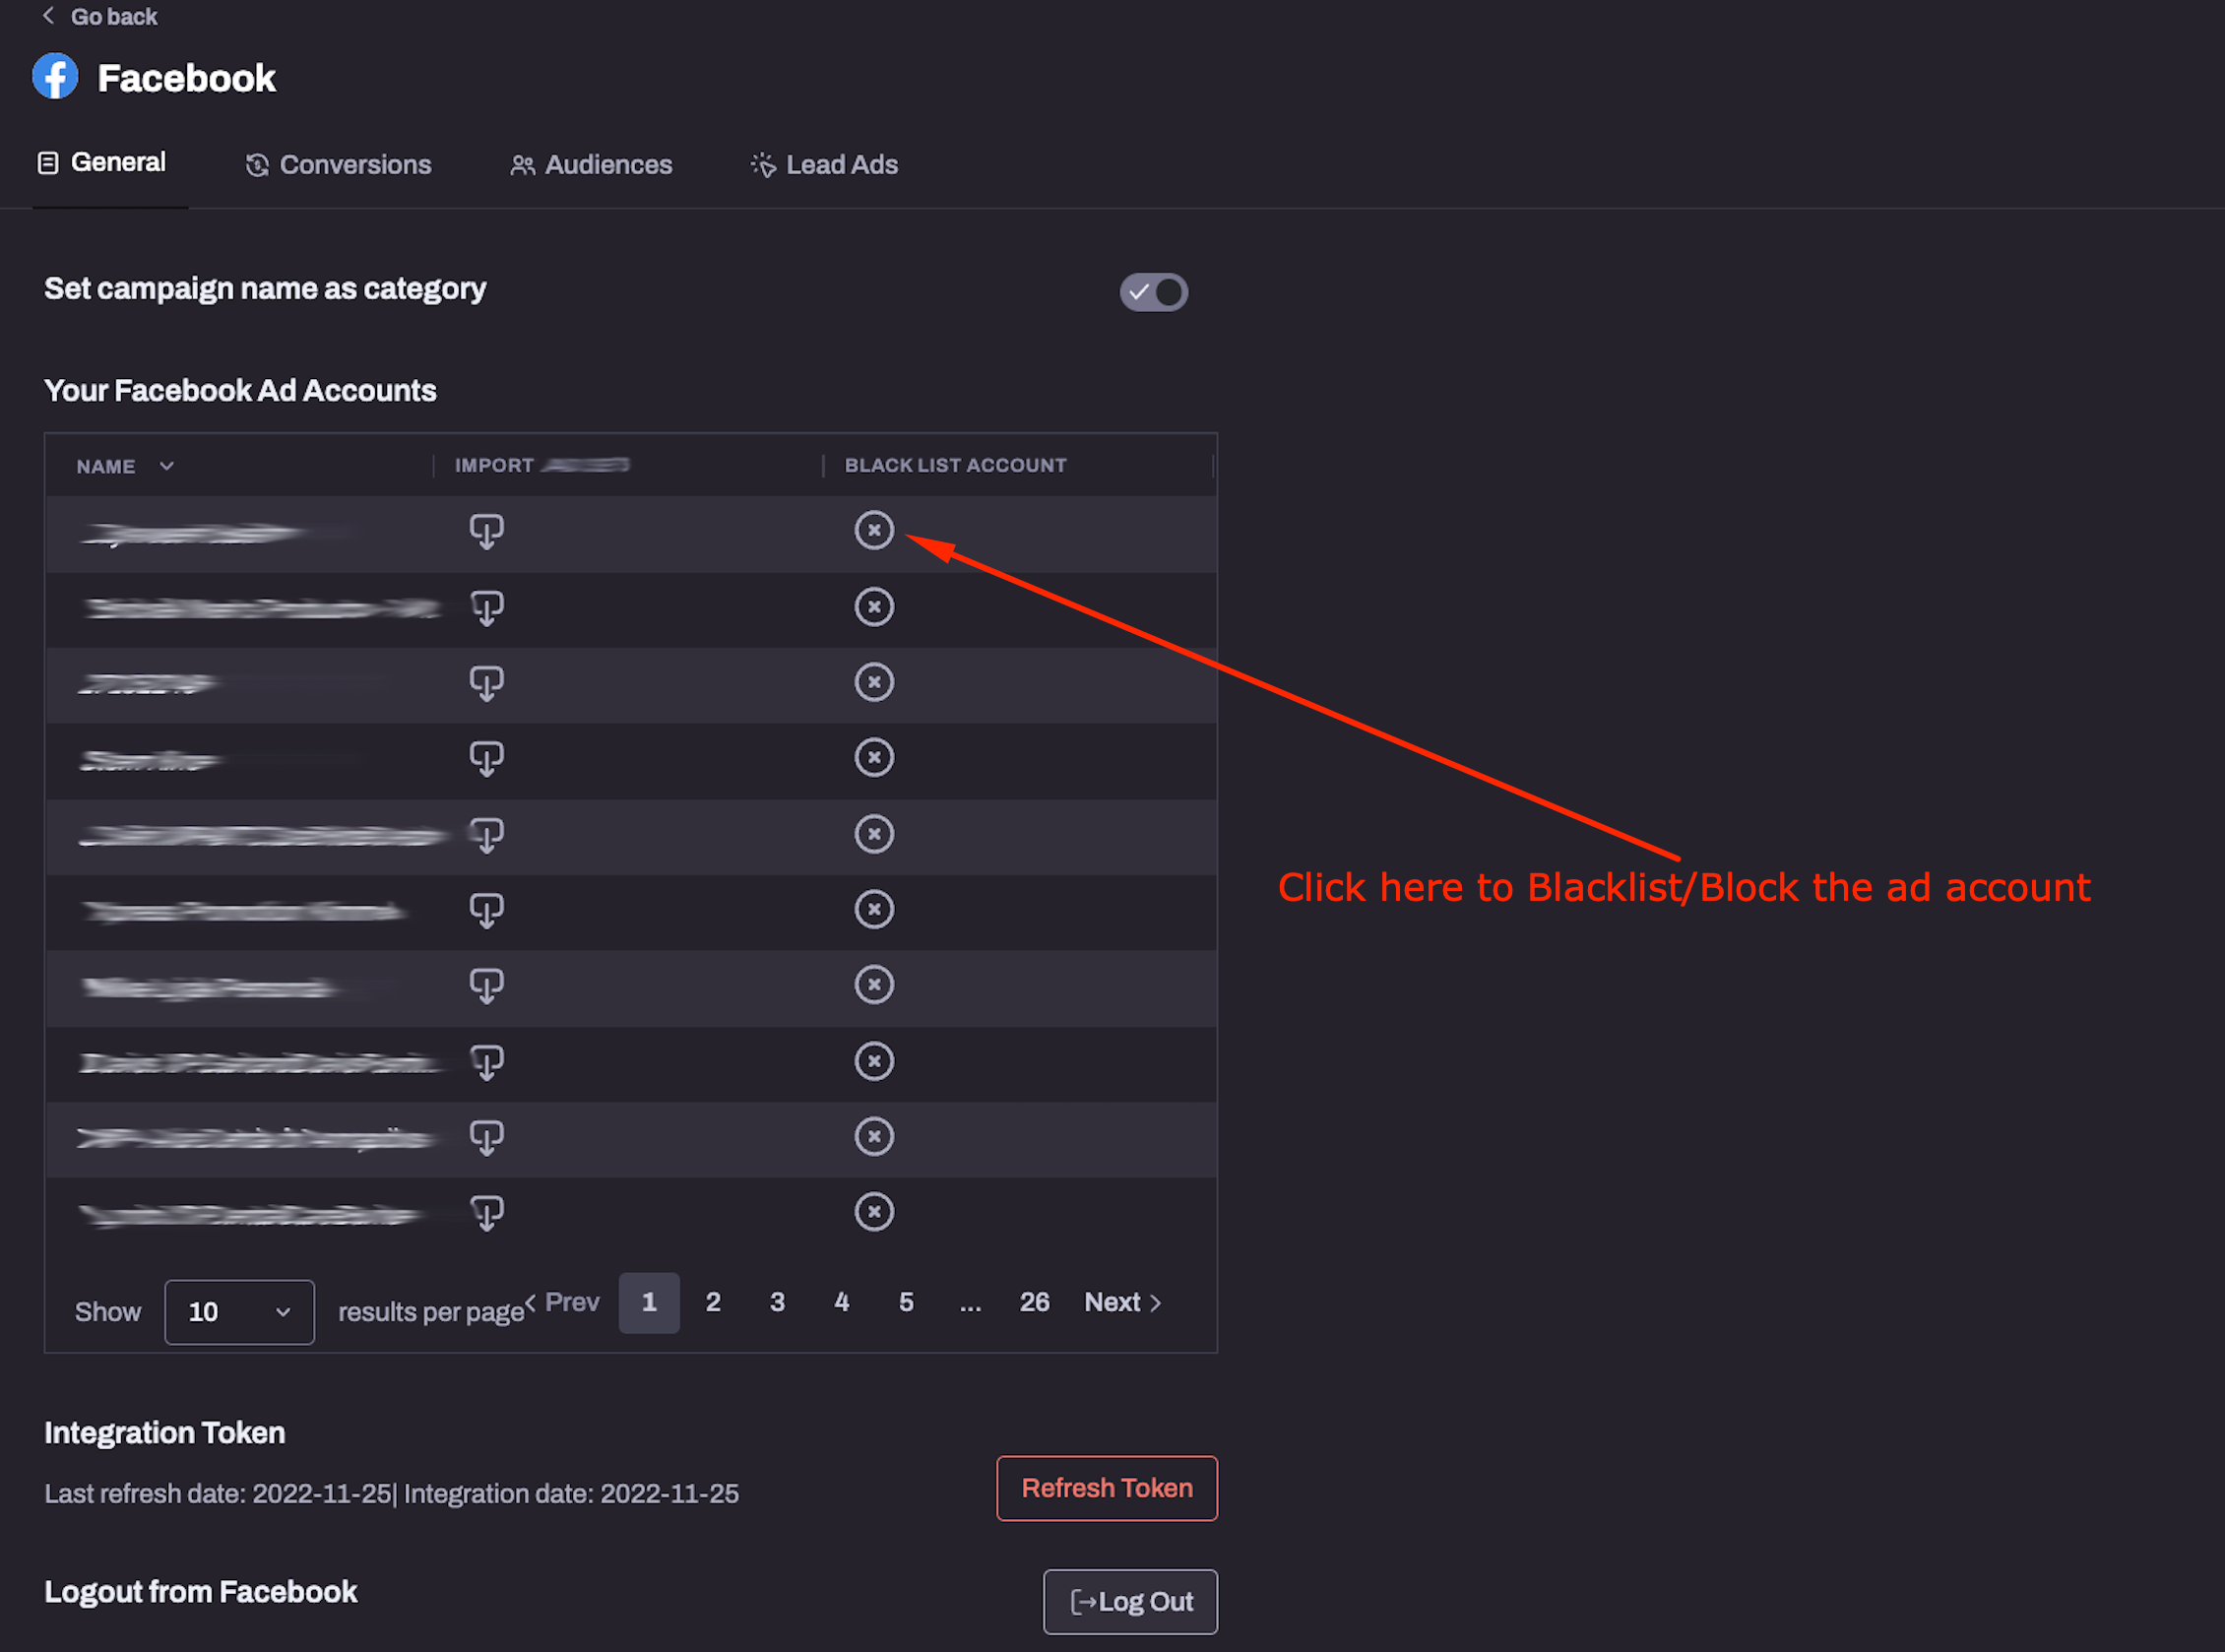
2) Blacklisting Ad Accounts
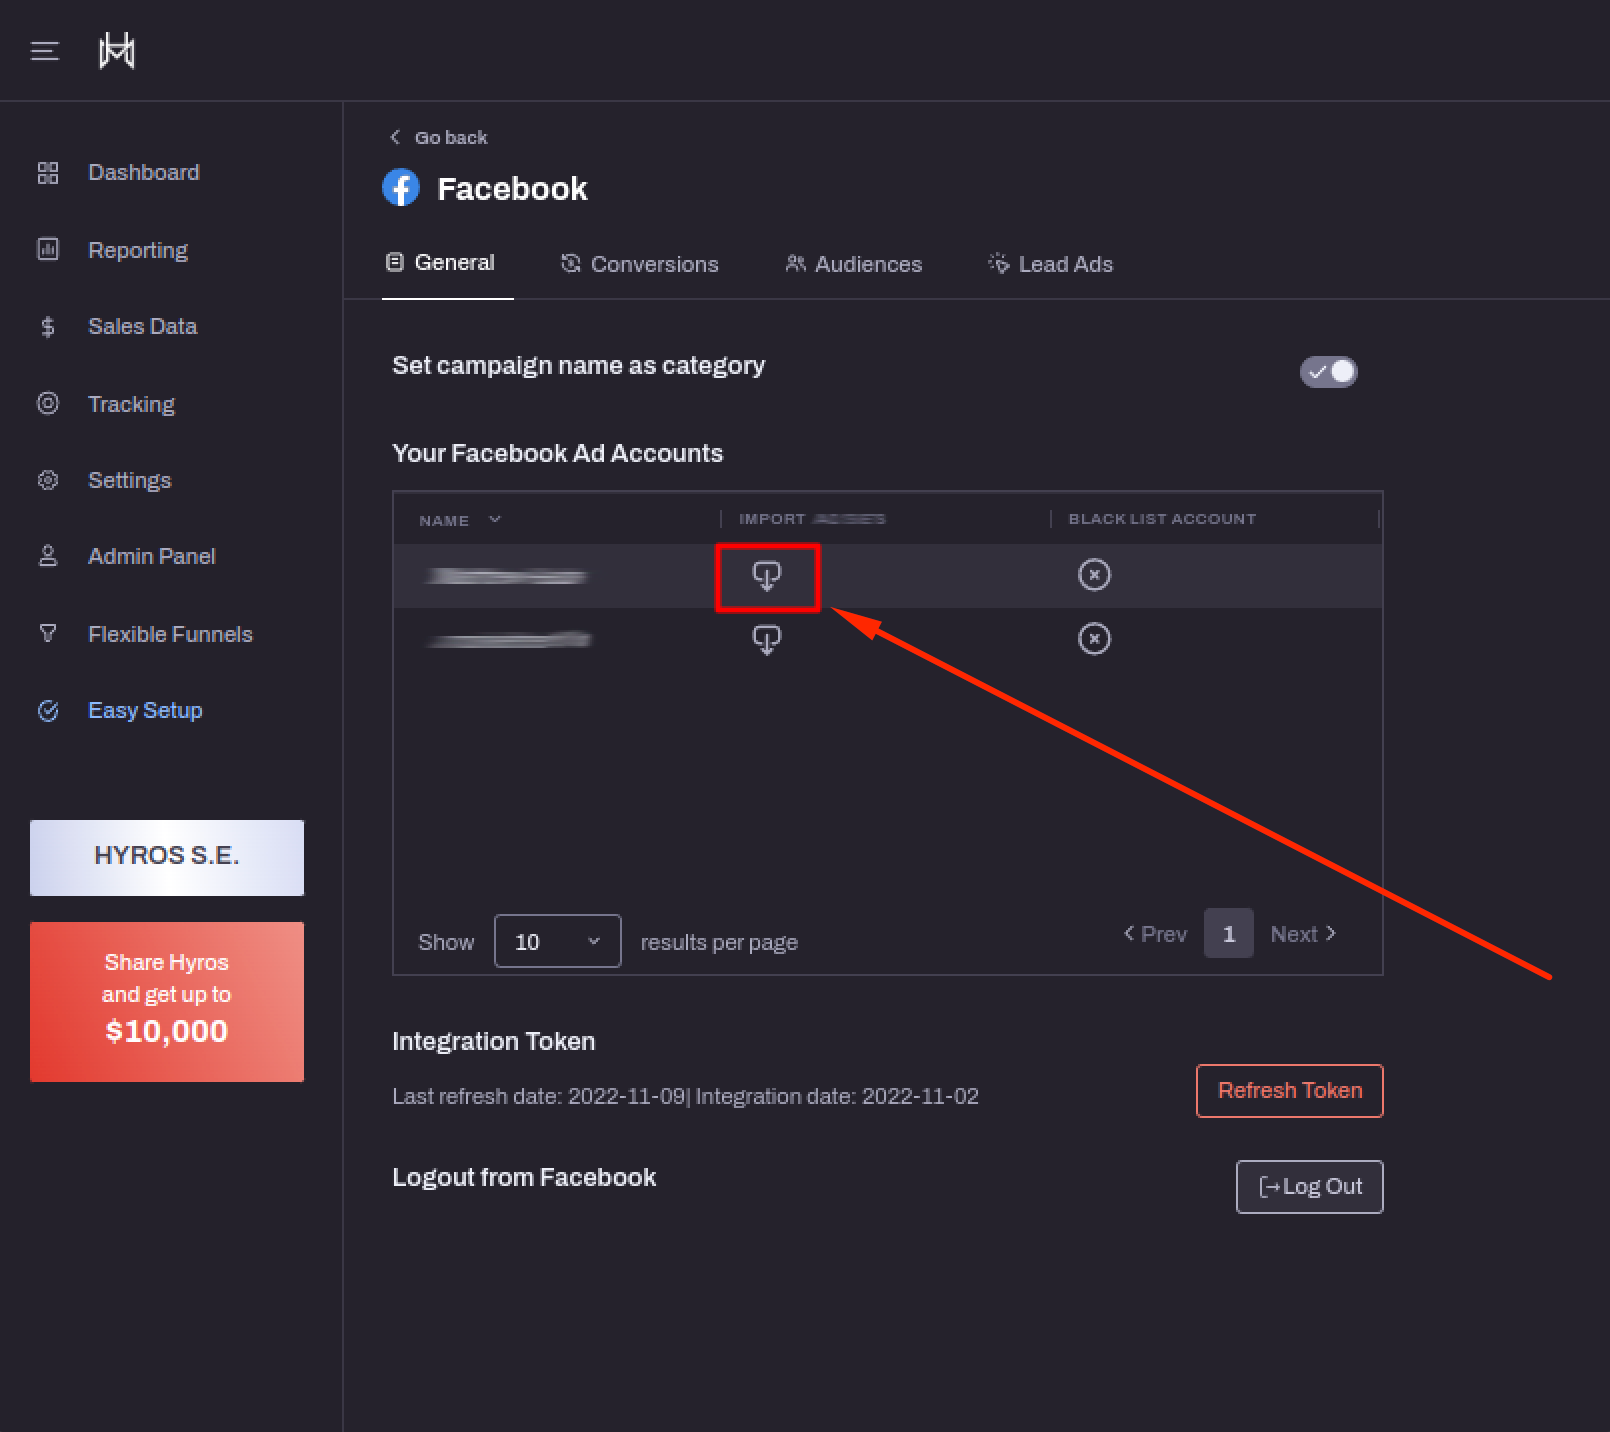
By default you will be able to view all ad accounts that the facebook account you have integrated with has access to inside your integration. We will not take any data from the ad accounts unless tracking is set up or ad sets are manually imported.
However if you have non disclosure agreements or want to keep ad account names private for any reason, you also have the option to blacklist or block ad accounts from being seen inside the integration here:
If you want to use the ad account again inside hyros, the only way to unblock the account will be to re-integrate with Facebook.
THEN move to step 2.
Facebook Trouble Shooting
IF your final url does not show the parameter at all make sure you are not using a redirect like bit.ly.
IF your final url show the parameter in a messy way such as “%%fbc_id%=214234” make sure you did not put a “?” before the parameter AND if you added it to existing UTM make sure you placed “&” before it.
IF the parameter will not show after the steps above contact your onboarding rep on Facebook OR use support via the live chat in the lower right hand corner of this page and say “My Facebook ad URL parameters are not working”
If you already have the Wicked Reports or TripleWhale parameters above installed in all your active Facebook ads, there is no need to follow the steps above. You just need to integrate your Facebook account from here.
Once you have confirmed the integration, you can proceed to the next step in the initial setup process.
Tracking Facebook Lead Ads
Tracking Facebook Lead Ads
First, please make sure you have integrated correctly with Facebook. If you have not done this yet, follow THIS GUIDE before proceeding.
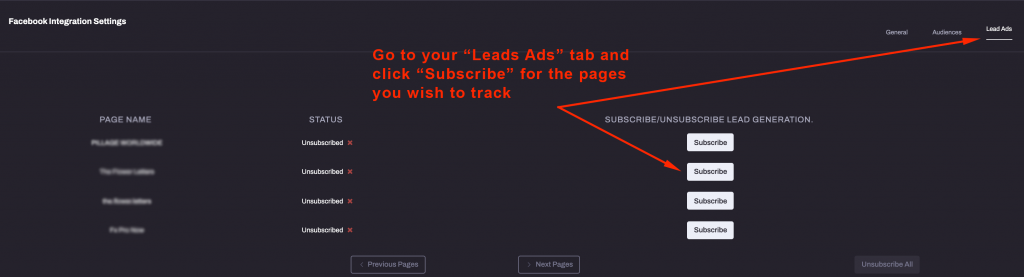
After Facebook is integrated successfully, go to your Facebook integration inside Hyros then click on the “Leads Ads” tab. You should see a list of Facebook pages that you can subscribe to.
IF you don’t see any pages, please check the following:
1. Make sure you have admin access to all pages you want to use.
2. You may need to re-integrate with Facebook so you can accept permissions for Hyros to access your pages.
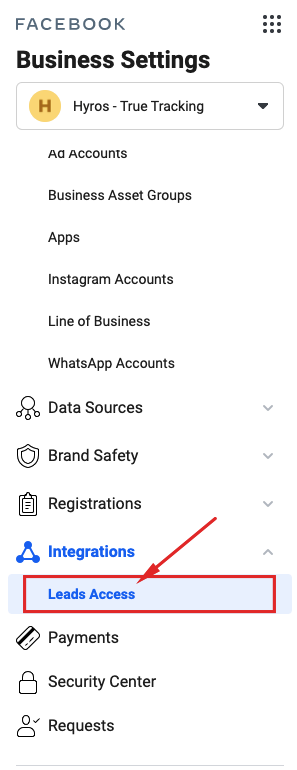
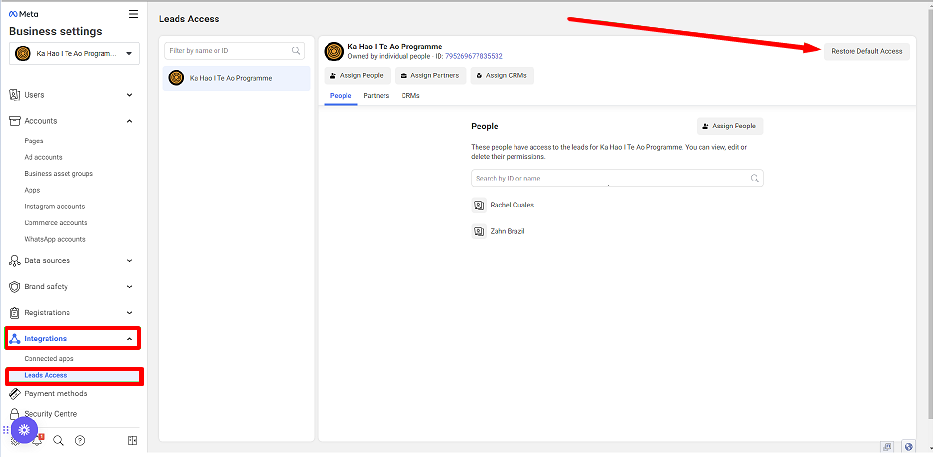
IF leads still aren’t entering Hyros, make sure you have toggled Hyros On inside your Leads Access settings:
Please also make sure we have the right access options enabled by going to your Meta Business Manager > Integrations > Lead Access, then select the right account to work on and click on Restore Default Access:
This will conclude the set up for Facebook Lead Ads. If you have any issues please reach out to the onboarding team or in-app support.
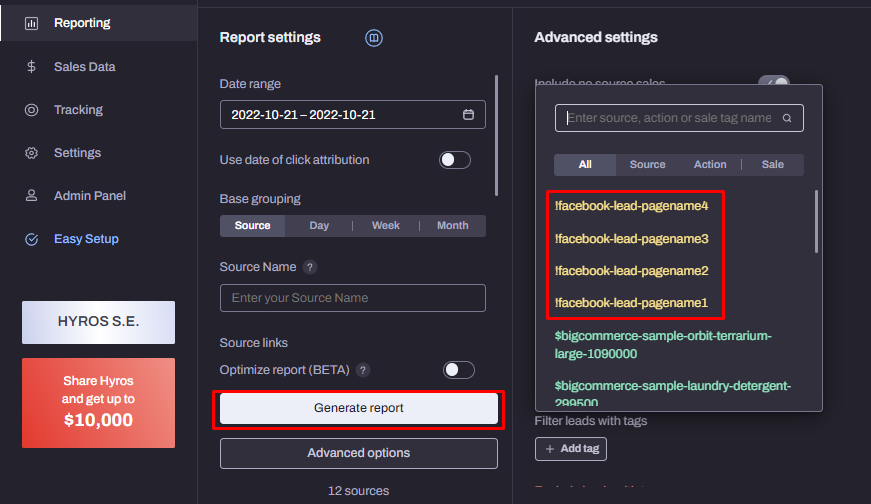
Facebook Leads page tagging
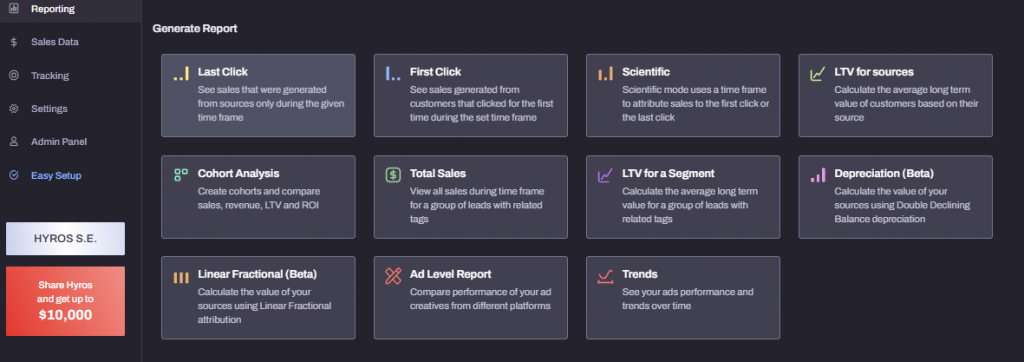
Hyros now automatically adds a tag to Facebook Leads to identify the actual page where the opt in ocurred giving us more tools to identify specific lead behavior and make decissions based on it. If you want to restrict report results by page tag please go to Hyros > Reporting and choose the type of report you want to run:
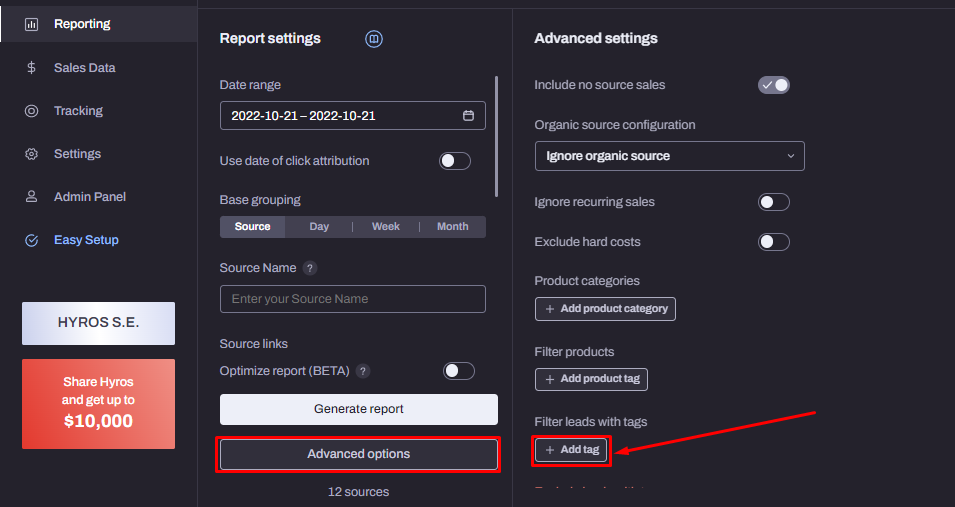
After choosing the type of report to generate please click on Advanced options and then on the +Add tag button:
Then select the tag(s) you want to be shown and click on Generate Report:
The resulting report will only show us Leads with the selected tag(s) attributed to their journey.
Google Ads
Please follow these 2 steps to set up tracking for your Google ads:
NOTE : When connecting HYROS to Google Ads do NOT connect with the MCC or manager account. Connect with an Google account that is directly connected to the Google Ads account you would like to track as an admin.
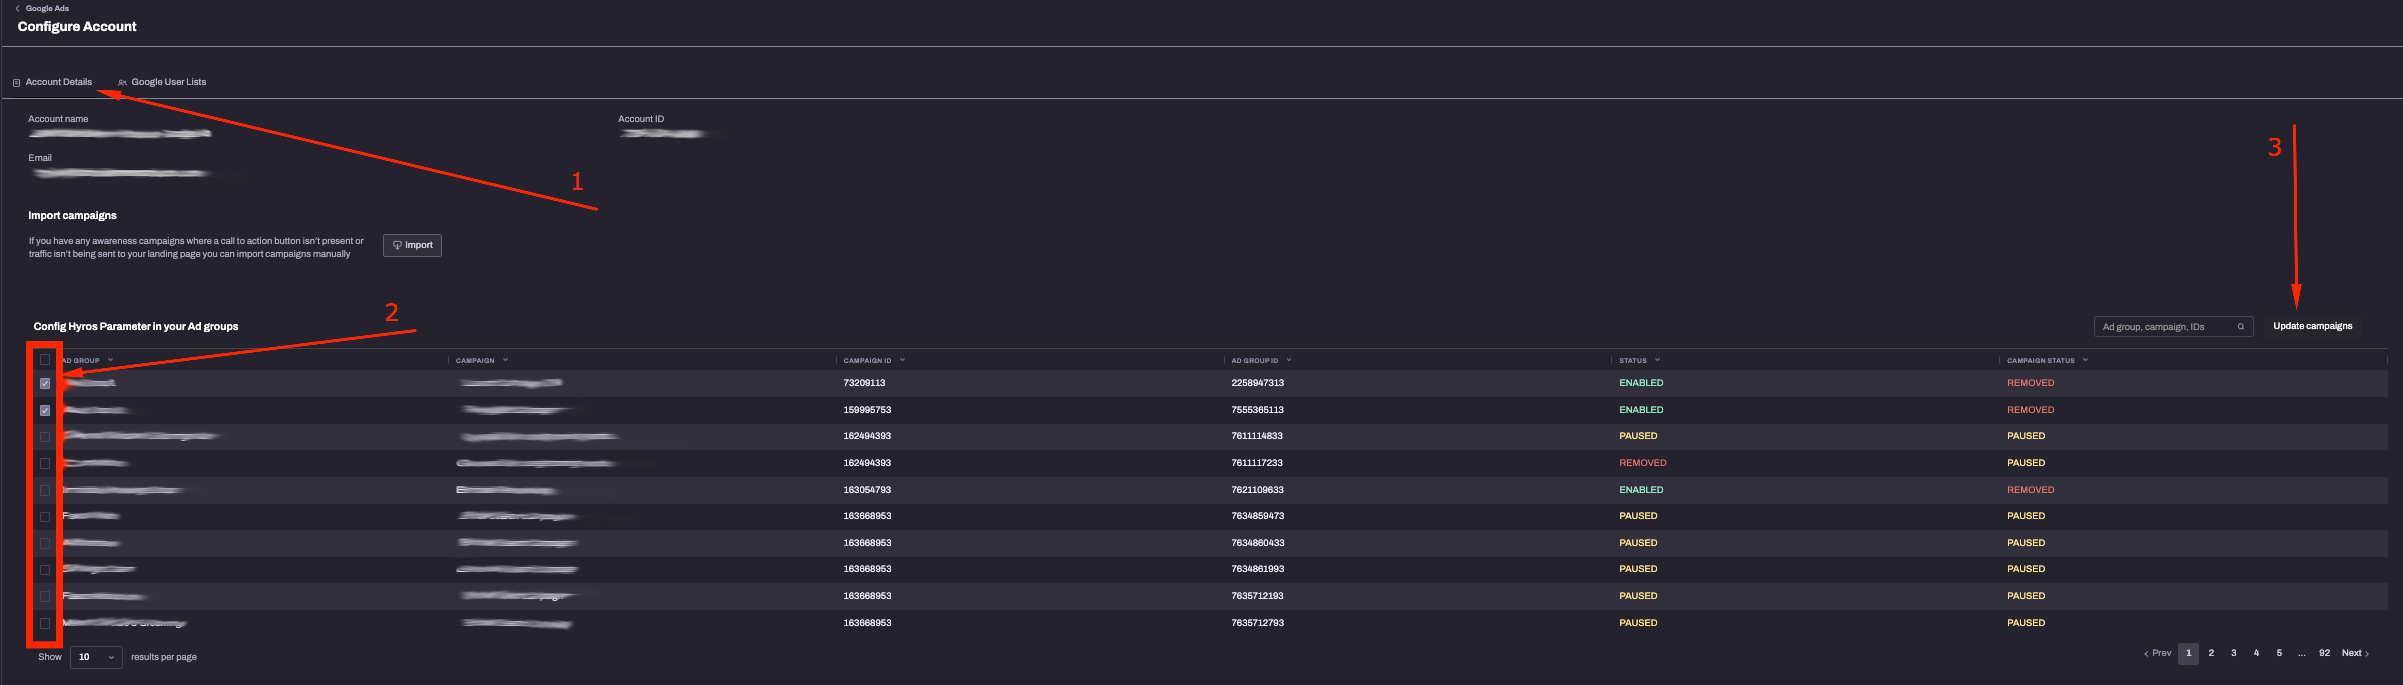
OPTIONAL STEP: Manually Importing Campaigns and Ads
This is especially useful if you have any awareness campaigns where a call to action button is not present or traffic isn’t being sent to your landing page.
Normally, as soon as a click event is tracked from a campaign or ad, it is automatically imported into Hyros along with the costs and other relevant information. However, if there is no click event to be tracked, you will need to import the campaign/ad manually into Hyros in order to receive the costs from that ad set.
NOTE: This will NOT enable you to track view through conversions or associate any ads without a call to action button with purchases. It WILL allow you to track the costs associated with the Campaigns.
To configure this, simply go to your Google integration, click configure and click “Import Campaigns” inside “account configuration” as shown in the above video.
Step 2 – Add the Hyros Tracking UTM Parameter and Test your Ads
Please add your parameters depending on the campaign type as shown below.
Please also note that at this moment in time Hyros can not track Google experimental Campaigns. Experimental campaign tracking is expected in the short term future.
Please note that if you already use existing parameters at a specific level, you must place the parameters at the same level. Otherwise, please follow the steps mentioned in the documentation below.
If you already have Wicked Report or TripleWhale Parameters
Wicked Google URL parameters: {lpurl}?wickedsource=google&wickedid={gclid}&wickedid={creative}&wcid={campaignid}
TripleWhale Google URL parameter: gadid={creative}
If you already have Wicked Reports or TripleWhale parameters installed in all your active Google ads, there is no need to add any more UTM parameters as Hyros will automatically use the existing parameters above from either platform.
Important: If you have the Wicked Reports or TripleWhale parameter installed at the account level and at the same time you have other UTMs placed at ad group or ad level, please note that UTMs at the ad group and ad level will be prioritized and the Wicked Reports URL parameter will drop.
Once you have confirmed the integration, you can proceed to the next step in the initial setup process.
Shopping and Smart Shopping Campaigns
TO BULK EDIT PRODUCT GROUPS: Following the video, you can not add the Hyros UTM tracking parameter at bulk to your product groups. However you can do this instead by downloading a product group report with the “tracking template” column open from Google, and then bulk adding the Hyros tracking parameter and re-uploading it to Google. To do this please follow Google’s documentation HERE
.
HYROS Google Shopping URL Parameter : {lpurl}?gc_id={campaignid}&g_special_campaign=true
IF you already have UTMs or parameters in your tracking area, add our url parameter with an “&” sign.
Example : {lpurl}?utm1&gc_id={campaignid}&g_special_campaign=true
Performance Max Campaigns
If you want to see the setup tracking on the old theme, use this link .
HYROS Performance Max Campaign Tracking template: {lpurl}?gc_id={campaignid}&g_special_campaign=true
IF you already have UTMs or parameters in your tracking area add our url parameter with an “&” sign.
Example : {lpurl}?utm1&gc_id={campaignid}&g_special_campaign=true
Smart Campaigns
If you want to see the setup tracking on the old theme, use this link .
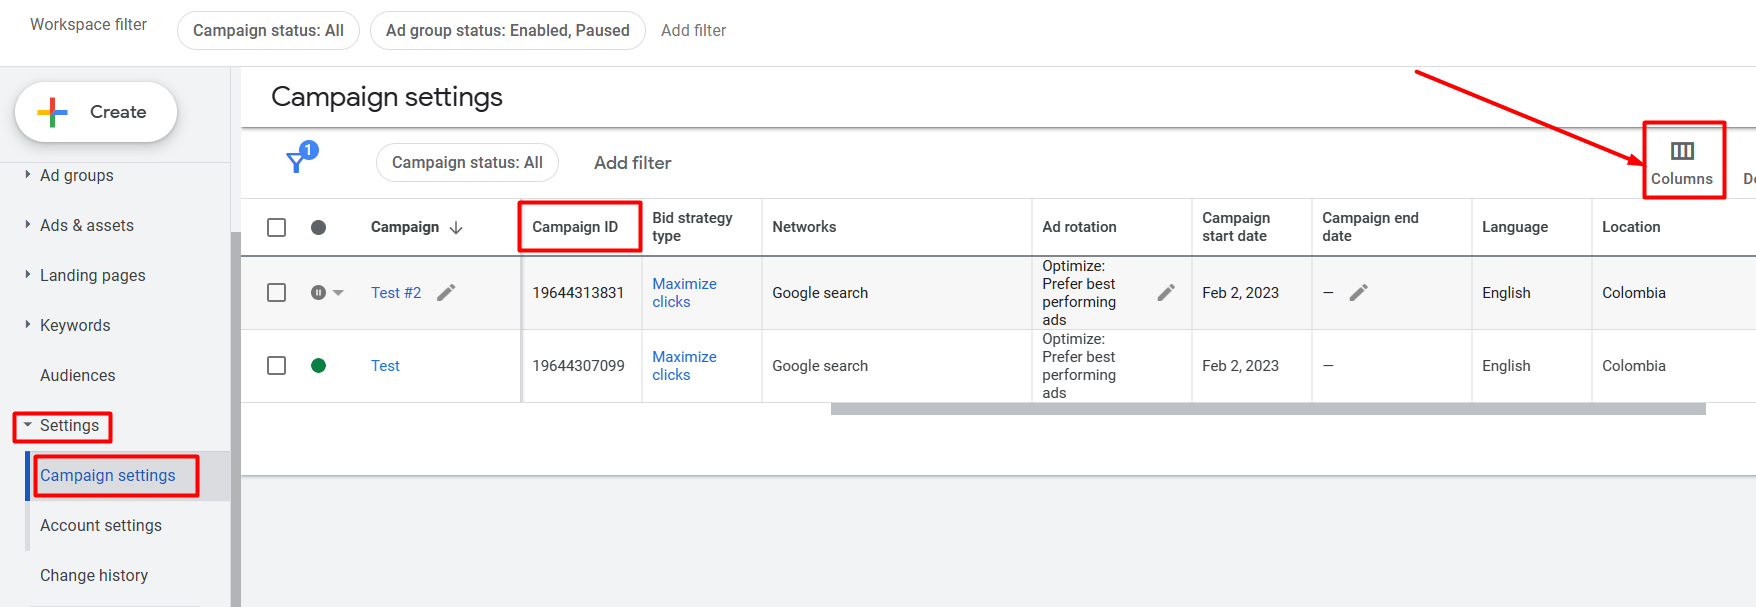
Please find the Campaign ID for that specific Campaign inside Campaign Settings (it may be required to activate the Campaign ID column):
Add it in front of the “=”. For example, if the campaign ID is “1234567”, then you should have “?gc_id=1234567”
IF you already have UTMs or parameters in your tracking area add our url parameter with an “&” sign.
Example : www.hyros.com?utm1&g_special_campaign=true&gc_id=1234567
You can not add the URL parameter at ad group level, instead:
Copy the tracking parameter here: ?g_special_campaign=true&gc_id=
Find the campaign ID for that specific campaign inside the campaign settings. Add it in front of the “=”. For example, if the campaign ID is “1234567”, then you should have “?g_special_campaign=true&gc_id=1234567“
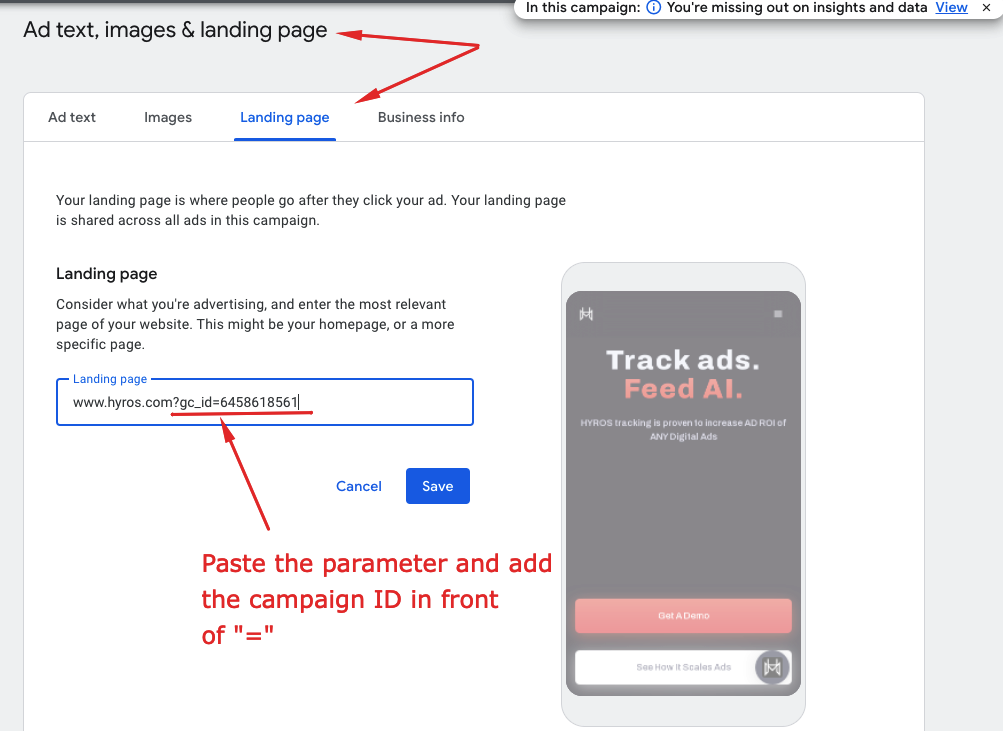
In your Smart Campaign settings, go to “Ad text, images & landing page”.
In “Landing page” paste the Hyros parameter at the end of the Website URL as shown here, with the campaign ID at the end, and click save:
All other Campaigns and Testing
HYROS Google URL Parameter : {lpurl}?gc_id={campaignid}&h_ga_id={adgroupid}&h_ad_id={creative}&h_keyword_id={targetId}&h_keyword={keyword}&h_placement={placement}
IF you already have UTMs or parameters in your tracking area add our url parameter with an “&” sign.
Example : {lpurl}?utm1&gc_id={campaignid}&h_ad_id={creative}….
Testing Your Ads
Create a test link like in the video above. Click the link and ensure that your link has our tracking parameter and the campaign ID in the link. The URL parameter should appear cleanly EXACTLY like in the example link below.
If the parameter is not in the final URL OR is messy use the troubleshooting steps shown below.
Google Trouble Shooting
IF your final url does not show the parameter at all make sure you are not using a redirect like bit.ly.
IF your final url shows the parameter in a messy way such as “%%fbc_id%=214234” make sure you did not put a “?” before the parameter AND if you added it to existing UTM make sure you placed “&” before it.
Also ensure all UTM parameters are in the same place. If some are placed at ad group level and others at ad level they will break tracking.
IF the parameter will not show after the steps above contact your onboarding rep on Facebook OR use support via the live chat in the lower right hand corner of this page and say “My Google ad URL parameters are not working”
To help us troubleshoot, please also send us 2/3 ad preview links as shown in the video, along with a screenshare or screenshot displaying our parameters clearly attached in the tracking template column.
Google AUTOMATIC Setup
Important! If you run Shopping ads, please note that Google’s automatic setup does not cover this type of ads.
For Shopping ads we use a different type of parameter and the setup has to be done manually at the Ad group level. Please make sure to use this parameter: {lpurl}&gc_id={campaignId}&h_ad_id={creative}
STEP 1: Go HERE and integrate with Google. Login to Google to complete the integration.
STEP 2: Find the account you want to track in, then click “configure” and find the configure automatic tab:
STEP 3: Once your ads are loaded select them all by checking the high checkbox. Then hit confirm and then confirm once more.
STEP 4: Confirm your tracking by creating a preview link following THIS GUIDE. Click the link and ensure that your link has our tracking parameter and the campaign ID in the link. It should appear cleanly in the URL.
The url below is an example of a clean parameter. It should appear exactly like it does below.
If your final url is not showing the parameter or is messy use the troubleshooting guide below.
Trouble Shooting
IF your final url does not show the parameter at all make sure you are not using a redirect like bit.ly.
IF your final url show the parameter in a messy way such as “%%gc_id%=214234” make sure you did not put a “?” before the parameter AND if you added it to existing UTM make sure you placed “&” before it.
IF the parameter will not show after the steps above contact your onboarding rep on Facebook OR use support via the live chat in the lower right hand corner of this page and say “My Google ad URL parameters are not working”.
Linked-In
Video Guide:
Please complete the steps in the video for each of your active Linked-in ads.
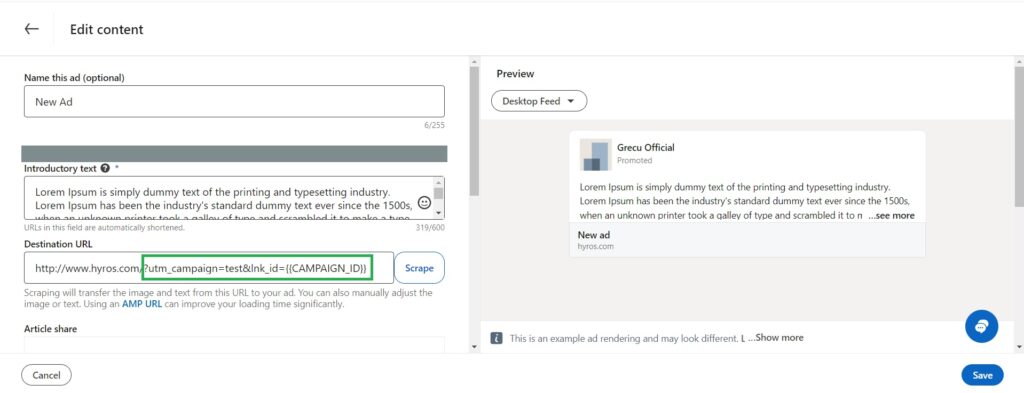
Hyros tracking parameter: ?lnk_id={{CAMPAIGN_ID}}
In case you have existing UTM’s in the Destination URL field please use the “&” symbol instead of the “?” symbol before our tracking parameter.
Lead Gen Ads
Tracking Linked-in lead ads requires the use of Zapier
Tracking Lead Gen Ads with Zapier
At this moment in time, LinkedIn does not offer a possibility to track Lead Gen Ads. However, we have a workaraound to effectively track them with Zapier.
In order to track this type of ads, follow these steps:
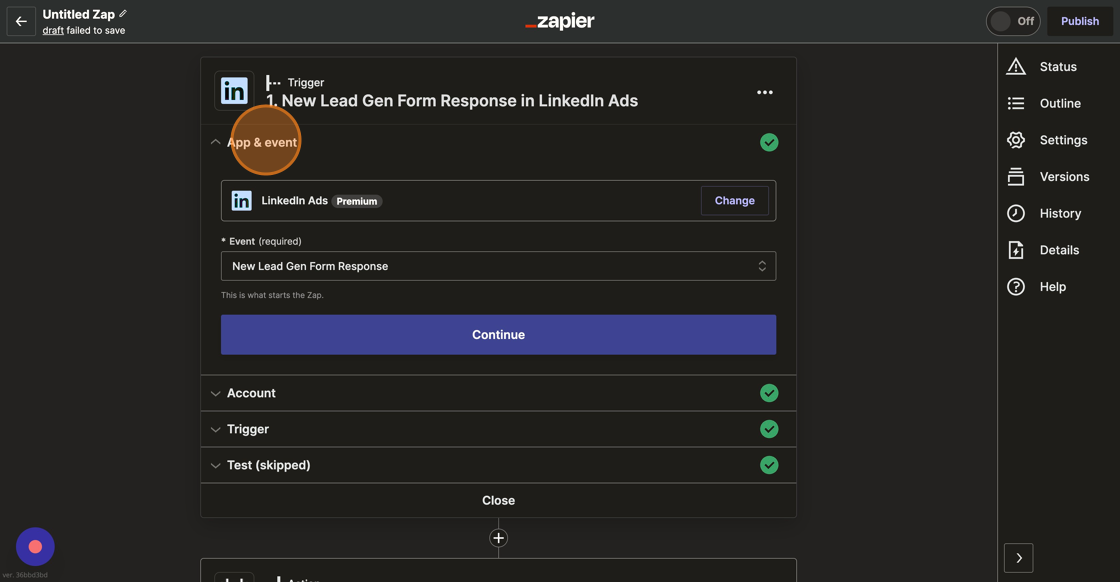
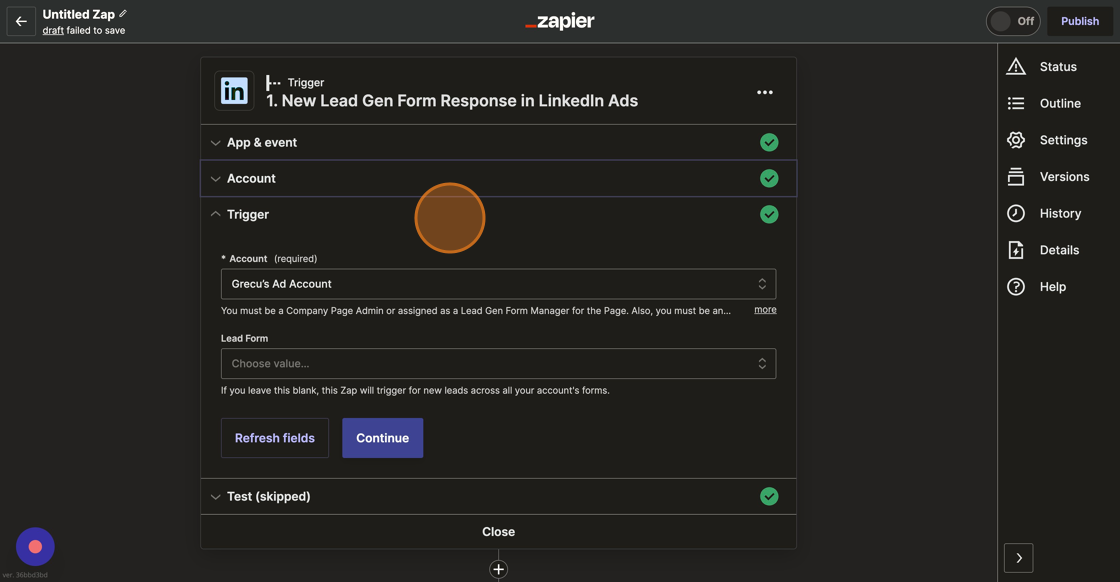
1. In the Trigger section, click “App & event”. Select LinkedIn Ads and “New Lead Gen Form Response” from the Event field.
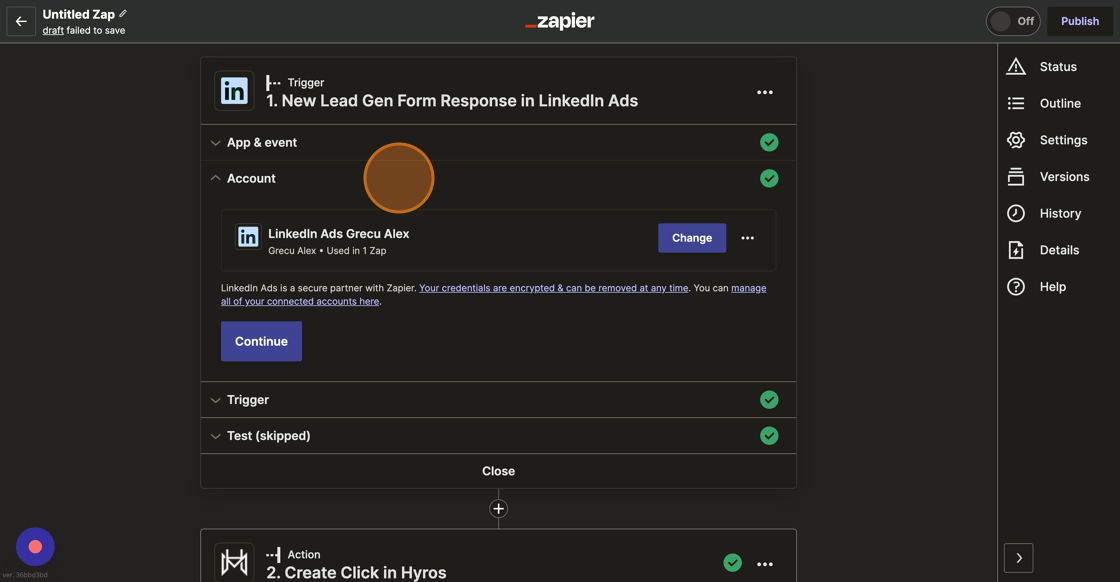
2. In the Account section, connect to your LinkedIn account.
3. In Trigger, select the LinkedIn Ad account you are using for tracking.
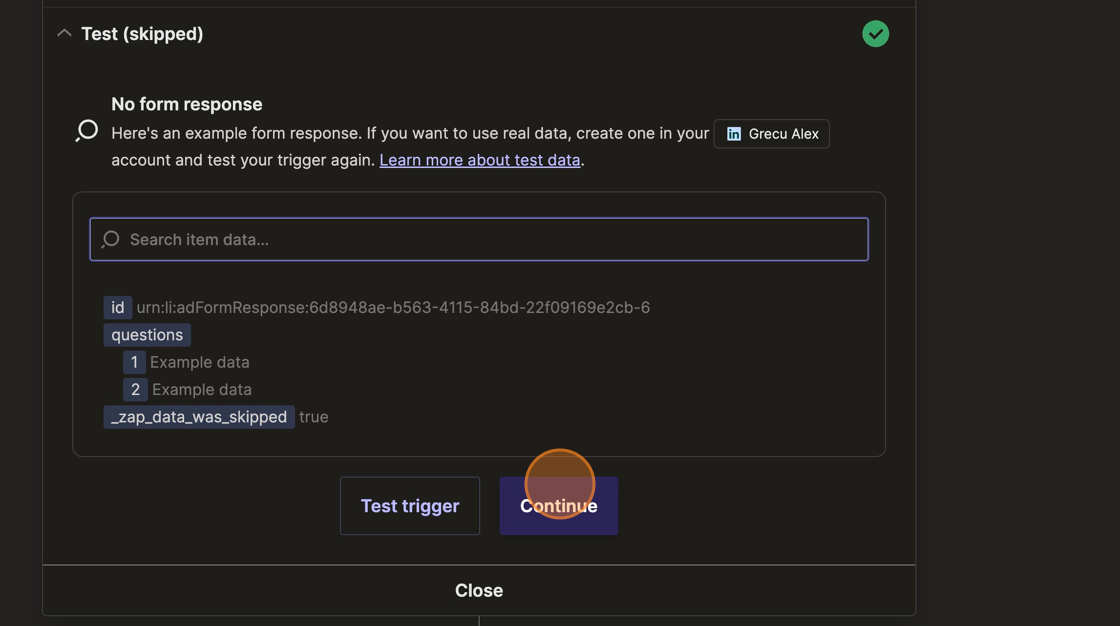
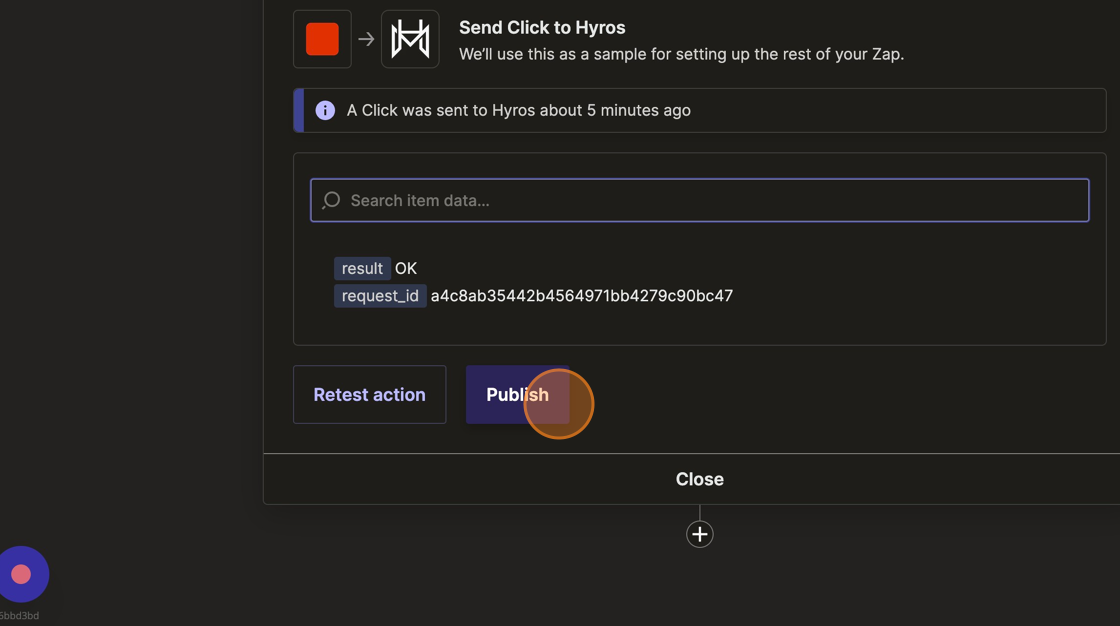
4. Here you can test the trigger and then you can continue to the Action to set up Hyros.
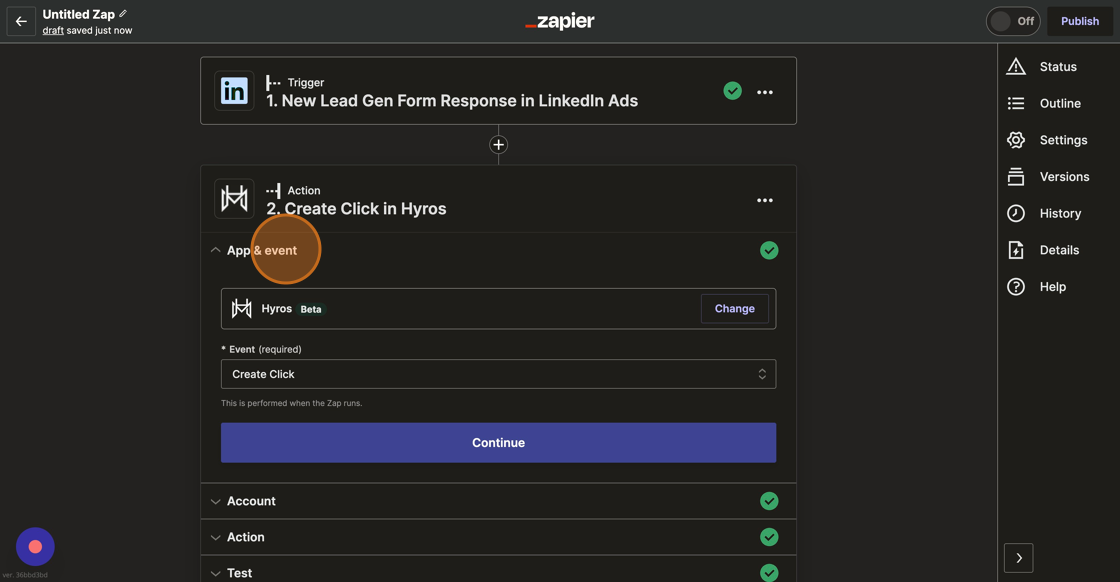
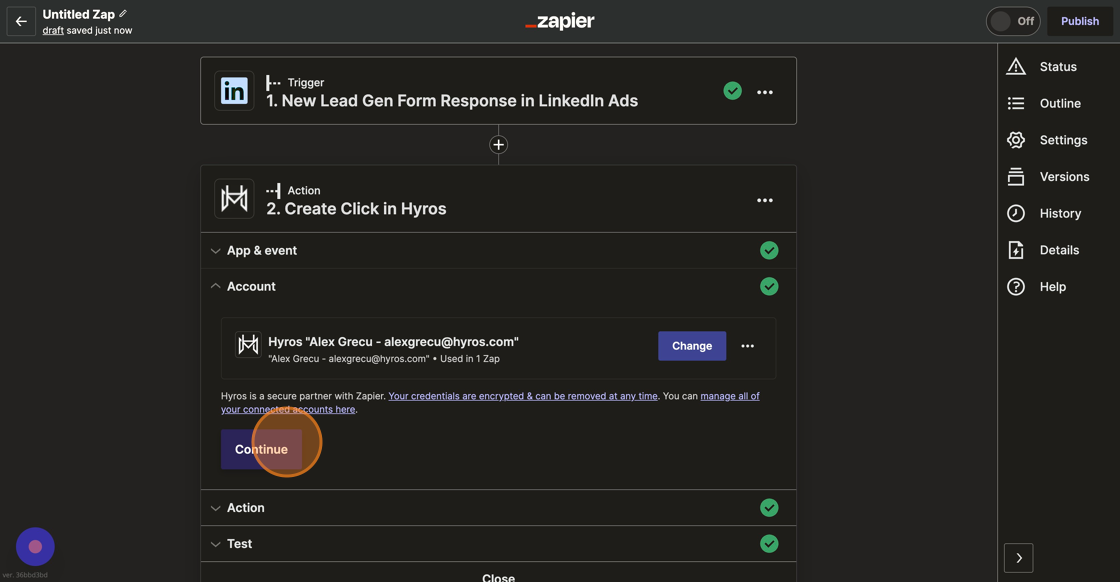
5. Select Hyros Beta and choose “Create Click” from Event field.
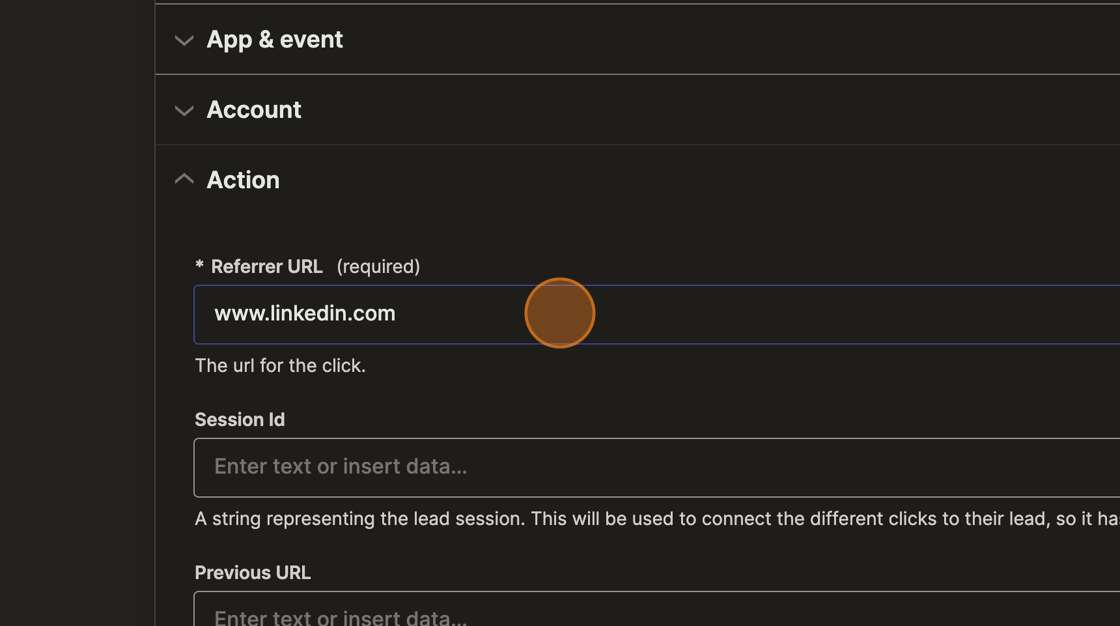
7. If you have the link to the form available, add it in the Referrer URL field. If you do not have access to the URL form, you can also add www.linkedin.com.
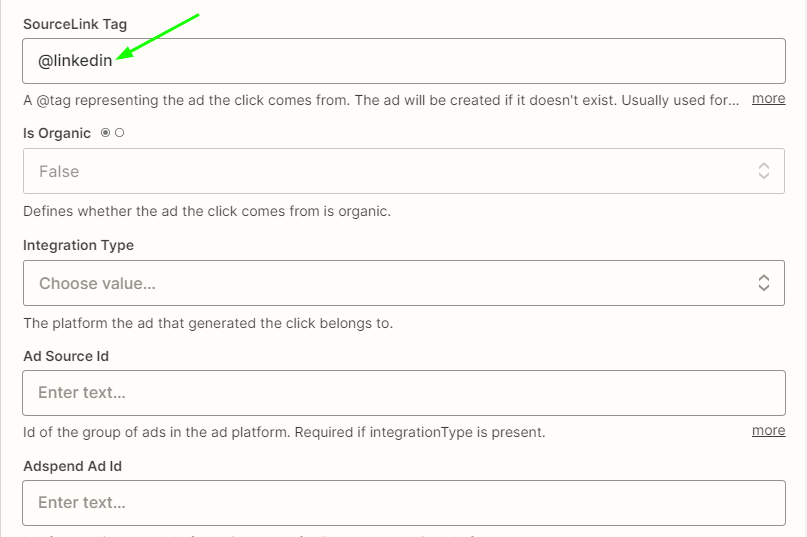
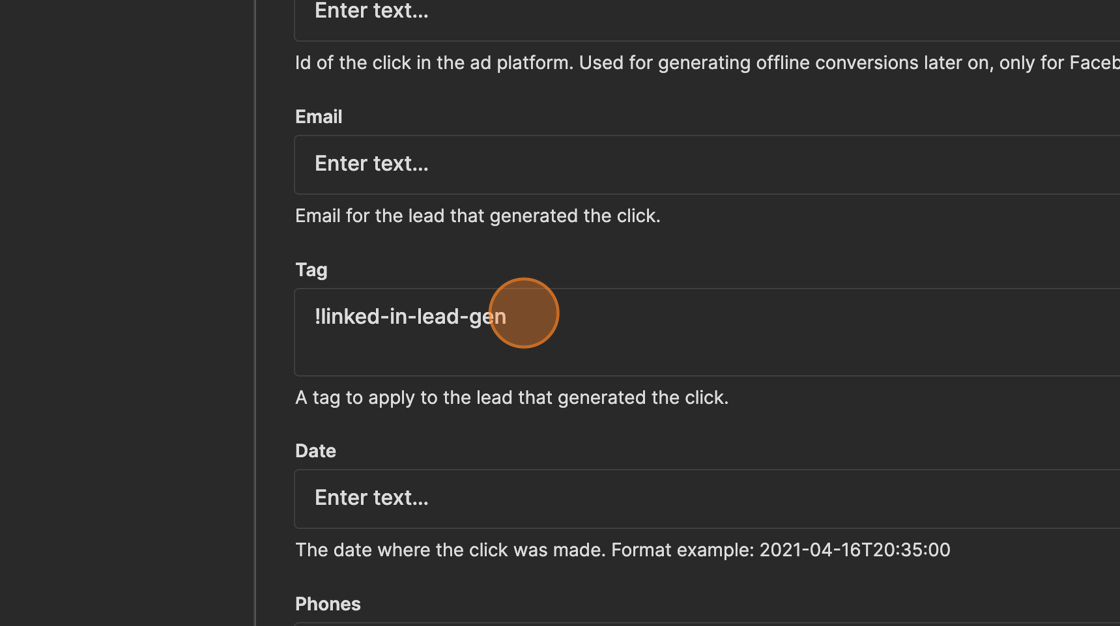
8. In the “SourceLink Tag” field enter “@Linkedin” or something similar, this way it will be easy to identify your leads who came from Linked inside Hyros later. (Its important to add th “@”at the begining of the tag
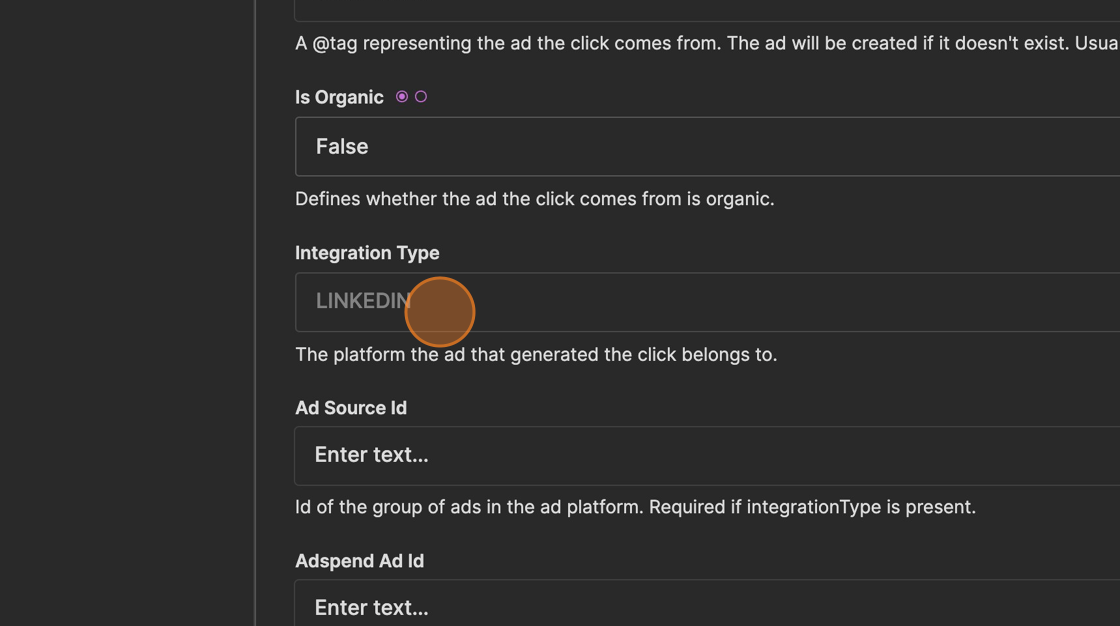
9. The “Is Organic” field should be “False”.
10. The “Integration Type” field should be “LINKEDIN” in upper caps.
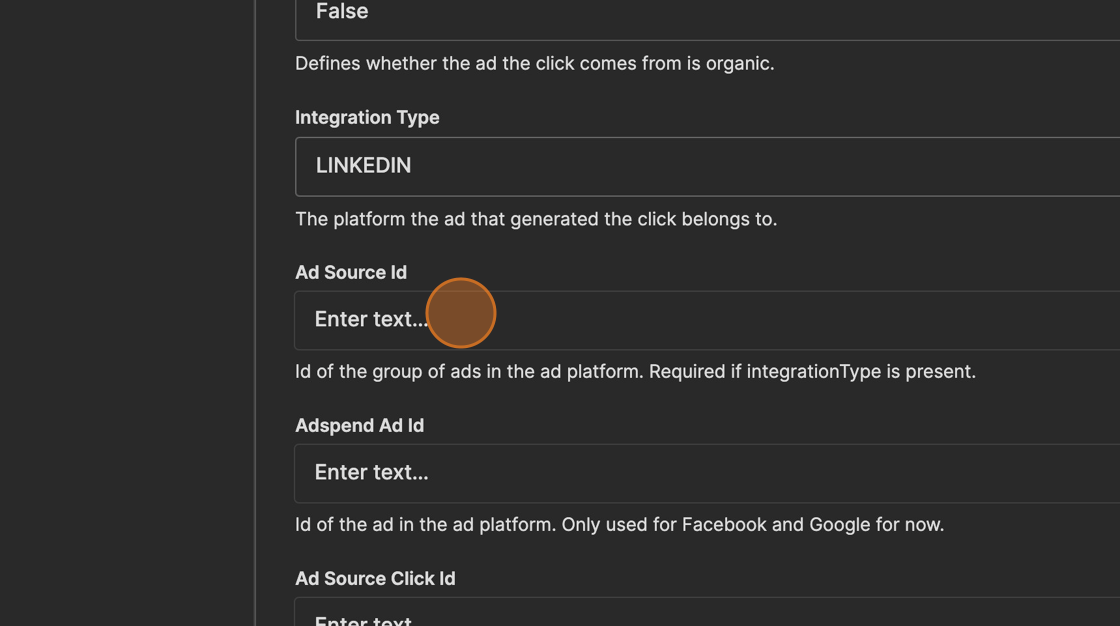
11. The “Ad Source Id” field should have the campaign ID, or the field corresponding to the campaign ID from Linked-In.
12. Optional Step: in the “Tag” field enter “!Linked-in-lead-gen” or something similar, this way it will be easy to identify your leads who came from Linked-in Lead-Gen Forms inside Hyros later.
13. Select the field corresponding to the Email of the lead from here.
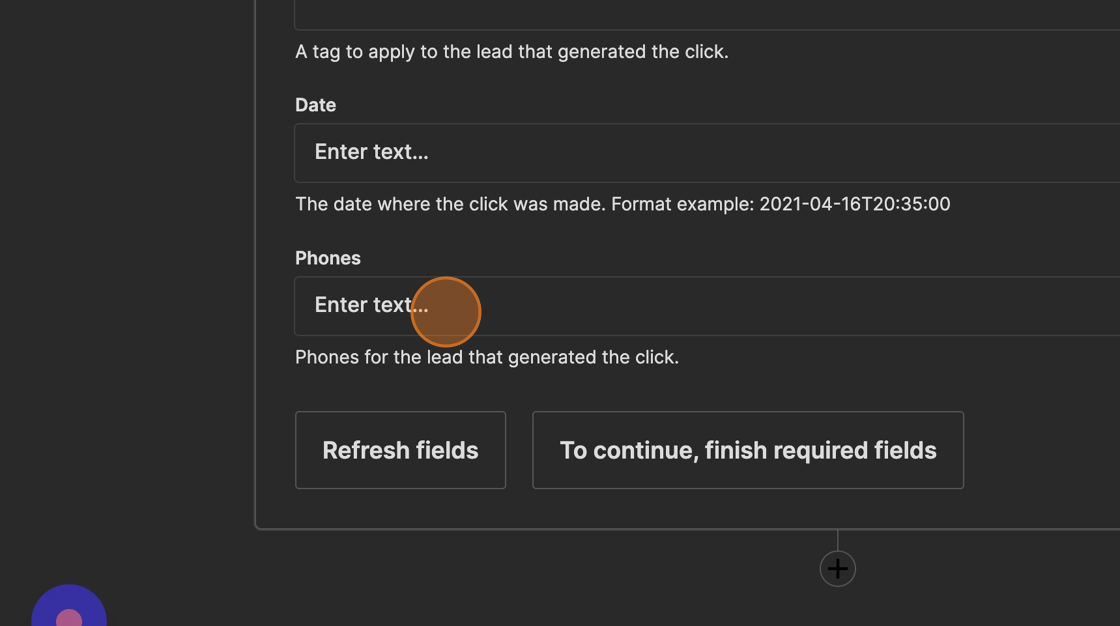
14. Date can be left blank, we will track the date of when the zapier event is sent to us automatically.
If you collect the phone number in the form, this field can be entered here.
15. Click “Publish”
This completes the setup for Linked-In, please see below for any other optional steps:
———————————————–
Written Setup Guide
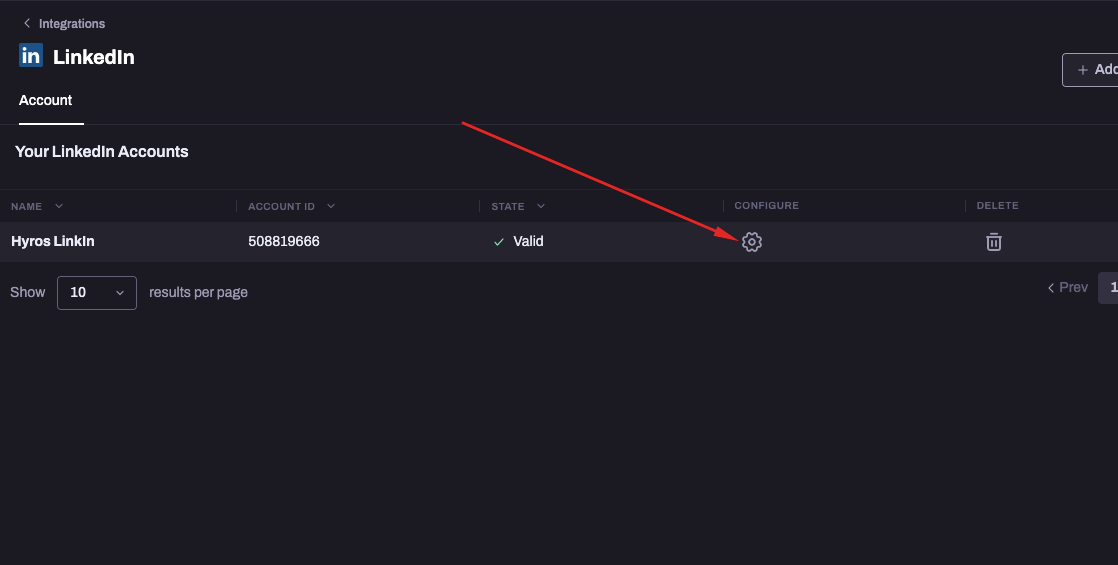
Step 1 – Add Integration Inside Hyros
Go to your integration settings and find the Linked In integration HERE.
Click “add account”, then name the integration however you like.
You will then be redirected to Linked-In and be asked to log in, do so and then select the ad account you would like to track with.
Step 2 – Add the Linked-In Tracking Parameters to Your Ads
Add the Linked-In Tracking Parameter at the end of your Destination URL: ?lnk_id={{CAMPAIGN_ID}
If you have multiple utms already, then you need to add our parameter at the end of them with an “&” instead of an “?”. For example, the URL should look similar to this:
You can also add the parameters in exactly the same place when creating new ads.
Testing your Ads
To test your ads, click the drop down on your ad and select “preview”. Then click on the call to action button.
Once your landing page has loaded, you should see our tracking parameters and your campaign CLEARLY inside the URL
Your URL should look similar to this:
www.hyros.com?lnk_id=191161243
If the hyros UTM parameter and/or the campaign ID do not show up cleanly in the URL or do not show up at all, then please check the following:
Ensure you do not have any redirects on your ads. The URL set in the ad should match with the final landing page URL.
Ensure the parameters were attached correctly and there are no typos etc.
Please also ensure you are previewing the ad EXACTLY as shown in the above example, some previews do not pass on the parameters correctly.
If you have done all of the above and still can’t find the issue, please reach out to the support team. Otherwise, the Linked-In ad setup is complete.
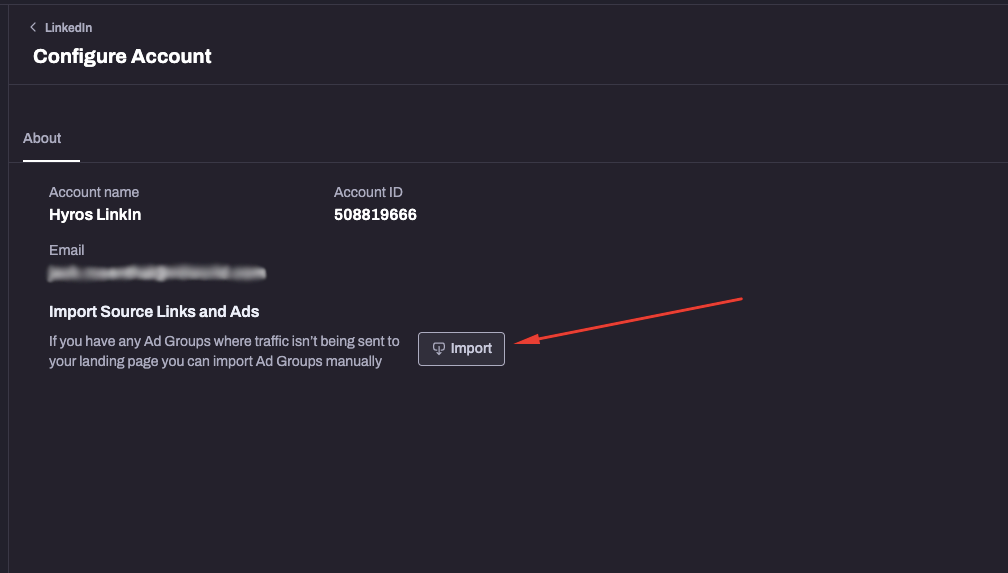
Manually Importing Sources – For Engagement Ads
Manually Importing Ads
This is especially useful if you have any awareness campaigns where a call to action button is not present or traffic isn’t being sent to your landing page.
Normally, as soon as a click event is tracked from an ad, it is automatically imported into Hyros along with the costs and other relevant information. However, if there is no click event to be tracked, you will need to import the ad manually into Hyros in order to receive the costs from that source.
NOTE: This will NOT enable you to track view through conversions or associate any ads without a call to action button with purchases. It WILL allow you to track the costs associated with the ads.
To configure this, simply go to your Linked-in integration, click configure and click “Import” as shown here:
Pinterest
Note: Do you already use the TripleWhale URL parameters? You can go directly to the TripleWhale section at the end of this article.
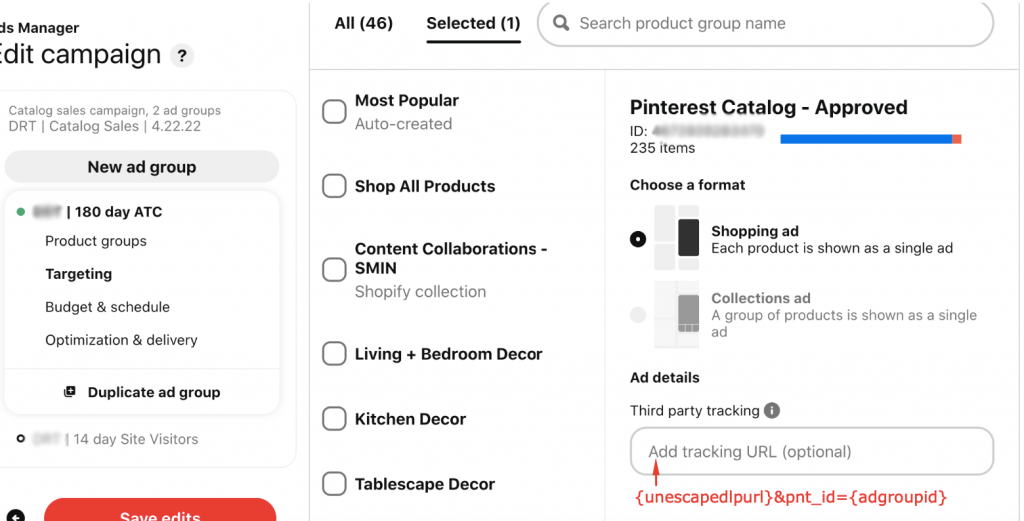
For Catalog campaigns ONLY: Under ad details insert {unescapedlpurl}&pnt_id={adgroupid} in the “Third Party Tracking” field as shown below:
For any other campaign type, please follow the video guide below:
Hyros UTM Tracking Parameter for Pinterest: ?pnt_id={adgroupid}&h_ad_id={adid}
This completes the setup for Pinterest, please see below for any other optional steps:
———————————————–
Written Setup Guide
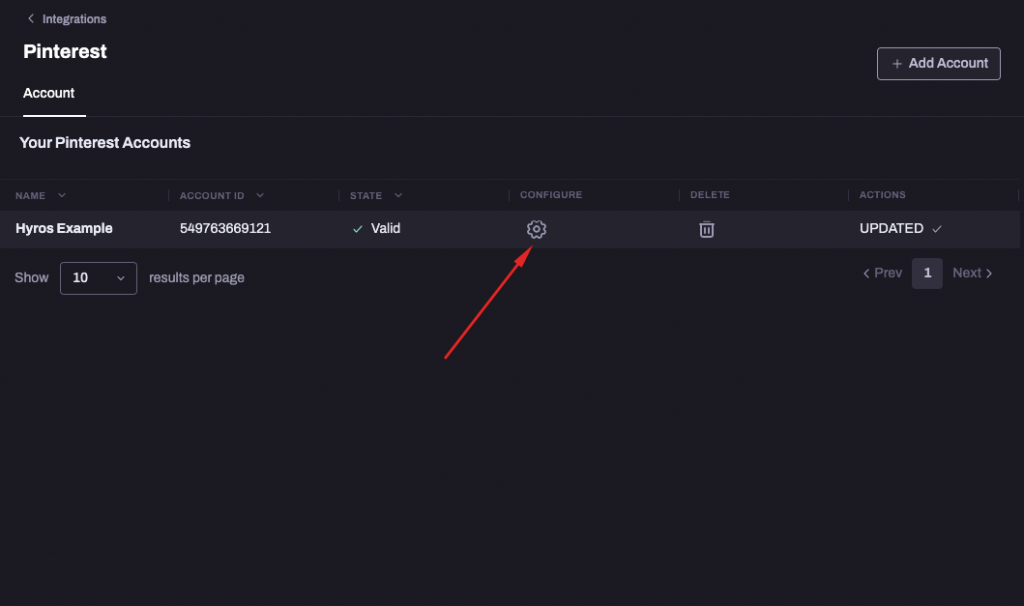
Step 1 – integrate with Pinterest inside Hyros inside your integration settings HERE.
Step 2 – Copy the Tracking parameters below the video, paste it at the end of the URL inside the “Destination URL” field.
If you have another ad type that does not have this field, there should be a “Tracking Template” or “URL parameter” field that you can also add our parameters to. Please reach out to support if you need assistance with this.
TripleWhale
TripleWhale
TripleWhale Pinterest URL parameter: padid={adid}
If you already have TripleWhale parameters installed in all your active Pinterest ads, there is no need to follow the steps above. You just need to integrate your Pinterest account from here.
Once you have confirmed the integration, you can proceed to the next step in the initial setup process.
Optional Steps
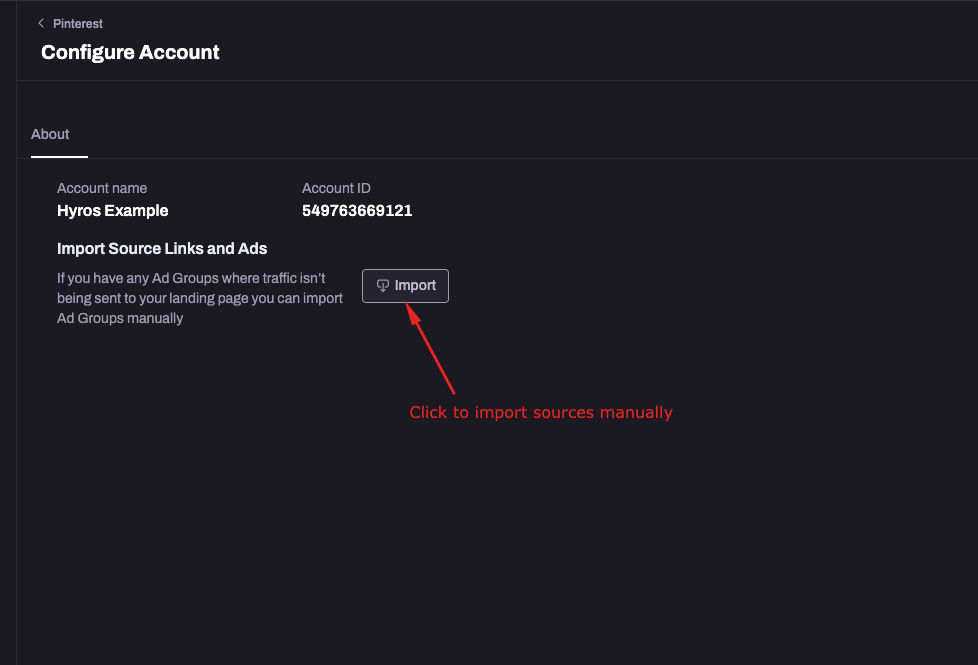
Manually Importing Ads
This is especially useful if you have any awareness campaigns where a call to action button is not present or traffic isn’t being sent to your landing page.
Normally, as soon as a click event is tracked from an ad, it is automatically imported into Hyros along with the costs and other relevant information. However, if there is no click event to be tracked, you will need to import the ad manually into Hyros in order to receive the costs from that source.
NOTE: This will NOT enable you to track view through conversions or associate any ads without a call to action button with purchases. It WILL allow you to track the costs associated with the ads.
To configure this, simply go to your Pinterest integration, click configure and click “Import” as shown here:
Snapchat
Note: Do you already use the TripleWhale URL parameters? You can go directly to the TripleWhale section at the end of this article.
Snapchat ad parameter: ?snc_id={{adSet.id}}&h_ad_id={{ad.id}}
This completes the setup for Snapchat, please see below for any other optional steps:
———————————————–
Written Setup Guide
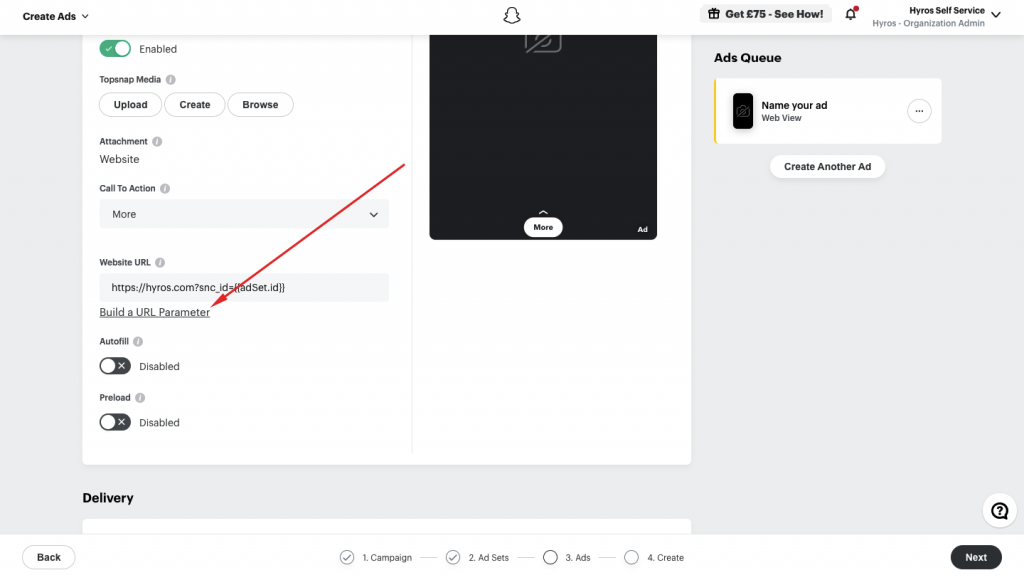
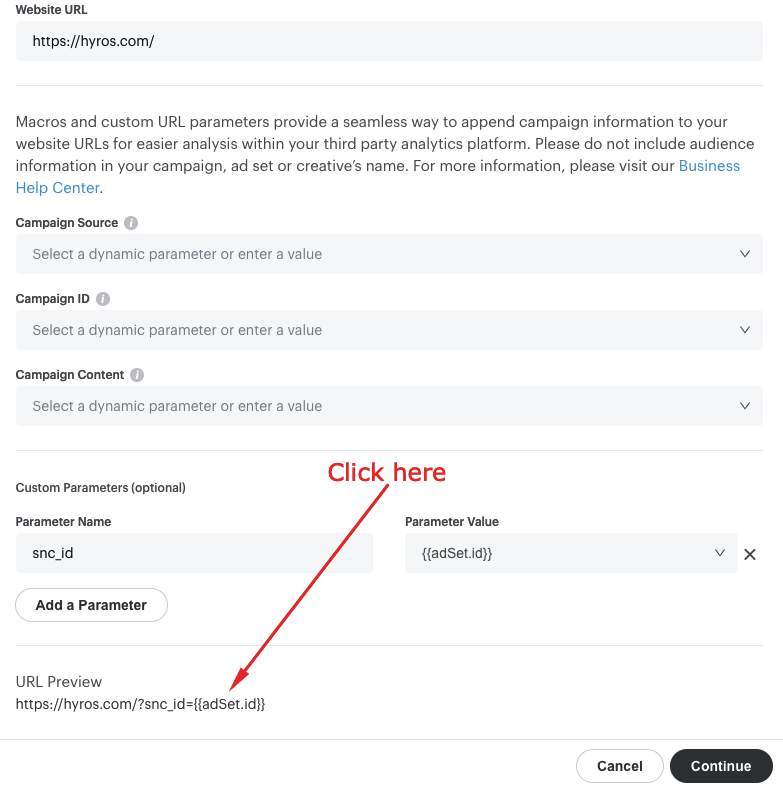
Step 1 – Add the Hyros UTM Tracking Parameter
Copy the following Parameter and paste it directly at the end of landing page link set for your ads or when first creating a campaign: ?snc_id={{adSet.id}}&h_ad_id={{ad.id}}
If you have any other utms you want to place on the URL as well, just add an “&” between them. For example:
You can test this parameter by going to the “Build a Url Parameter” when configuring or editing an ad:
Select the preview link as shown:
You should then see in the URL our parameter cleanly attached with “snc_id=successful_adSet_id” as shown:
https://hyros.com/?snc_id=successful_adSet_id
If it does not land on the page cleanly like this then something is wrong, please check the parameters have been placed correctly on the URL and that there are no redirects present that may drop the parameters.
Step 3 – Integrate with Snapchat
Go to your integration settings inside Hyros or click HERE to go directly to the Snapchat integration settings. Name the integration.
Log in with Snapchat and select the organization and ad account you would like to track with.
We also recommend checking that your Hyros timezone matches your timezone for your Snapchat ad account. You should be asked to change this once the integration is complete, but you can check your Hyros timezone in your profile settings HERE.
If you already have TripleWhale parameters installed in all your active Snapchat ads, there is no need to follow the steps above. You just need to integrate your Snapchat account from here.
Optional Steps
Manually Importing Ads
This is especially useful if you have any awareness campaigns where a call to action button is not present or traffic isn’t being sent to your landing page.
Normally, as soon as a click event is tracked from an ad, it is automatically imported into Hyros along with the costs and other relevant information. However, if there is no click event to be tracked, you will need to import the ad manually into Hyros in order to receive the costs from that source.
NOTE: This will NOT enable you to track view through conversions or associate any ads without a call to action button with purchases. It WILL allow you to track the costs associated with the ads.
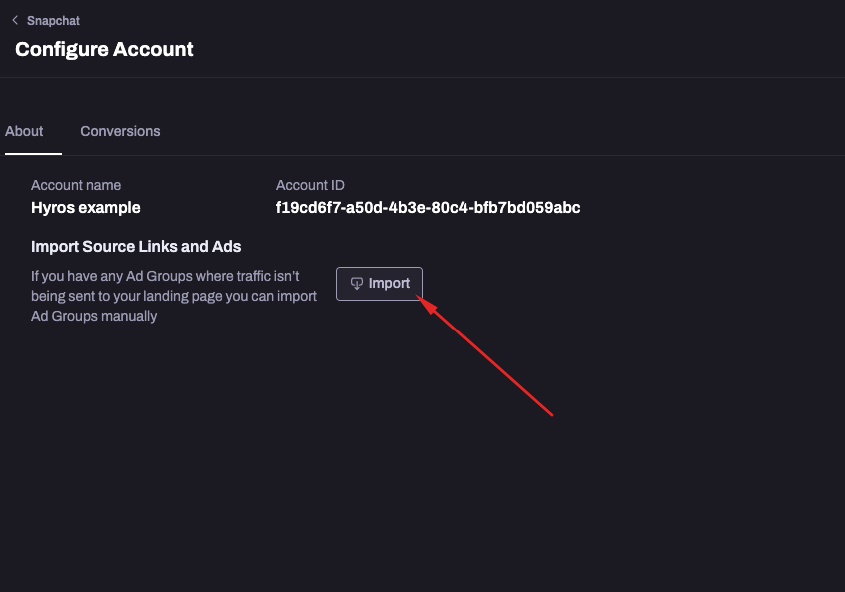
To configure this, simply go to your Snapchat integration, click configure and click “Import” as shown here:
TikTok
Note: Do you already use the TripleWhale URL parameters? You can go directly to the TripleWhale section at the end of this article.
Important: Tik-Tok now allows us to install parameters to an active ad. Take in mind that updating ads will reset the learning phase and will require Tik-Tok to review and re-approve your ads. This should not dramatically effect ad performance. The ROI gained/saved from tracking ads will greatly outweigh and justify the re-learning.
Video Guide:
IF YOU RUN LEAD GENERATION ADS Please review the section below labelled “Lead Generation Ads” as well as the standard setup guide.
Please toggle on “Lead Ads Generation” under “Webhooks” as shown here:
This completes the setup for Tik-Tok, please see below for any other optional steps:
———————————————–
Written Setup Guide
Step 1 – Install the Tik-Tok URL parameter
1. Inside Hyros go to Tracking -> Source links. Scroll down and you will see the Tik-Tok parameters. You can also copy the Tik-Tok parameter just below:
2. Next inside your Tik-Tok account when you create a new Ad at the Ad level, scroll down until you see the URL field and place the parameter at the end of the URL link. This is how the link should look like:
IMPORTANT! Please note that if you edit an Ad after it has already been published, you will not be able to edit the URL field. The process of installing the parameter must take place before publishing an Ad.
2. A pop-up window will appear and you need to enter a name, for example, Hyros. Then click the Tik-Tok sign in button.
3. You will be redirected to the Tik-Tok page where you must to grant Hyros permission to access your Ad accounts. Before confirming permission, make sure you check “Click to Agree to the Platform Agreement”.
4. Once you click confirm, you will be automatically redirected to your Hyros account where you need to select the Ad account that you wish to track and click Save.
If you already have TripleWhale parameters installed in all your active Tik-Tok ads, there is no need to follow the steps above. You just need to integrate your Tik-Tok account from here.
Optional Steps
Manually Importing Ads
This is especially useful if you have any awareness campaigns where a call to action button is not present or traffic isn’t being sent to your landing page.
Normally, as soon as a click event is tracked from a your ads, it is automatically imported into Hyros along with the costs and other relevant information. However, if there is no click event to be tracked, you will need to import the source manually into Hyros in order to receive the costs from those ads.
NOTE: This will NOT enable you to track view through conversions or associate any ads without a call to action button with purchases. It WILL allow you to track the costs associated with the ads.
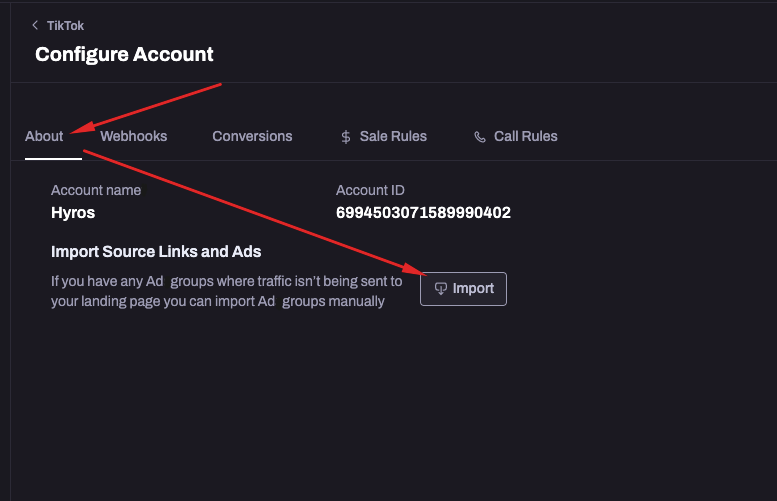
To configure this, simply go to your Tik Tok integration, click configure and click “Import” inside the “About” tab as shown in this example:
Once you have confirmed the integration, you can proceed to the next step in the initial setup process.
Twitter
Please follow this guide to track any call to action links on your Twitter Ads:
Video Guide:
Please copy the Hyros Tracking Parameter here and place it at the end of your call to action links with the ad group ID attached in front of the “=” symbol: ?twt_id=
This completes the setup for Twitter.
———————————————–
Written Setup Guide
It is important to take into account Twitter does not allow editing Tweets at the Ad level, mainly because their categories are organized in a different way than in other ad platforms and instead of using a Campaign > AdGroup> Ad hierarchy Twitter uses Campaign > AdGroup and then 4 independent categories depending on which ad you want to release (Targeting Criteria, Promoted Accounts, Promoted tweets, Media Creatives). Our team is actively working to find the best way to integrate Twitter ads at the AdLevel (or equivalent).
In order to integrate your Twitter sources with Hyros, new Ads have to be configured so we can edit their destination link and include the necessary tracking parameters, please follow the steps described below.
1- Configure and draft the campaign and ad group you want to advertise. Please do not publish it right away because you will not be able to add or adjust our tracking parameter after publishing.
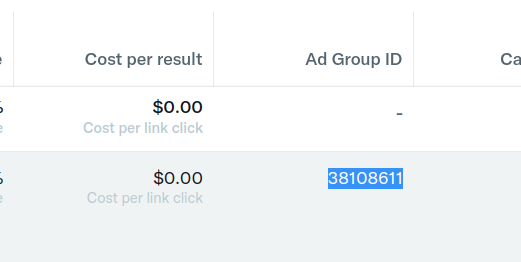
2- Go to your Ad Manager and find the Ad Group that was drafted. Here you will be able to see the ad group ID, which is a details we are going use to generate the tracking parameters and identify the traffic that arrives to the page through the Tweet we want to advertise.
Then add the ad group ID to the end of our tracking parameter: ?twt_id=
In this case, if the ad group ID is “38108611” then the full tracking parameter you will need to copy is ?twt_id=38108611.
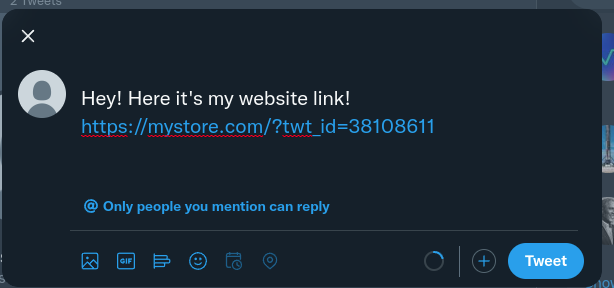
3- Proceed to create a new tweet and add the tracking parameter with the ad group ID at the end of the Call to action link.
Example:
We want to drive people to our store https://mystore.com/ , in this case the new Tweet that will be advertised must have the following link in it:https://mystore.com/?twt_id=3810861
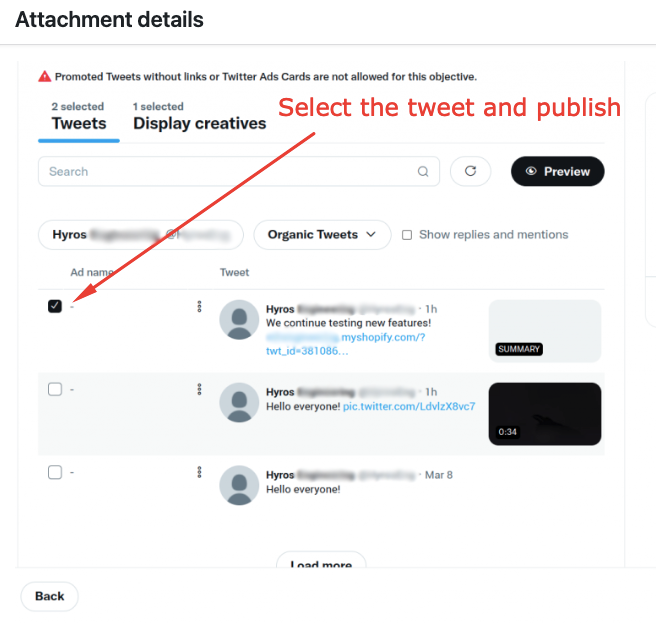
4- Once the new Tweet is created we can go back to the Campaign > Ad Group setup, select the Tweet and publish when ready.
And that’s it! This concludes Twitter ads integration! Now when a user clicks on the link in the Tweet they will be directed to the desired page, after this the installed tracking parameters will be identified by our Hyros Universal Script which will attribute the appropriate source to the event.
Misc Ad Platforms
Please see below for a list of all other ad platforms that we do NOT have a direct integration with yet. We can still track these using manual source UTM parameters:
AdRoll
AdRoll Tracking Parameter (This is an updated version, please use the full set of parameters below instead of the one shown in the video): ?sl=[ADROLL:CAMPAIGN_NAME]&htrafficsource=AdRoll
To add the URL parameter above, just go to your ad library and select all ads. Then add the Hyros tracking parameter directly at the end of the “Destination URL” and click “apply all ads” as shown here:
If you have other UTMs already at the end of the link, you can add the Hyros tracking parameter at the end of those UTMs with an “&” symbol instead of a “?”:
Also please note depending on the ad type, you may not have a “Destination URL” field but instead see a “UTM Parameters” field. You can add the parameters here in exactly the same way as shown above. However do NOT place utms in more than one place.
Reddit
Video Guide:
Reddit Ad Tracking Parameter (This is an updated version, please use the full set of parameters below instead of the one shown in the video above):
Taboola Tracking Parameter (This is an updated version, please use the full set of parameters below instead of the one shown in the video above):
?sl={campaign_name}&htrafficsource=Taboola
MGID
In order to track MGID ads please follow the steps below.
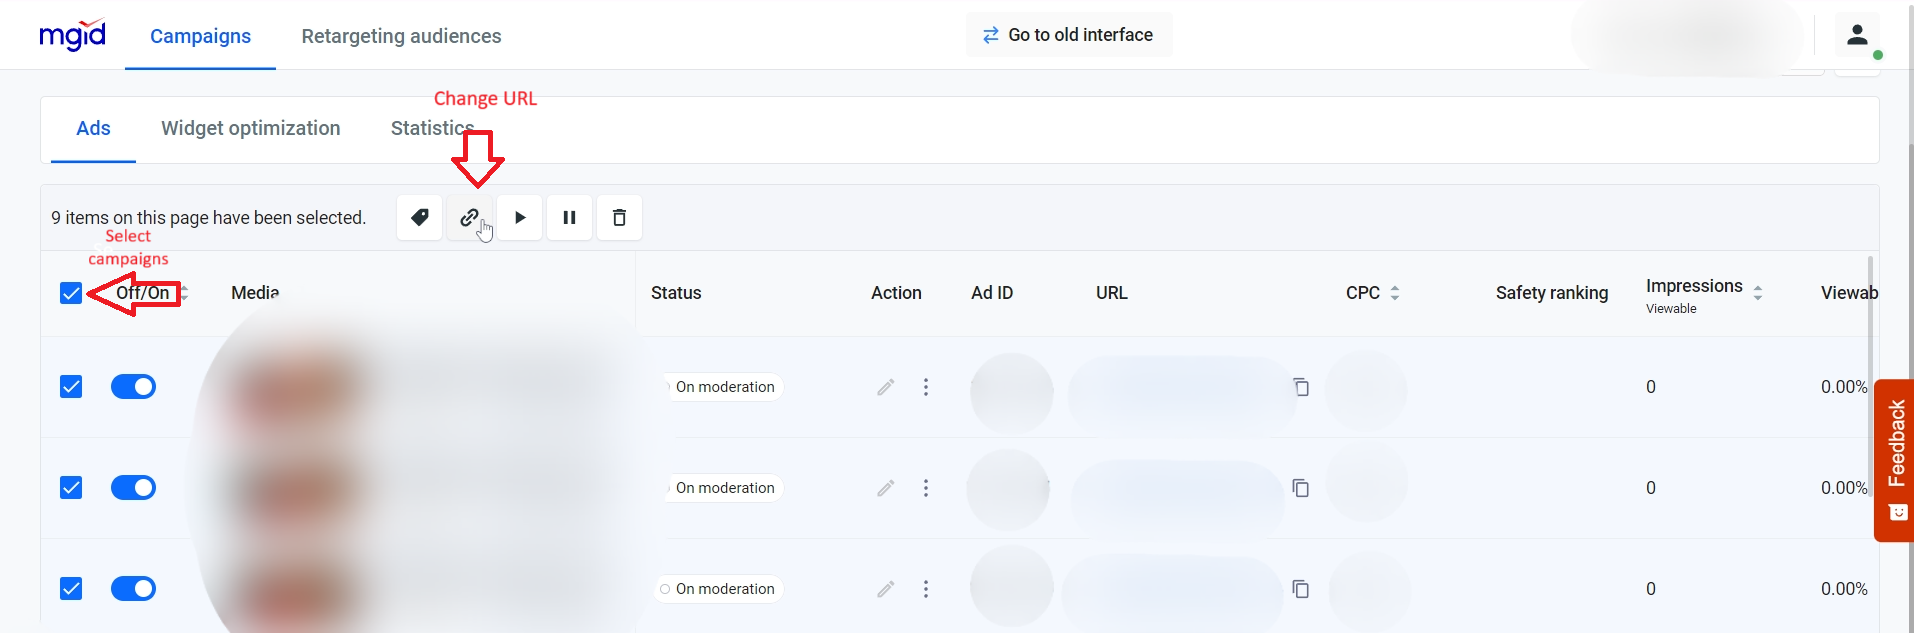
Access your MGID account and navigate to Campaigns -> Ads
Select your ads and click on the Change URL icon
Add your Ad URL in the field and paste the following Hyros tracking parameter at the end of the URL: ?sl=AD_NAME&htrafficsource=MGID. The final URL should look as such: www.mysite.com?sl=AD_NAME&htrafficsource=MGID
Keep in mind the word palced after ?sl= does not have to be necessarily you Ad name, it can be basically any value that will make it easier for you to know exactly what source the lead clicked.
Don’t see your ad source?
If you do not see your source inside this guide, you can track any misc ad source by simply adding ?sl=youradsourcename to the end of the URL of any of your ad links.
This would create a source in this case named “@youradsourcename”. Just adjust whatever comes after ?sl= to change the name of your source.
Step 3 : Setting Up Your Email and Organic Traffic
Tracking Specific Organic Links or Pages
This option to track using manual source parameters is very useful when we want to track specific links or pages.
To track any organic source simply add a manual source link parameter with ?el= followed by the name of the source you would like to track to the end of a URL.
HYROS will then create a source based on the name you used in that parameter and begin attributing clicks and sales to it.
Individual Source Link Tracking
To track specific traffic sources just change the text that comes after “=”
For example www.hyros.com?el=pinterestpost1. This will create a source automatically named “@pinterestpost1”.
For example, if you create 3 sources using this method such as “pinterestpost1”, “pinterestpost2” and “pinterestpost3” then when you load up a report you will be able to see how much traffic is coming in via each post. This can be useful for tracking the performance of individual links and pages.
Organizing Your Sources
We also recommend using our extra UTM parameters to automatically allow you to add these new organic sources into specific traffic sources, inside of Hyros.
Although this is an optional step, it allows you to better organize and segment your data later based on this information, without having to manually adjust any sources later.
To do this, simply add the following UTM parameter at the end of ?el=yoursource, separated by an & symbol:
htrafficsource=yourtrafficsourcename
So in an example where we are tracking three separate Pinterest links, instead of just using ?el=pinterestpost1, then ?el=pinterestpost2 etc, we would instead use the following UTM parameters for each link:
As you can see, although in this case we are creating 3 different sources by changing the name slightly after el=, we are including them within the same traffic source, which will allow us to group them together by traffic source in the reports later in a more automated way.
For more details on some specific setups, follow the use case examples below.
If you want to track traffic accessing the above link, we need to append the custom parameter “el” at the end of the URL link and we can name it whatever we want, normally a unique name to be associated with that source, for example ?el=facebook-organic-post.
Also, the same principle of adding the custom el parameter to URL links can be applied to URL links in comments, URL links in the Intro area or any links on your Facebook page.
Important: Please note that when we add the custom “el” parameter to any URL link we want to track the source, we need to make sure that the traffic is sent to a page where we have the Universal script, otherwise we will not be able to track the source of leads.
Youtube Organic
If you want to track the URL links in your youtube description videos, follow the procedure below. As an example, we have this link below https://docs.hyros.com/.
To track traffic accessing the above link, we need to append the custom parameter “el” at the end of the URL link and we can name it whatever we want, normally a unique name to be associated with that source, for example ?el=youtubeorganic.
Also, the same principle of adding the custom el parameter to URL links can be applied to URL links in comments, or any links.
Important: Please note that when we add the custom “el” parameter to any URL link we want to track the source, we need to make sure that the traffic is sent to a page where we have the Universal script, otherwise we will not be able to track the source of leads.
Instagram Organic
If you want to track bio links from Instagram, follow these next steps.
Let’s assume our link is www.google.com. If you want to track the traffic source using this link, you need to add the el parameter and you can name it for example instagram.
The final URL link will be www.google.com?el=instagram.
Tracking Email Traffic
To track leads accessing your email links, follow these guidelines.
In order to track specific links from your email campaigns, you need to add the he= and el= parameters at the end of the URL link.
Depending on your email software that you are using, you need to copy the email parameter that is associated:
Select the parameter associated with your autoresponder
Important: Please note that when we add the email parameter to any URL link we want to track the source, we need to make sure that the traffic is sent to a page where we have the Universal script, otherwise we will not be able to track the source of leads.
Should I Add the Above Parameters Globally or On Each Link?
Some email softwares will allow you to add parameters globally, which will be a much easier setup. However this entirely depends on the email software you are using.
One specific example where we can add the parameter el=email globally would be Klaviyo.
For more details follow the example below:
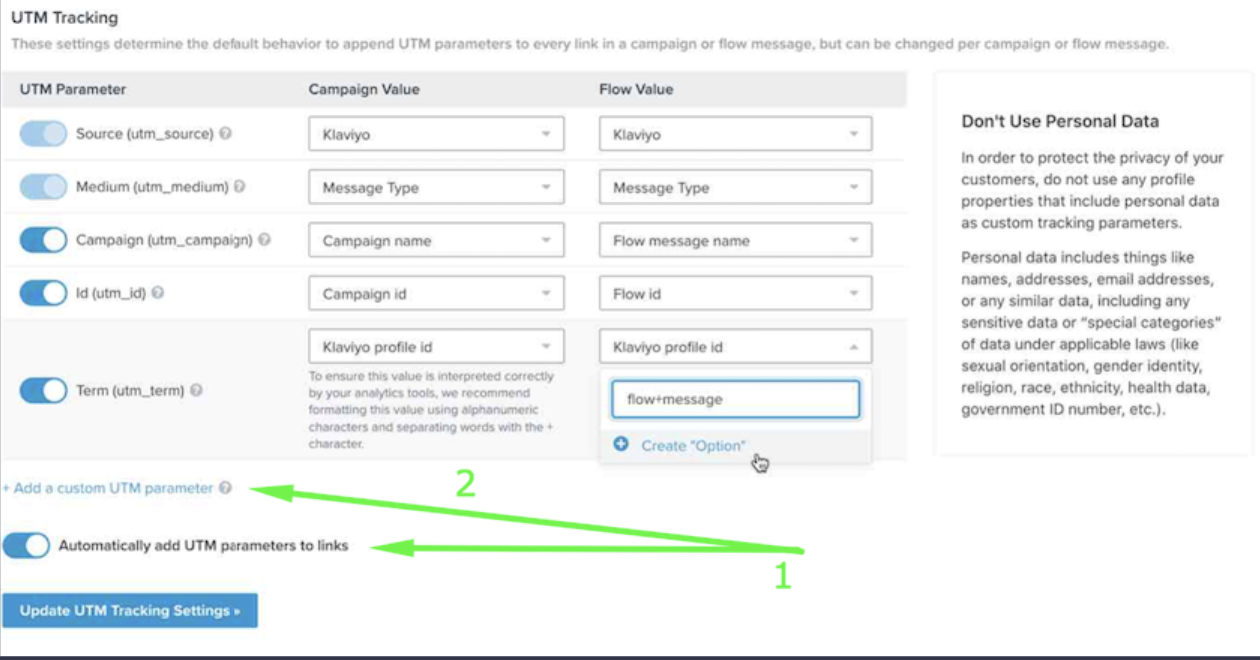
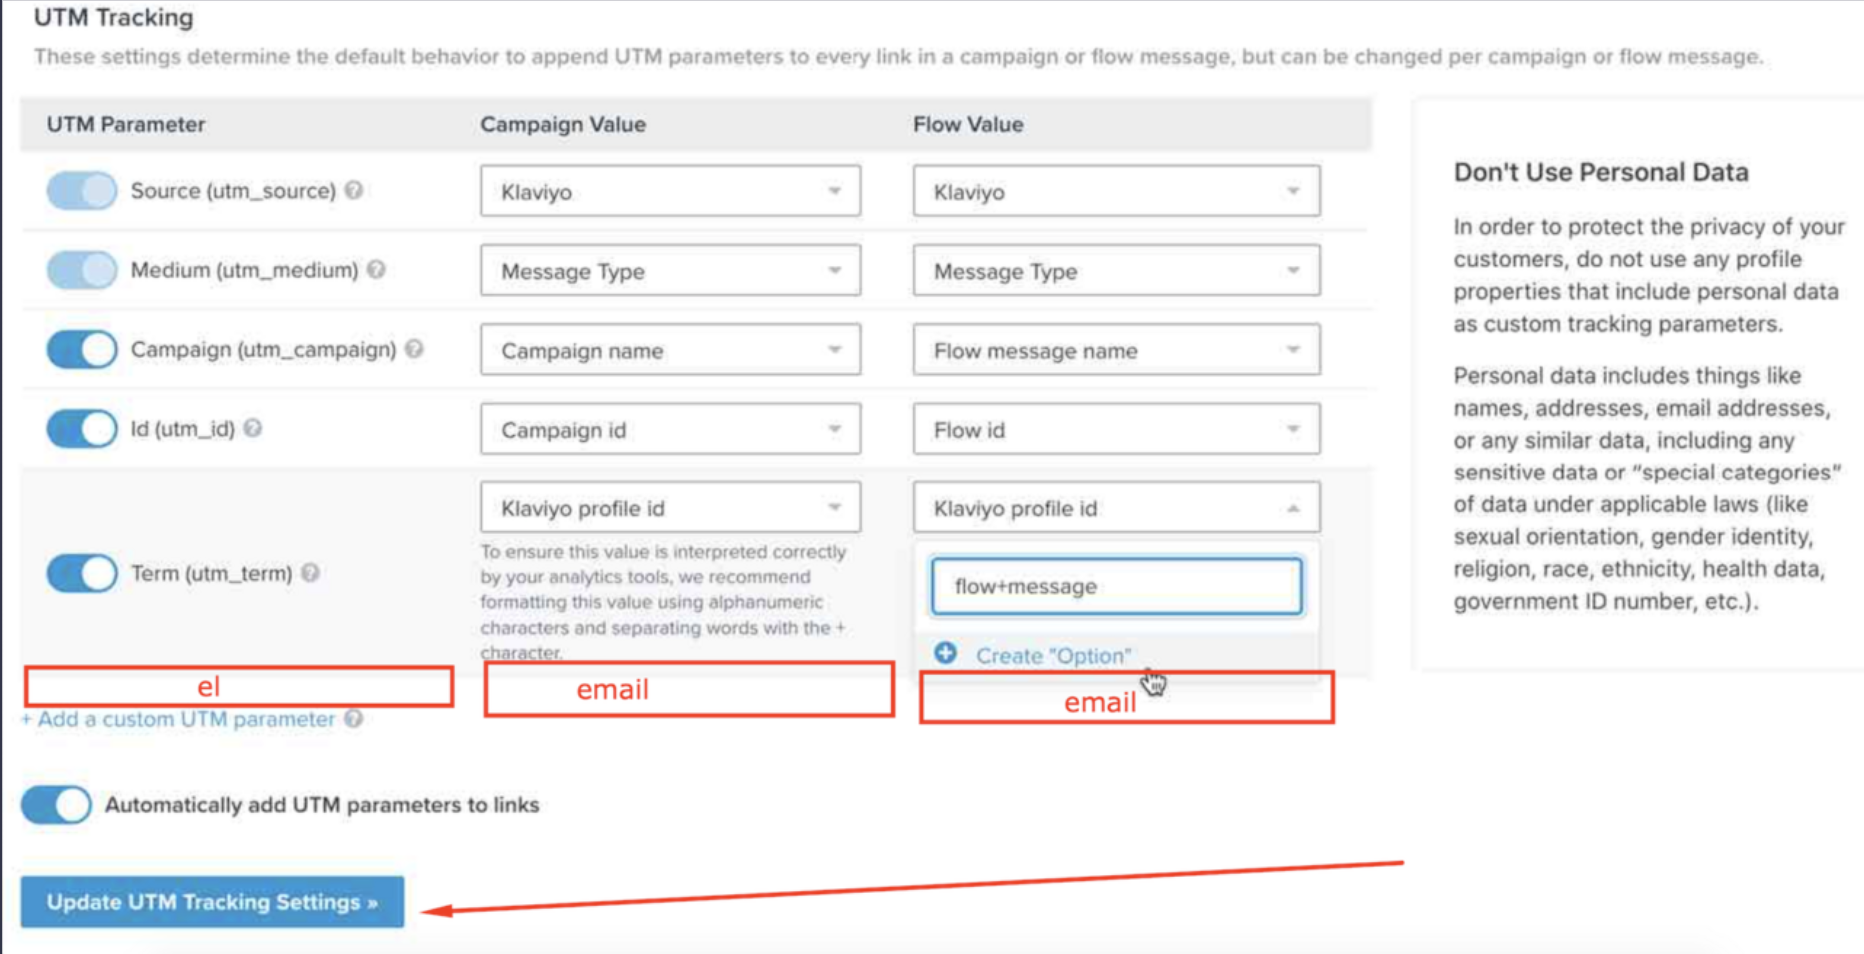
Klaviyo
In order to track email campaigns, you need to add the parameters mentioned above for Klaviyo.
Take in mind if you choose to add these parameters globally, then you can NOT add the he={{ email }} part, because this is a dynamic parameter which Klaviyo does not allow to be added universally.
To understand the difference between the 2 email parameters we use, please see the below section. In some cases he={{ email }} may not be important, especially if you have a business with a short average customer journey, in which case this can be ignored and you can just add the el=email parameter globally:
How Does Email Tracking Work? “he=” vs “el=”
As you may have noticed, we have 2 different parameters which perform different functions that we advise adding to your email links:
For example, for Klaviyo these are: ?he={{ email }}&el=email
Which can be split up into:
“he={{ email }}” AND
“el=email”
he={{ email }}: This will generate the email of the lead and add it to the landing page URL once they click on the link inside the email. So if the lead “example@hyros.com” clicks on your email link it will generate a URL such as “www.yourlandingpage.com?he=example@hyros.com“.
We use this to ensure we track that original email on the rare occasions that the lead comes back to your funnel via an email link with totally different data points on a different device and then uses a different email.
So if they came back later in these circumstances and purchased using Hyros@Purchaseemail.com, we would be able to still track that email and therefore the purchase back to “example@hyros.com” and therefore continue their tracking profile from the original ad click.
This particular section is mostly useful for businesses with longer journeys. For e-commerce businesses or any business with a very short journey, this parameter is not necessary for accurate tracking.
el=email: This is the part of the parameter that actually creates the source. When we read the “el=email” parameter in the URL we will create an “@email” tag.
You can also change the name after “el=” to change the tag, so for example “el=emailcampaign1” will create a source named “@emailcampaign1”. This is useful if you want to track sales back to a specific email campaign.
Adding the Tracking Parameters Universally
If you want to simply add our parameter to the universal settings, please take in mind that this will track ALL emails back to the same source, such as “@email”. If you want to attribute sales and other events back to specific email campaigns, we suggest adding the recommend parameters to each specific link in your email campaigns.
However if you are happy with tracking globally, then please just copy this Tracking parameter instead: el=email
This then needs to be added in the UTM tracking section inside Klaviyo. In order to access this section, these steps needs to be followed:
Click your account name in the top-right corner of your screen
In the dropdown menu, select Account
Click Settings, then open the UTM Tracking tab
Once inside, you need to turn it on and click on add custom UTM parameters:
A row will show up and you need to add the el parameter and on the next 2 fields we need to add email:
Tracking Other Random Sources Using URL Rules
URL rules are an easy create way to create sources passively if the visiting URLs have distinct words or snippets in the URL.
How URL Rules Work
When URL rules are set HYROS will watch the URL that people visit from. Many times our users already have UTMs on these URL or they have distinct text in them.
An example is if you already have set up UTM parameters on your ORGANIC traffic. For example, a visit from youtube may have ?utm=youtube in the URL of the visitor.
You can create a rule that will allow HYROS to spot these unique terms and if spotted attribute a source to the visitor. This allows you to easily plug large tracking gaps from organic and easy to miss sources.
How To Create a URL Rule
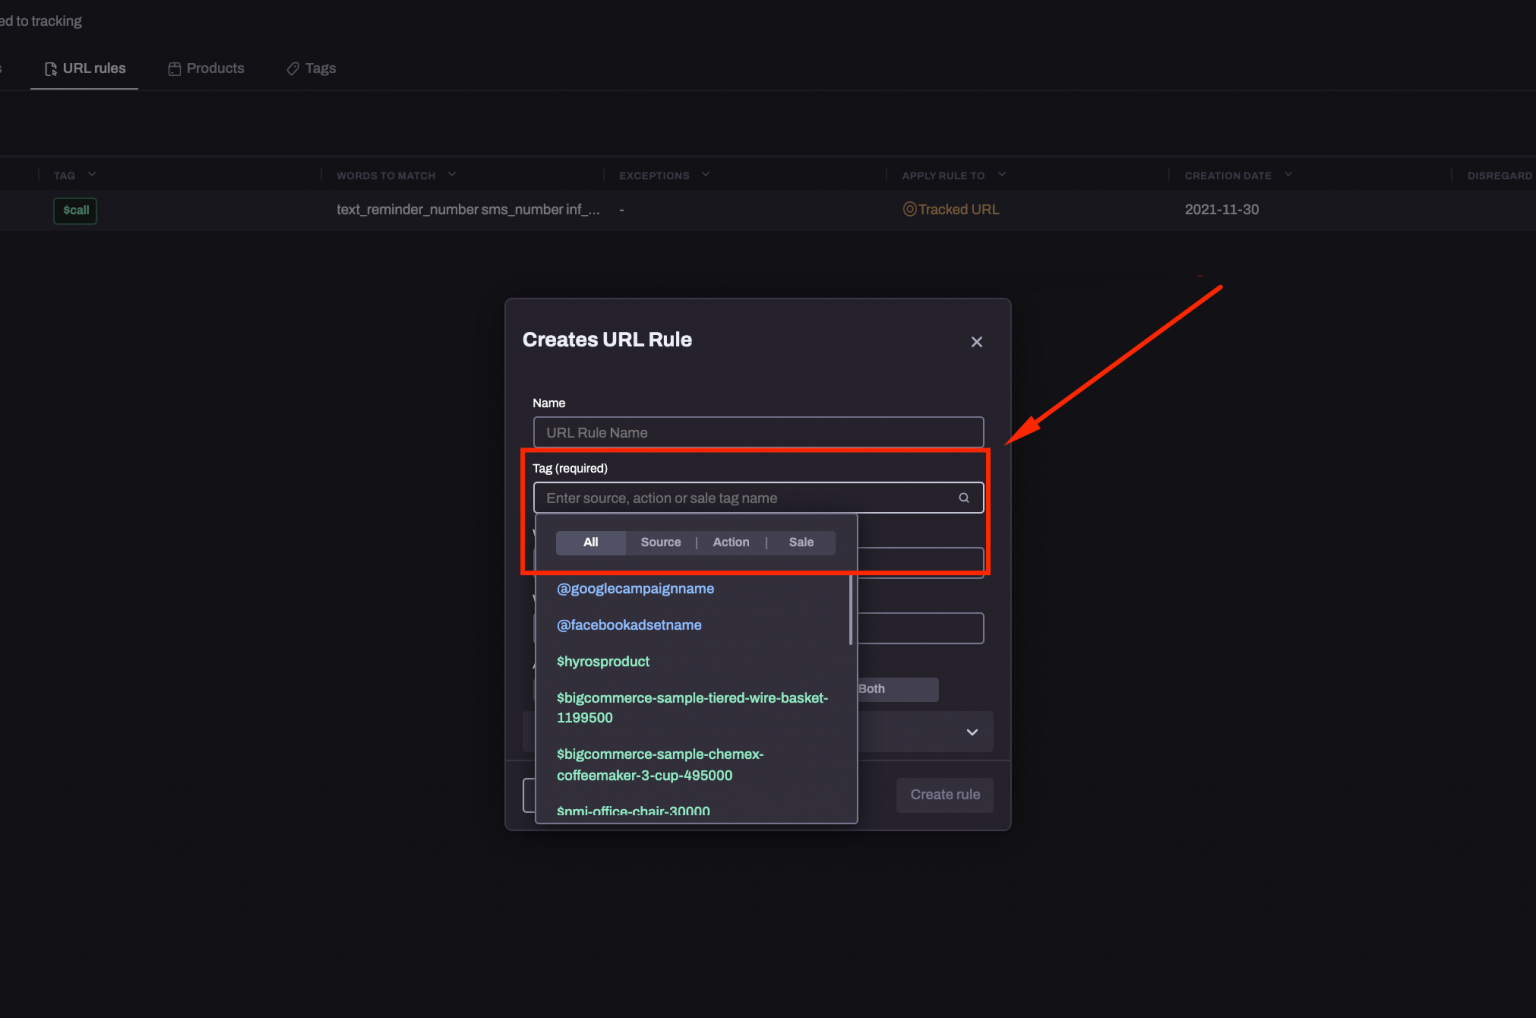
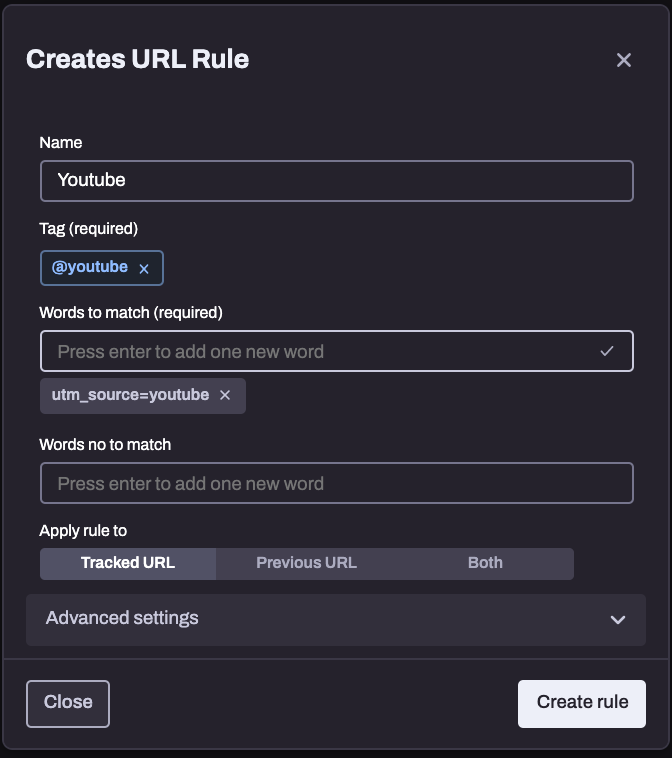
Creating URL rules is easy. To do so just go TRACKING ->URL RULES. Then click “+ Add new rule”
Next, inside the tag field set the tag to something that will indicate the source, action or sale you would like to track. Make sure you use the correct tag type depending on what you would like to track, to read more about how are tags work please see the guide HERE.
After, adjust the name to whatever you like. For example, if you are using a URL rule to track youtube organic traffic, change the name to “Youtube” or “Youtube_Organic”.
Then analyze the text of visiting URLs you would like to track. For example, if you are sending traffic with a URL that looks like this “yoursite.com?utm_source=youtube” you will want to use the unique text “utm_source=youtube”.
Paste this text in the “Words to match” form. Here is an example:
Use-Case Examples
Please see the dropdown below and follow the exact steps to track some of the more commonly found external sources:
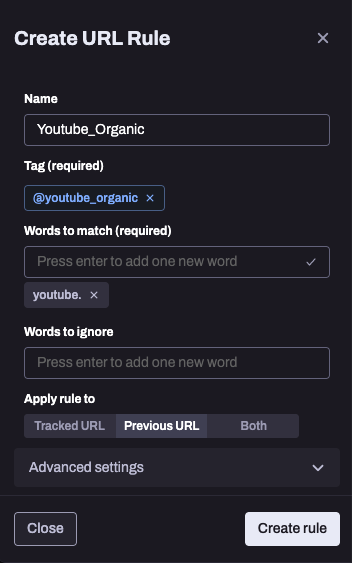
Youtube
Name = “Youtube_Organic”
Tag = “@youtube_organic”
Words to match = “youtube.”
Words to ignore = Empty
Apply rule to = “previous URL”
Advanced Settings = No changes
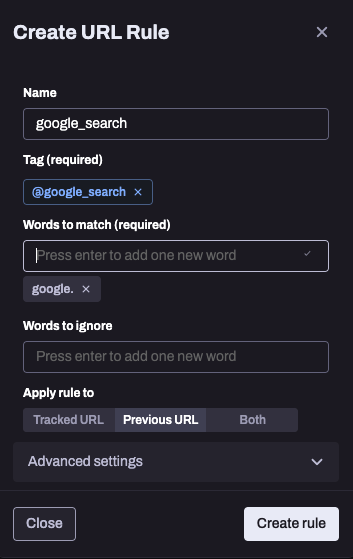
Google Search
Name = “google_search”
Tag = “@google_search”
Words to match = “google.”
Words to ignore = Empty
Apply rule to = “previous URL”
Advanced Settings = No changes
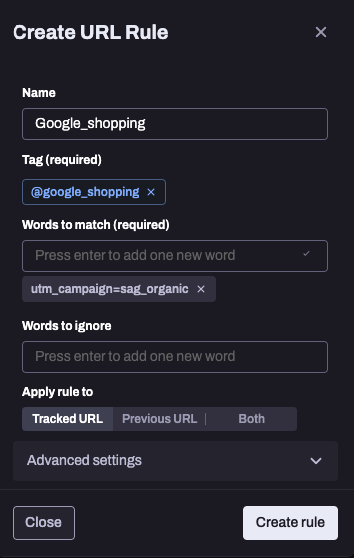
Google Organic Shop (for Shopify Stores)
Name = “google_shopping”
Tag = “@google_shopping”
Words to match = “utm_campaign=sag_organic”
Words to ignore = Empty
Apply rule to = “tracked URL”
Advanced Settings = No changes
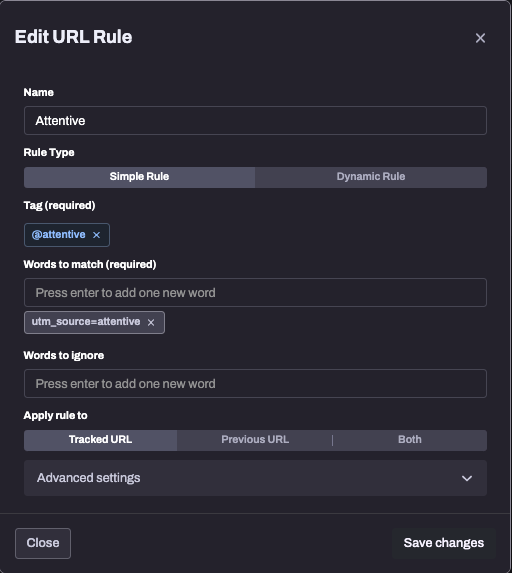
Attentive (SMS campaign)
Name = “Attentive”
Rule Type = “Simple Rule”
Tag = “@attentive”
Words to match = “utm_source=attentive”
Words to ignore = Empty
Apply rule to = “tracked URL”
Advanced Settings = No changes
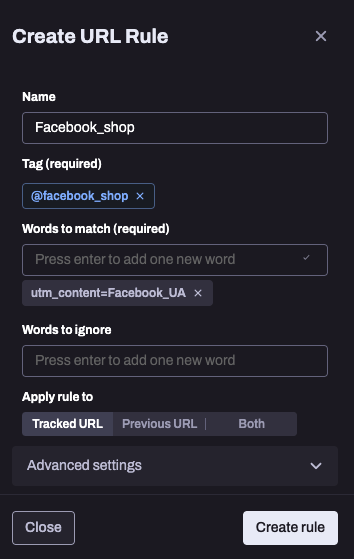
Facebook Shopping
Name = “Facebook_shop”
Tag = “@Facebook_shop”
Words to match = “utm_campaign=Facebook_UA”
Words to ignore = Empty
Apply rule to = “tracked URL”
Advanced Settings = No changes
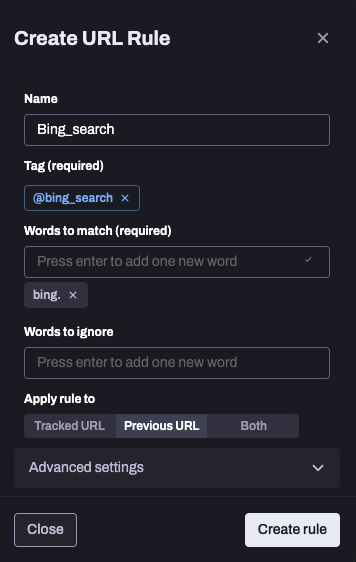
Bing Search
Name = “Bing_search”
Tag = “@bing_search”
Words to match = “bing.”
Words to ignore = Empty
Apply rule to = “previous URL”
Advanced Settings = No changes
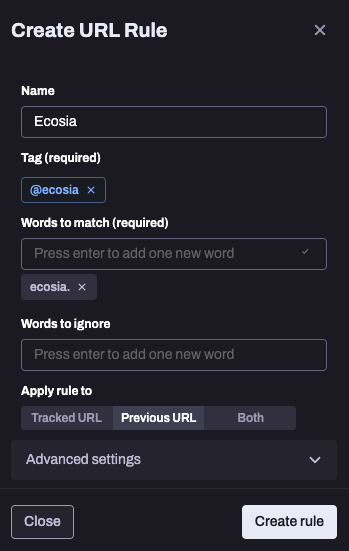
Ecosia Search
Name = “ecosia”
Tag = “@ecosia”
Words to match = “ecosia.”
Words to ignore = Empty
Apply rule to = “previous URL”
Advanced Settings = No changes
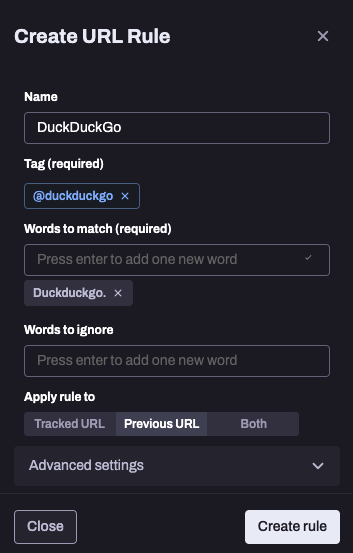
DuckDuckGo
Name = “DuckDuckGo”
Tag = “@Duckduckgo”
Words to match = “Duckduckgo.”
Words to ignore = Empty
Apply rule to = “previous URL”
Advanced Settings = No changes
Step 4 : Setting Up The Funnel
Notes: Although Google Tag Manager may work, it is more likely to be blacklisted by anti-tracking browsers etc, and as it is a third party script it may incur other additional unforeseen errors with tracking. Therefore for the most accurate tracking, we recommend adding the scripts directly inside the header of each page.
It is optimal to place the scripts at the VERY top of your load order.
Tracking Your Entire Funnel
To track your entire funnel simply place the UNIVERSAL code below in the header of every page of the funnel.
It is critical that you get this form on
-Any opts ins
-Any sales page
-Any opt in thank you pages
-Any checkout pages
IF your page is an opt in run this test
Opt into your opt in and ensure your email appears in your Hyros account under REPORTING → LEADS
Ensure that you have done this for all pages and opt ins you wish to track then move to STEP 3: Tracking Customer Payments.
Unbounce
Important! Please note that there are two types of Unbounce pages: AMP pages and non-AMP pages. At this time, Unbounce does not allow AMP pages to be tracked, only Non-AMP pages. If you are not sure what type of pages you are using, please contact your dedicated onboarding agent or inApp support.
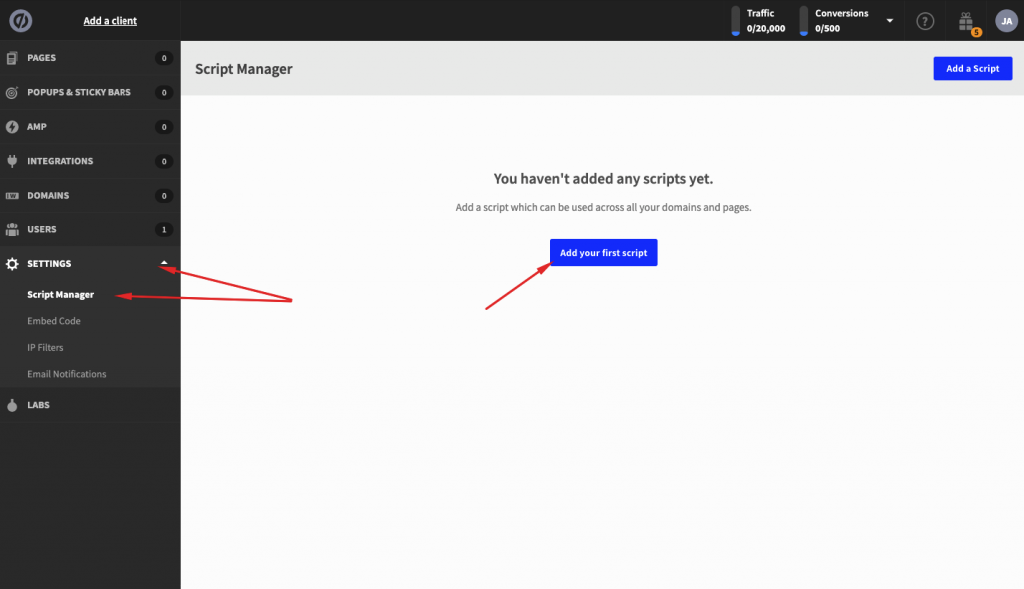
Tracking your Unbounce pages is simple. First, copy the universal script here:
Next, inside your Unbounce account, go to settings -> scrip manager and click “add your first-script”:
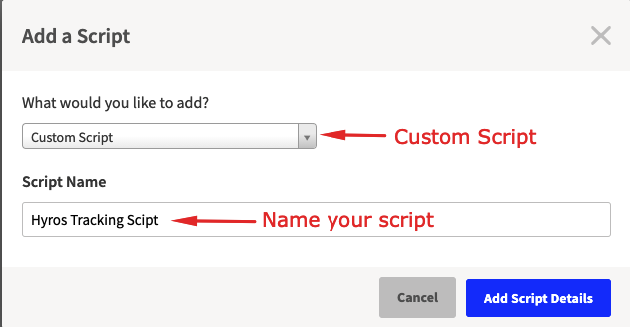
Then select “Custom Script” and name your script:
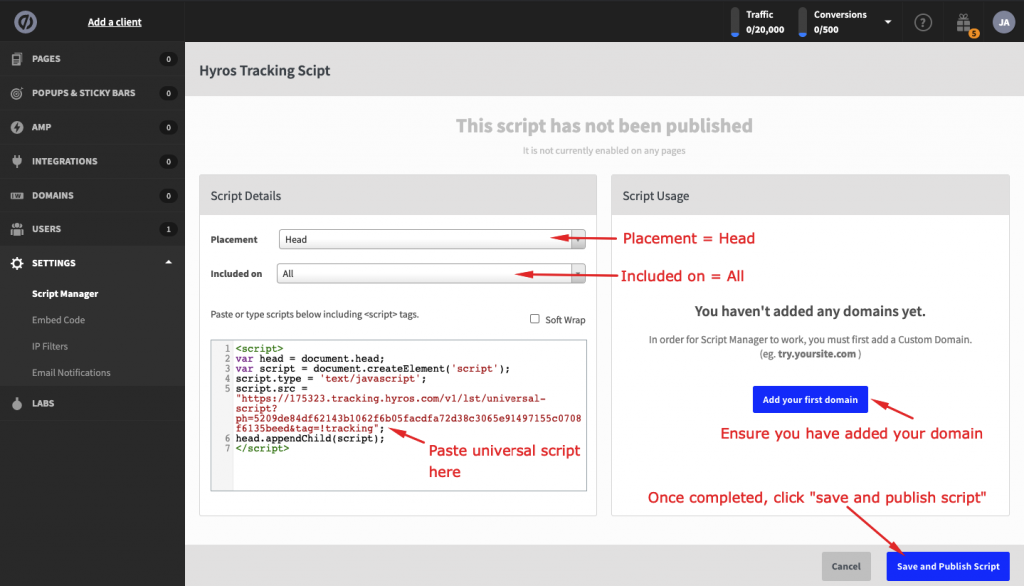
Finally, configure the script exactly as shown below:
Test your pages to make sure they are tracking correctly by using the testing app.
Once you’re done you can move to STEP 3: Tracking Customer Payments.
Uscreen
Written Guide:
1. First, please copy the universal script below:
2. Inside Uscreen, go to “customization”. Then on your live theme, go to “advanced” and select “code snippet” from the lockdown.
3. Paste the universal script inside the “Head Code Snippet” and click save.
4. Test your pages to make sure they are tracking correctly by using the testing app.
Once you’re done you can move to STEP 3: Tracking Customer Payments.
Kajabi Site Pages
If you have Kajabi site pages, please copy the universal script below, then inside Kajabi go to settings -> Site details -> Header Page scripts and paste the script -> click save as shown below:
Step 5 : Tracking Customer Payments
How HYROS Matches Customer Payments To Their Source (IMPORTANT)
How HYROS Payment Tracking Works
This video will explain how we track a customer conversion all the way back to the original ad click.
After the initial opt in HYROS will watch visitors going to your checkout pages via the Universal script in the header of the checkout page.
When a visitor lands that has matches from a profile seen before, HYROS will recognize the user. If the user then checkouts out HYROS will add the sale and sale amount to the user profile.
Because the user’s full ad and click history is already attached to the profile in the system, we can match the sale to the user and original ad clicked.
Choose Your Checkout System
IMPORTANT : Do not integrate a checkout system AND a processor. It will cause the checkout system to send in a sale and then cause the processor to send in the same sale causing DUPLICATE sales. Integrate only a checkout or ONLY a processor, not both.
Authorize.net
To connect Authorize.net to Hyros follow the steps below.
Inside your Hyros integration settings, go to the Authorize.net integration HERE.
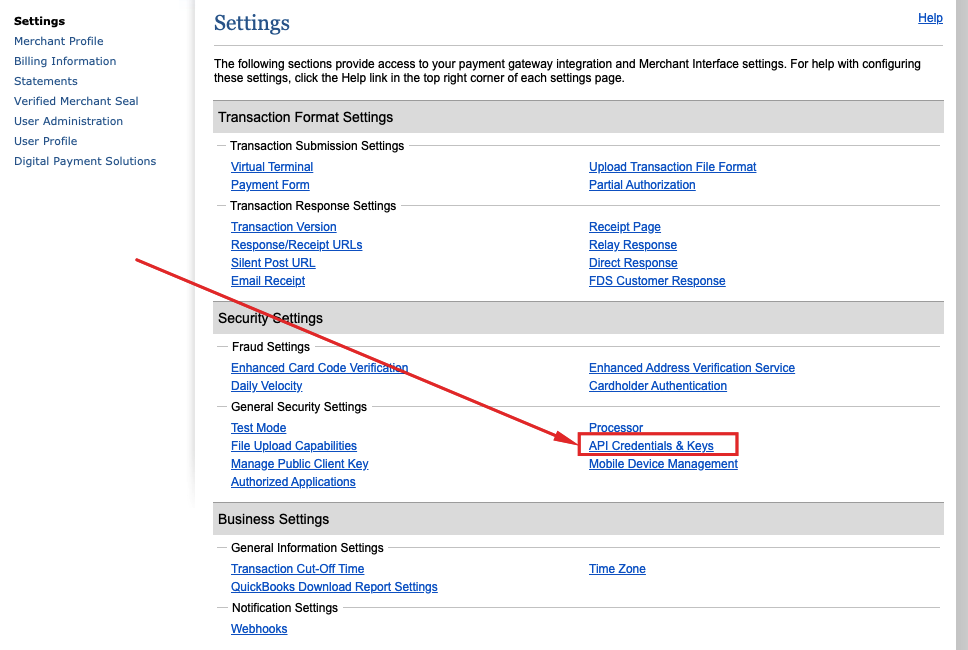
Now follow the prompts given to set up the integration in Hyros. You will need to find the following from your authorize.net account:
API Login ID
Transaction Key
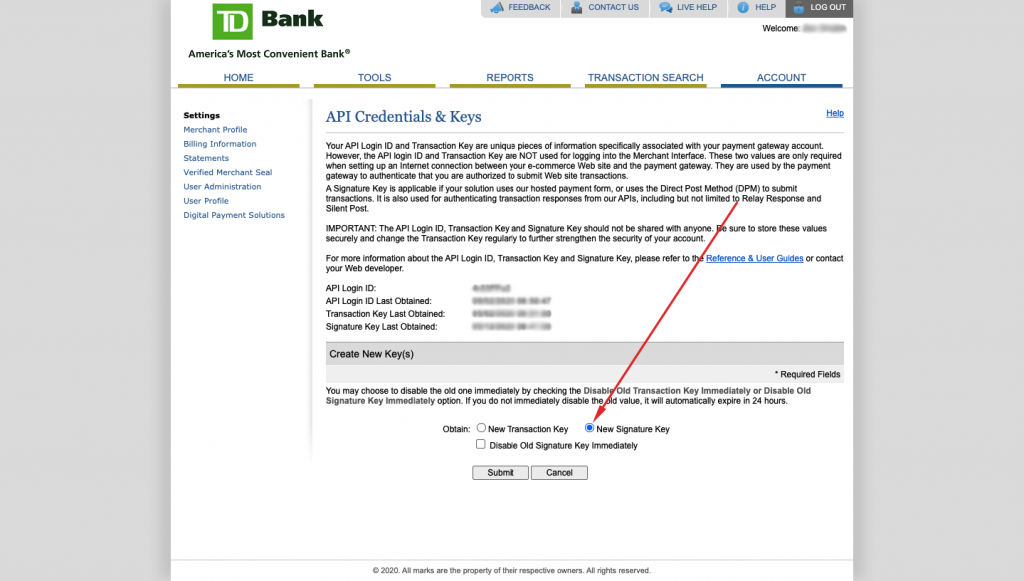
You will be able to find these inside authorize.net via “Account” -> “Settings” -> “API Credentials & Keys”
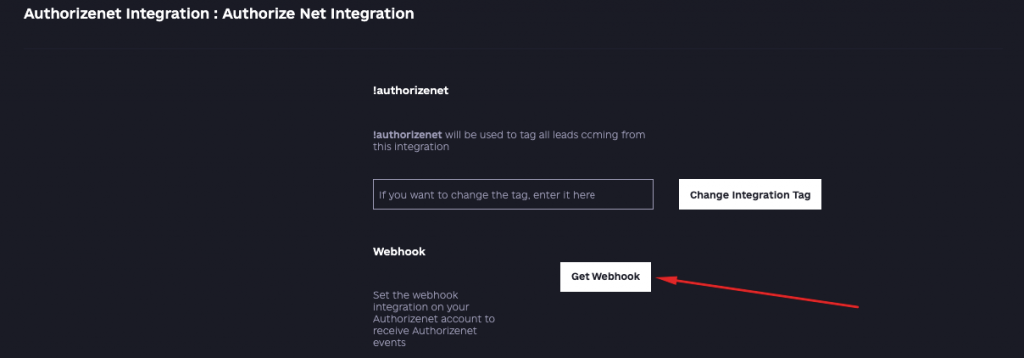
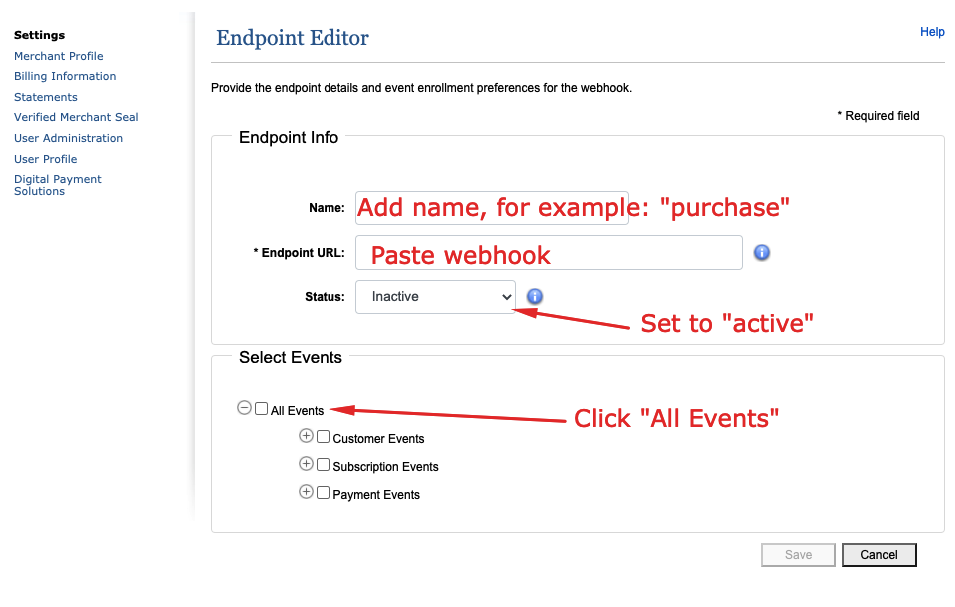
Once you have successfully created the integration inside Hyros, select “get webhook” and copy the webhook.
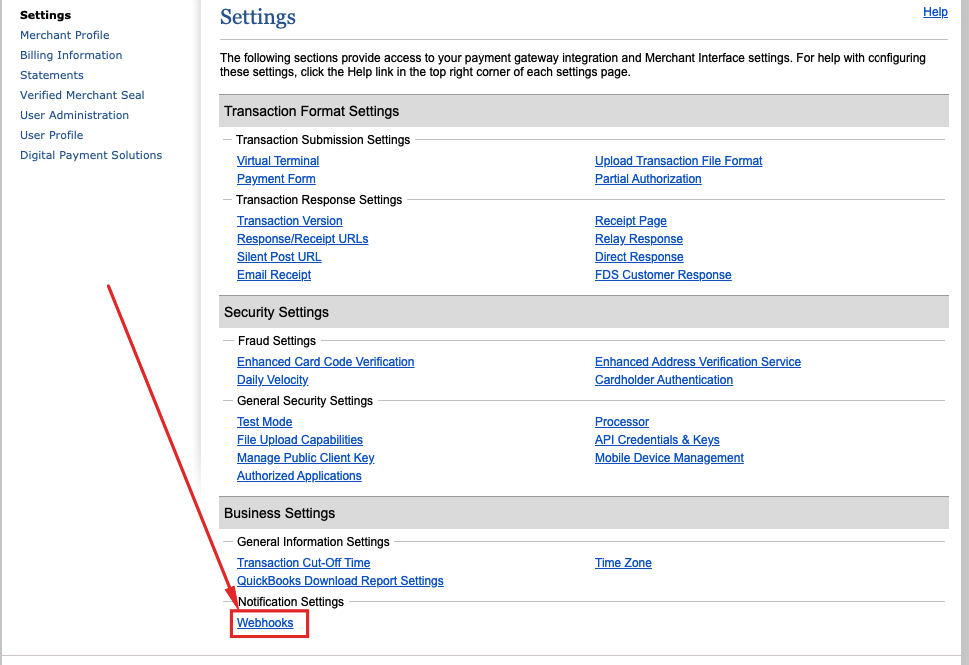
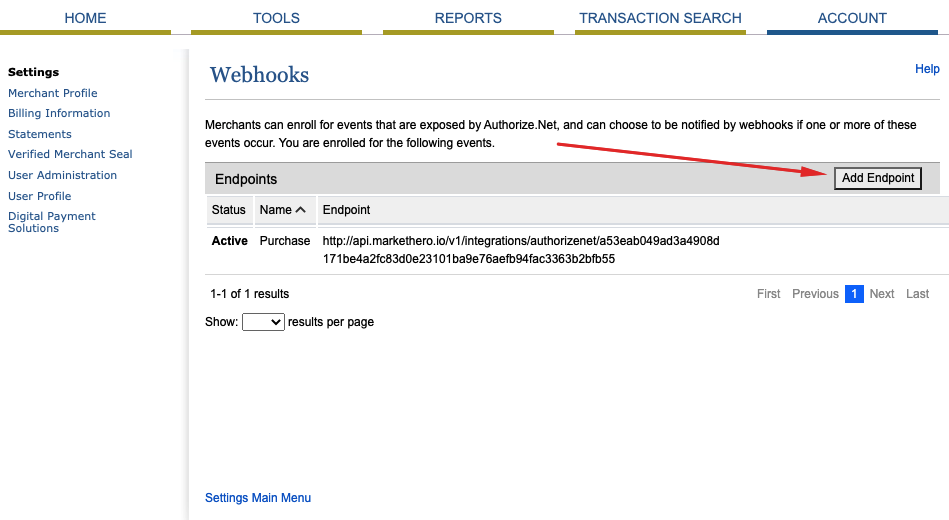
Go back to your Authorize.net account. Select “settings” -> “webhooks” -> “Add endpoint”:
Then fill in the endpoint information as shown below:
TROUBLESHOOTING
When saving the webhook if the error message appears “Error: please integrate a signature key from the merchant/partner interface to create a new webhook”:
Go to settings -> API Credentials & Keys as shown above and then create a new Signature key here:
Sales not coming into Hyros?
Please make sure sales are coming into authorize.net with an email attached, otherwise the sale will not be sent into Hyros.
If you’re still having issues, please contact in-app support.
BEST Clickfunnels Tracking Set Up (CF Pro Tools)
If you are using Clickfunnels checkouts with Paypal the most accurate way to track is using CF Pro Tools.
This set up is a bit complicated and best for advanced users who need to track long term ROI and rebills.
We suggest most users stick with the basic Clickfunnels set ups found below in this checkout section, especially when first learning to use HYROS.
———————-
Why? Paypal and checkout emails are routinely different and this will break tracking. This is fixed by our basic integration with Clickfunnels above BUT rebills will not be tracked.
CF Pro Tools enables HYROS to receive the Paypal AND checkout email of the user. This allows us to tracking recurring charges.
If you are NOT using Paypal OR a processor other than Stripe just use the Clickfunnels+STRIPE ONLY integration above.
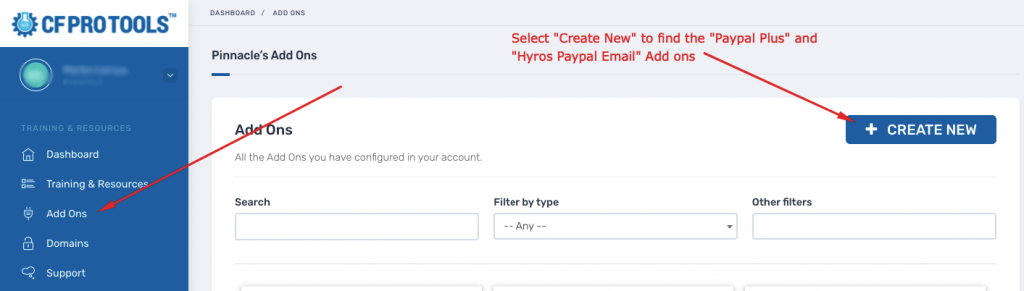
Step 2 : Once signed up, set up your checkouts to use the PAYPAL PLUS add on. For both add-ons you need to create a new add on in your Pro Tools account here:
Set this up on ALL of your checkouts that you wish to track. This must be done correctly by following the detailed guides inside CF Pro Tools.
Step 3 : Then set up the HYROS PAYPAL EMAIL add on.
You will find the Hyros Paypal Email add on exactly as shown above. Follow the steps exactly as laid out in CF Pro Tools.
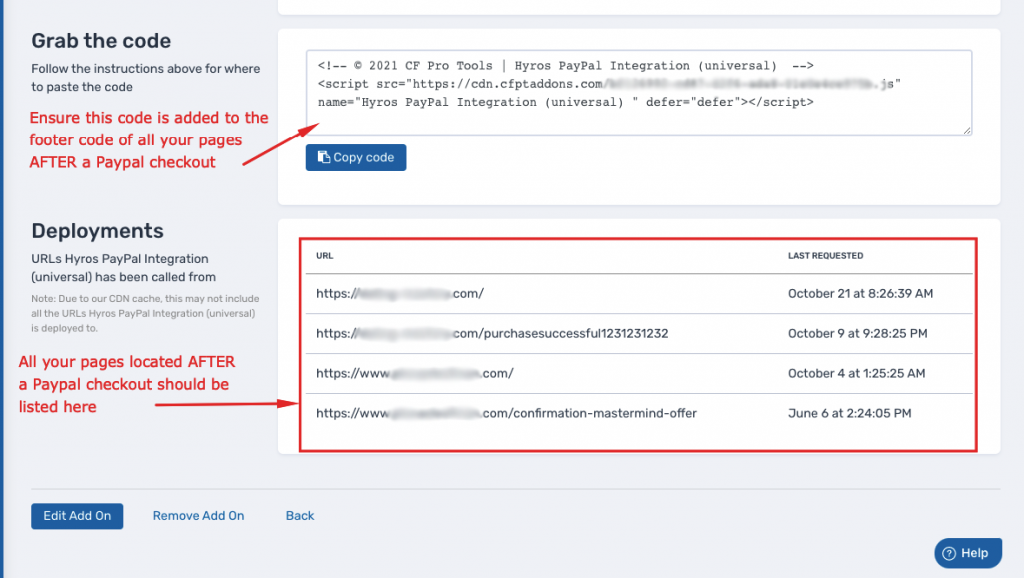
Place the code generated inside of CF Pro on the thank you page of your checkout (or the first upsale/page the user sees) according to the instructions on Cf Pro Tools. At the time of writing this documentation you need to place the code inside the footer code inside the “tracking script” section here:
You should see all the pages directly after a checkout shown under this list inside the CF Pro Tools “Hyros Paypal Email” Add-on once you have added the code:
Step 4 : Copy the Universal script below:
Ensure you have Pasted the script in your funnel settings as shown here:
Step 5 : Once this is set up integrate with your payment processor and Paypal in your integration area HERE.
Clickfunnel With Stripe ONLY (No Paypal)
Clickfunnels With Stripe ONLY Video Guide
Here is the code need for this integration
This completes the setup for Clickfunnels.
———————————————–
Written Guide
1- Take the UNIVERSAL code above and place it in the header of the funnel or checkout page you wish to track
You should see
1- A sale with your test checkout email, click the email.
If there is no sale check that you placed the Clickfunnels webhook correctly.
2- Under IP you should see an IP address.
If there is no IP confirm that you placed the UNIVERSAL code in the header of the funnel or checkout page.
IF you see both, move to the next step.
Clickfunnels 2.0 with Stripe ONLY (no Paypal)
Step 1 – Integrate with Stripe
Click HERE to integrate with Stripe (or go to settings -> integrations -> Stripe inside of your Hyros account).
Then simply create a new integration and follow the prompts to connect with your Stripe account.
Step 2 – Add the Hyros Universal Script to your Site (If you haven’t already done so)
You may have already done this in a previous step, but to ensure all pages are tracked please make sure you follow the steps below to add the Hyros Universal Script to your site pages:
Copy the Hyros Universal Script here:
Then go to the “site” tab in the navigation bar, click on “overview” and click the edit icon.
Scroll down and paste the universal script in the head code field and click “update page”.
This will track ALL of your pages created in Clickfunnels.
Now you have complete the setup, move on to the next step.
Clickfunnels 2.0 with Paypal and other processors
Step 1 – Create the Integration in Hyros
1. Go to settings -> integrations -> click on Clickfunnels 2.0 to access the integration settings. You can also click HERE.
2. Click “Create New Integration” and name it whatever you like.
3. Once the integration is complete, go inside your integration by clicking the “edit” icon
4. Once inside, click “get webhook”
5. Inside CF 2.0, go settings -> webhooks -> click “Add new endpoint”
6. Paste the webhook under the URL field, add any name you like and then select the event types order.updated, order.created, contact.created
Save the endpoint and move on to the next step.
Step 2 – Add the Hyros Universal Script to your Site (If you haven’t already done so)
You may have already done this in a previous step, but to ensure all pages are tracked please make sure you follow the steps below to add the Hyros Universal Script to your site pages:
Copy the Hyros Universal Script here:
Then go to the “site” tab in the navigation bar, click on “overview” and click the edit icon.
Scroll down and paste the universal script in the head code field and click “update page”.
This will track ALL of your pages created in Clickfunnels.
Now you have complete the setup, move on to the next step.
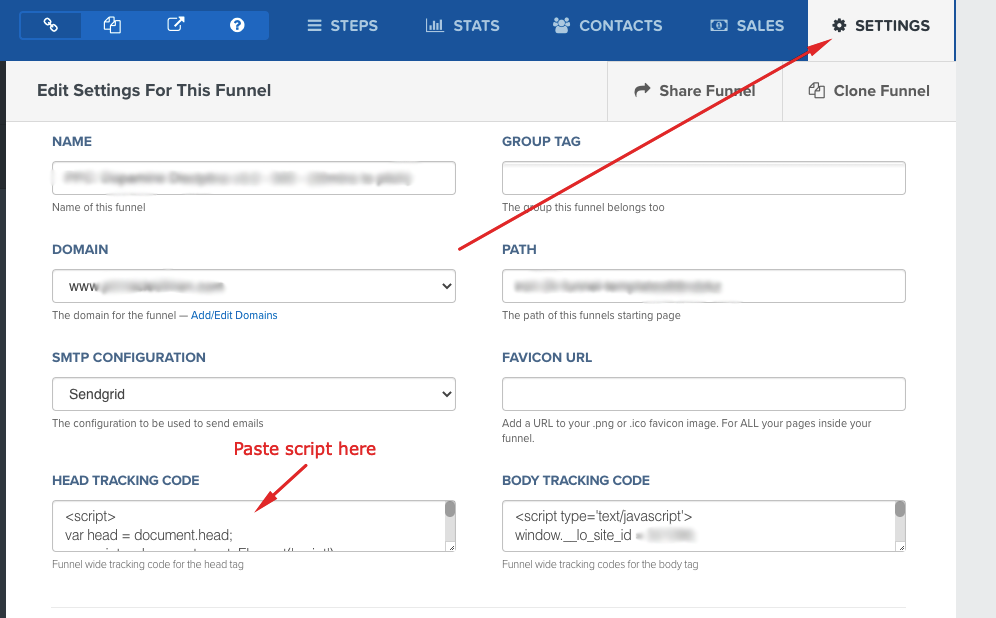
Funnelish for Clickfunnels
Step 1 – Track your Funnelish pages
For your site pages, first copy the Hyros Universal Script here:
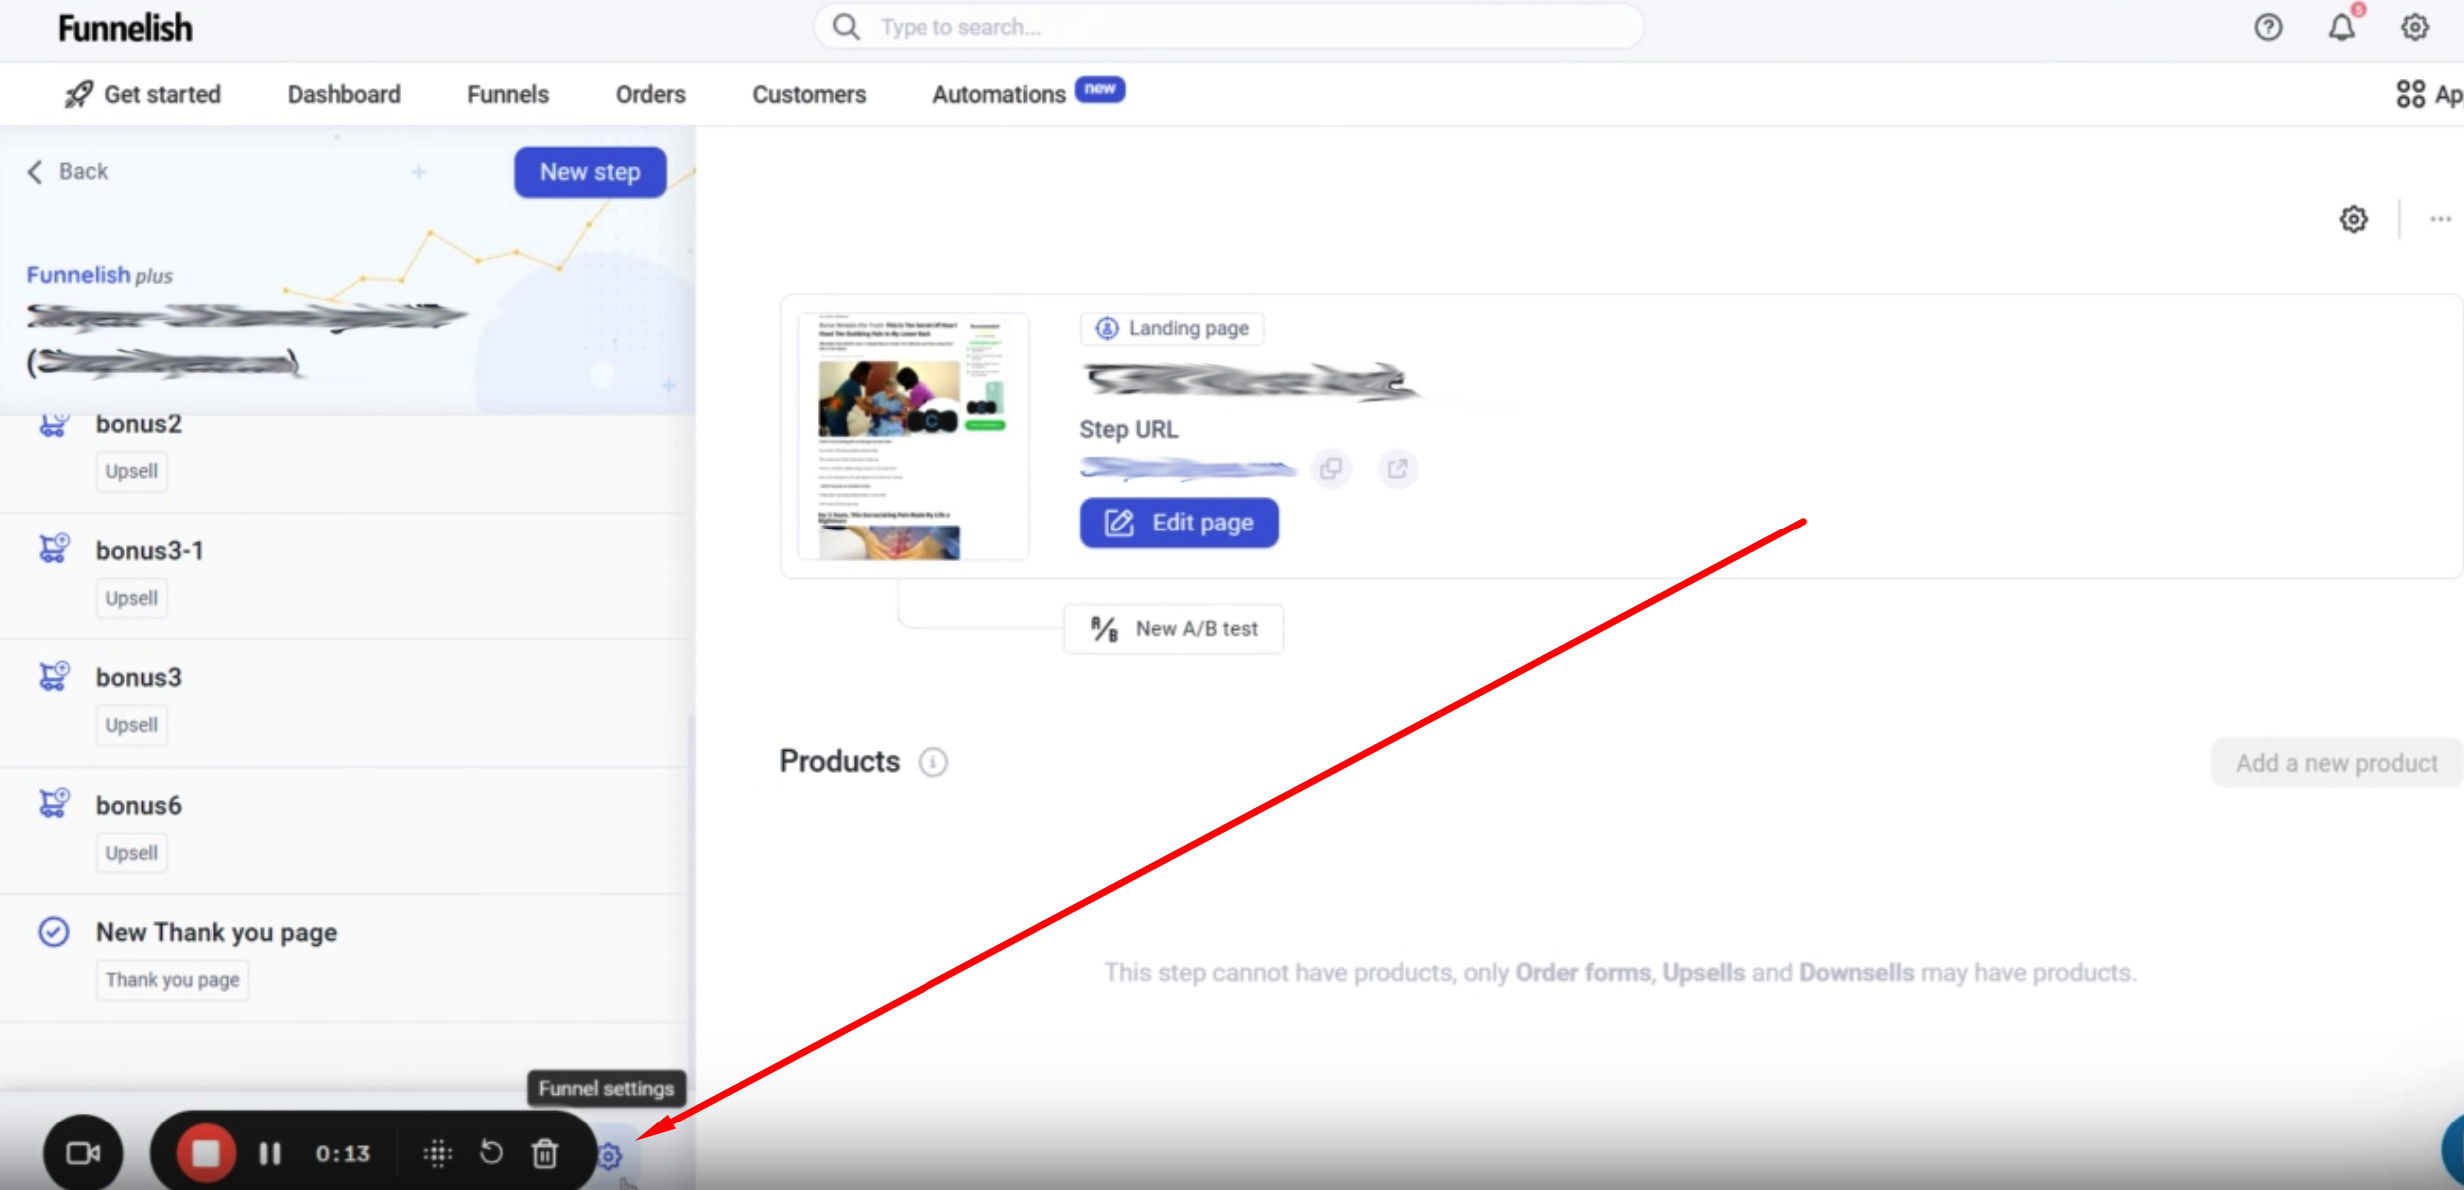
Once you have copied the code, go to your funnel you want to track and click Settings:
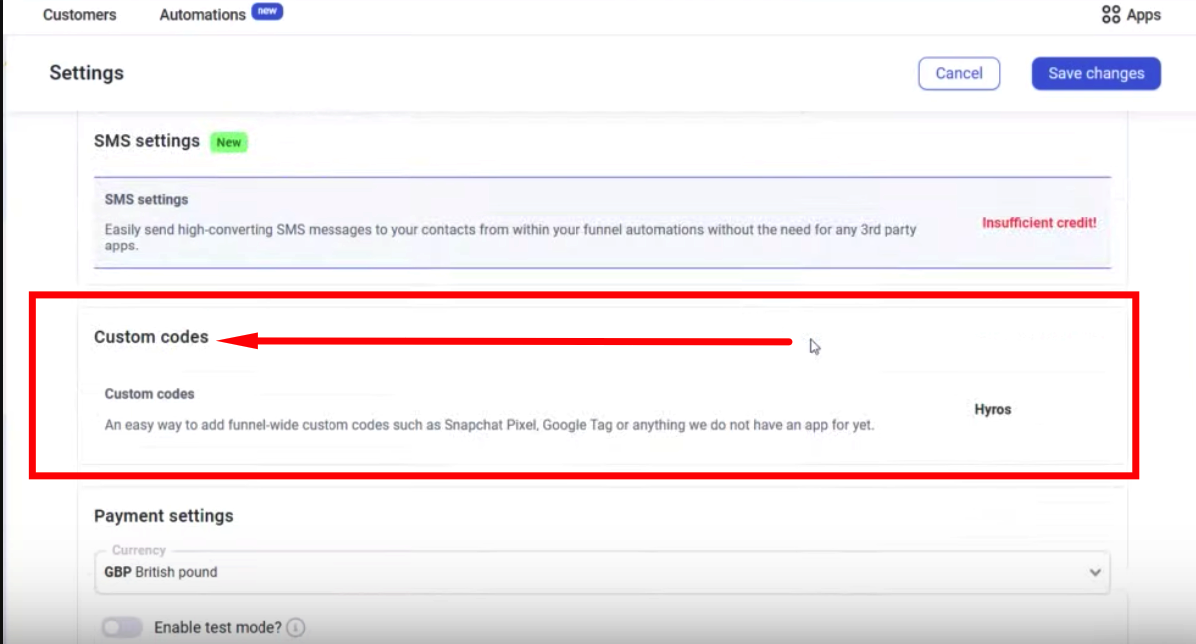
Inside Settings go to Custom codes and then create a new custome code.
Inside Settings go to Custom codes and then create a new custome code.
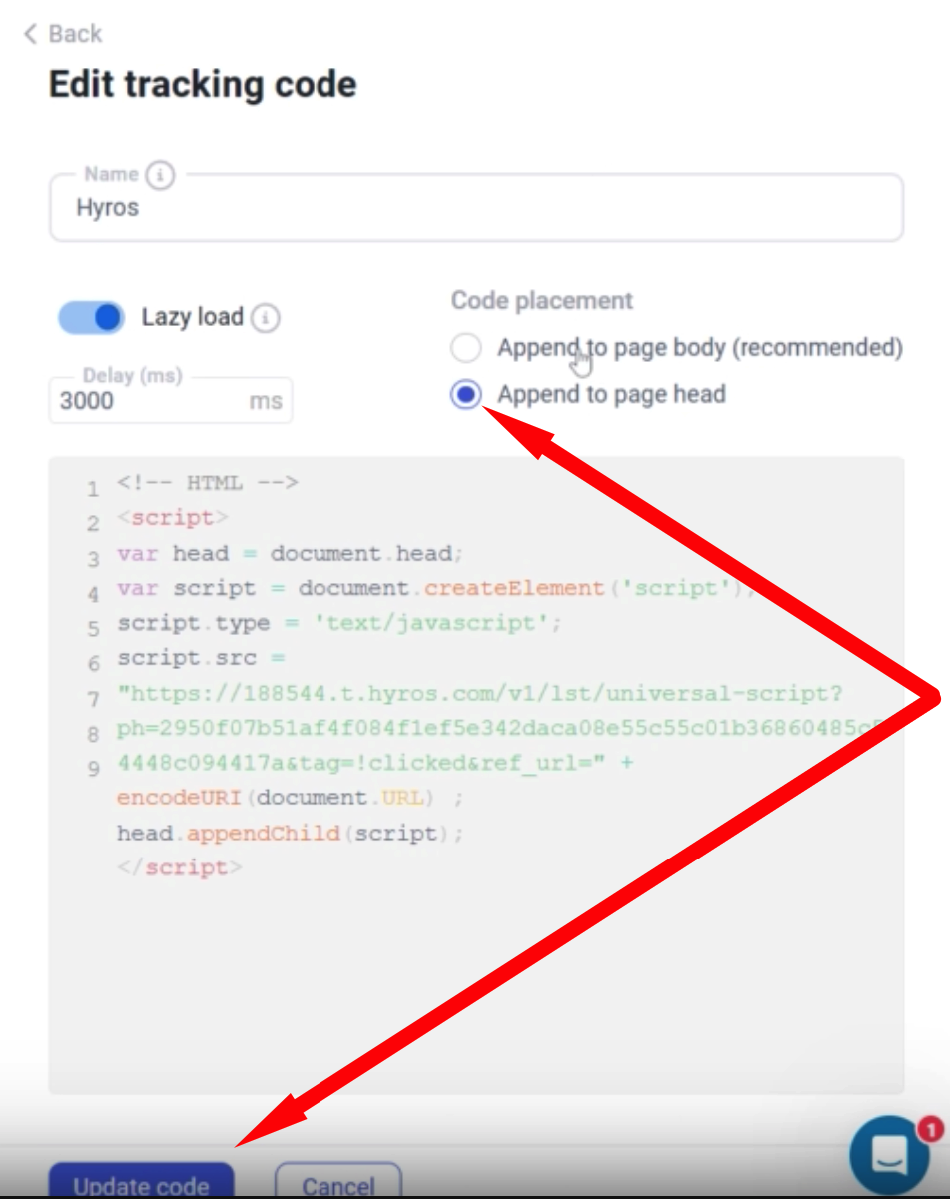
The last step is to paste the Universal script you copied earlier and make sure you select Append to page head as described below
Step 2 – Create your Funnelish automation
Funnelish have a direct integration on their platform, please follow their guide here.
Hubspot
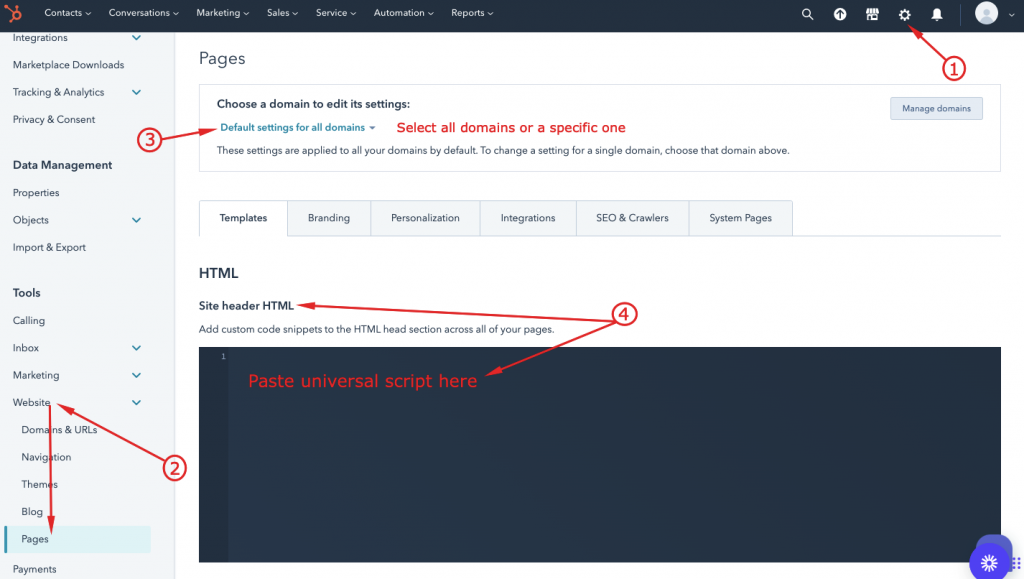
Step 1 – Track your Hubspot pages
For your site pages, first copy the Hyros Universal Script here:
Then just select the settings icon inside Hubpsot, go to “website” -> “pages”, choose which domain you would like to track and paste the universal script under the site header HTML as shown:
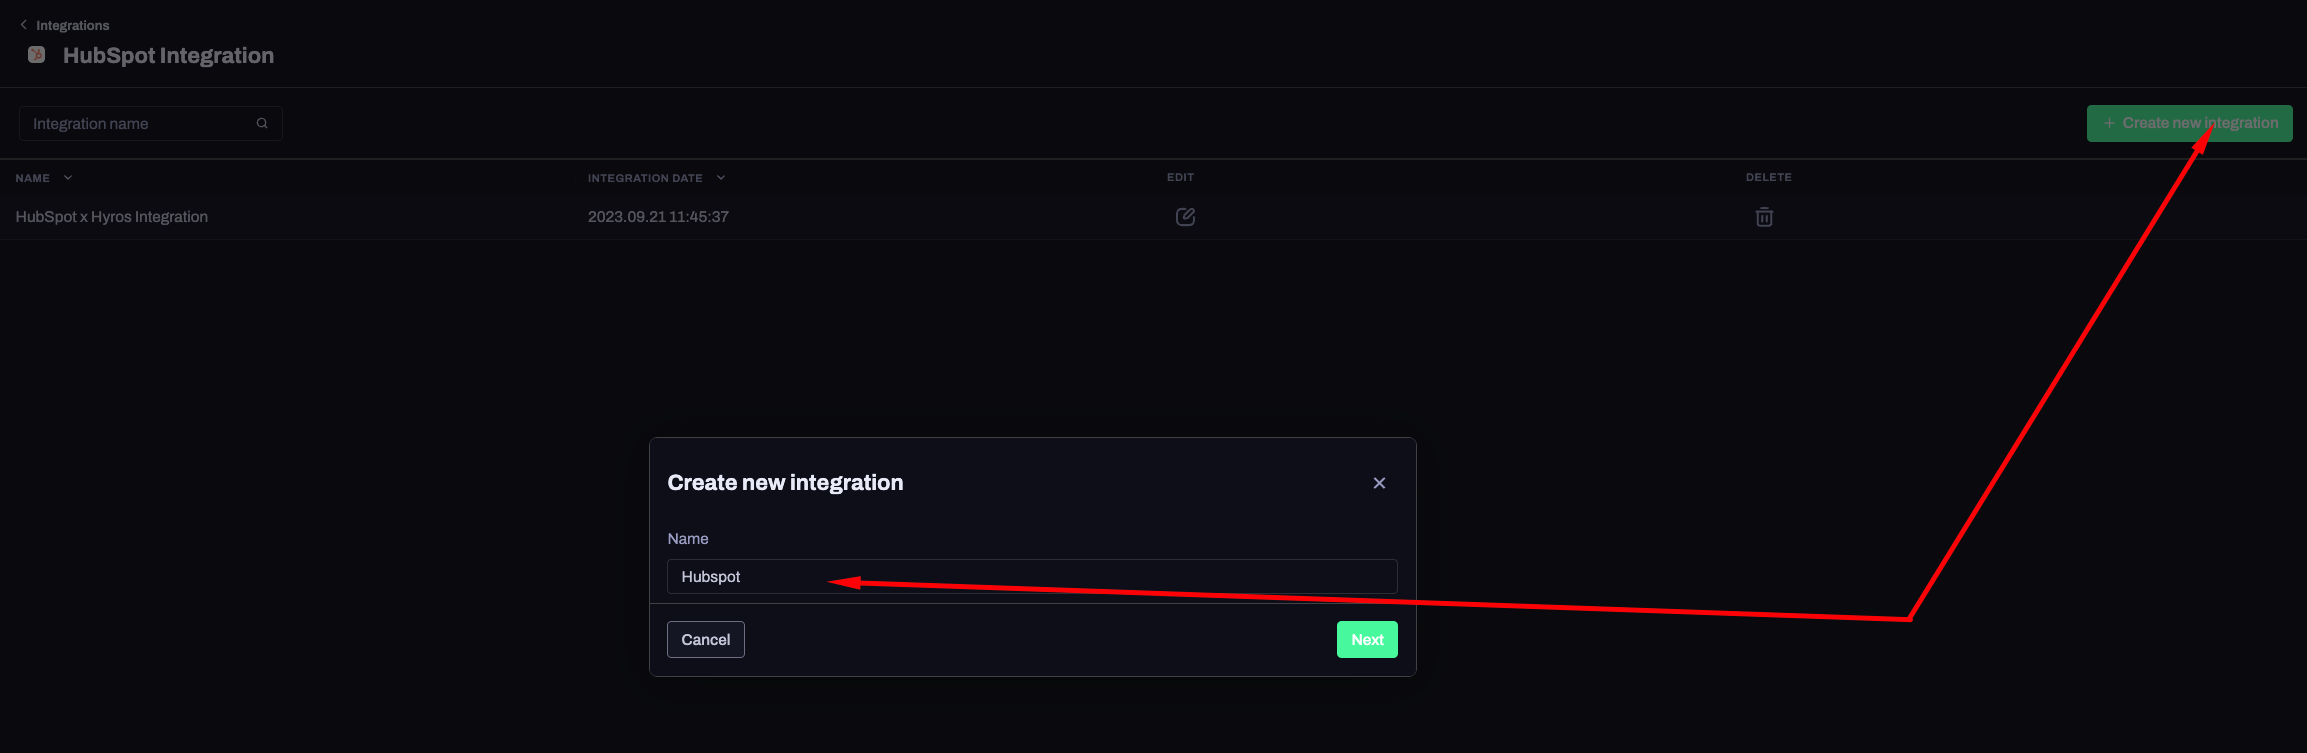
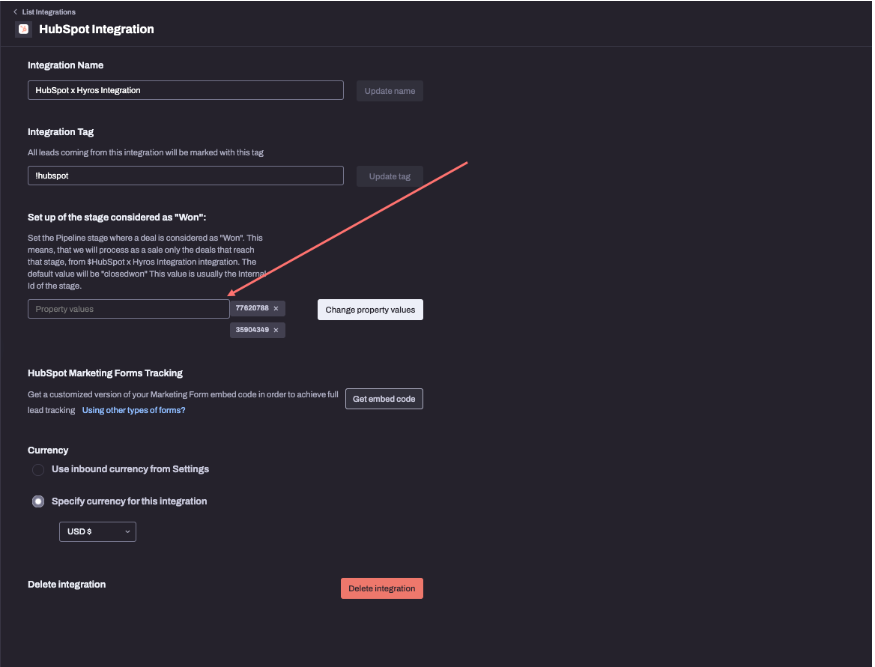
3. Create a name for the integration, such as “Hubspot”.
4. Click on Edit and scroll down to “Set up of the stage considered as Won”. Type in or select the desired stages and then Click on the “Change property values” button.
This will conclude the setup. Please move on to the next step.
Kajabi With Stripe ONLY (No Paypal)
Kajabi With Stripe ONLY Set Up Guide
Here is the code need for this integration
Written Guide
1- Copy the UNIVERSAL code above
2- Login to Kajabi and go to site settings in the lower left hand corner of your dashboard.
3- Form site setting go to Checkout setting.
4- Paste the script in the “header tracking” code form.
You should see
1- A sale with your test checkout email, click the email.
If there is no sale check your Kajabi integration.
2- Under IP you should see an IP address.
If there is no IP confirm that you placed the universal code in the checkout header in Kajabi.
IF you see both, move to the next step.
Kajabi Checkout with Paypal and Other Processors
Follow these steps to integrate Kajabi:
Go to Settings -> Integrations -> Kajabi
Inside the Kajabi Integration, click on the Create new Integration and then Add any name you want for the integration
Once the integration is created, click Edit
Copy the Webhook
Once the Webhook is copied, log into your Kajabi account, go to each individual Offer you want to track and paste the Webhook into the Activation URL and the Deactivation URL exactly as explained below:
This concludes the set up for Kajabi.
Kartra Checkout
Video Guide:
Tracking Kartra Funnel Pages:
1- Copy the Universal Script below:
2- Inside Kartra, go to my pages and find the page you would like to track. Click edit.
3 – Inside the page editor, go to settings, and inside tracking codes paste the Universal script inside the field labelled “Embed Facebook Ads Tracking Code”. Save the page.
4- Repeat this for all your kartra pages.
Tracking Sales with Kartra
WARNING: You MUST embed your checkout on a tracked page in order for sales to be tracked correctly. Please ensure that the checkout is embedded and that the page has our universal script shown above inside the <head> code of the page. If you need assistance with this please reach out to support and let us know what software you are using to host that page.
3. Create a name for the integration, such as “NMI” then click “save integration”.
4. Get your secret key from NMI and paste it in the field inside your integration, to do this just follow these steps:
Log into your NMI account.
Click “My Settings”.
Click “Security Keys”.
Scroll down and click “Add a New Private Security Key”.
Name the new “Key Name”, select the user from “Username Associated with key” and check the “API” option.
Copy the Security Key you just created and go back to your NMI integration inside Hyros, paste it under Private Security Key from your account and click Save integration.
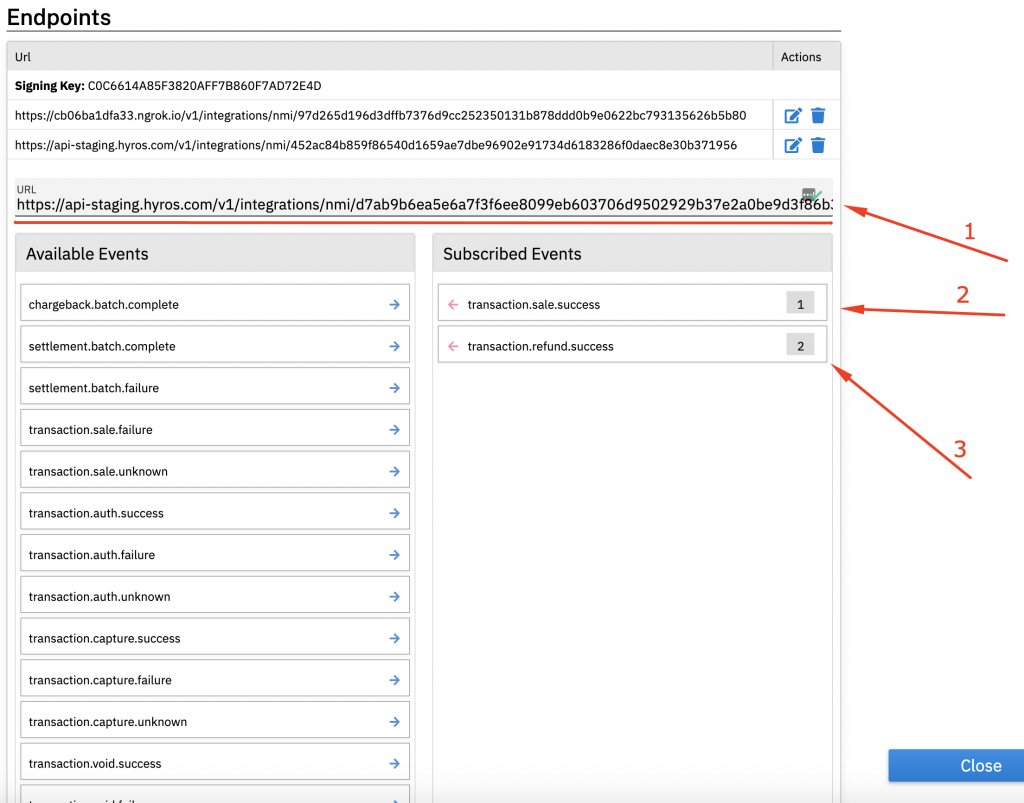
Step 3 – Add the Webhook
1. Go to your NMI account, click “Settings”, select “Webhooks” and then click the “Create” button.
2. Go to your NMI integration inside your Hyros account, click Configure and grab the webhook:
3. Go back to your NMI account, paste the webhook you just copied earlier inside the “URL” input (step 1), select the events “transaction.sale.success” (step 2) and “transaction.refund.success” (step 3).
4. Once you’re done following the guidelines above click on the “Save changes” button. This process will complete your NMI integration.
Important! Sales may have or not have products associated with them. In the case that no product is assigned to the sale, a product will be created with the generic name “NMI Integration Generic Product” and with the price of the amount field inside Hyros.
In order to be able to generate sales with products, products must be created in advance. Please move forward to Step 3 – Product creation.
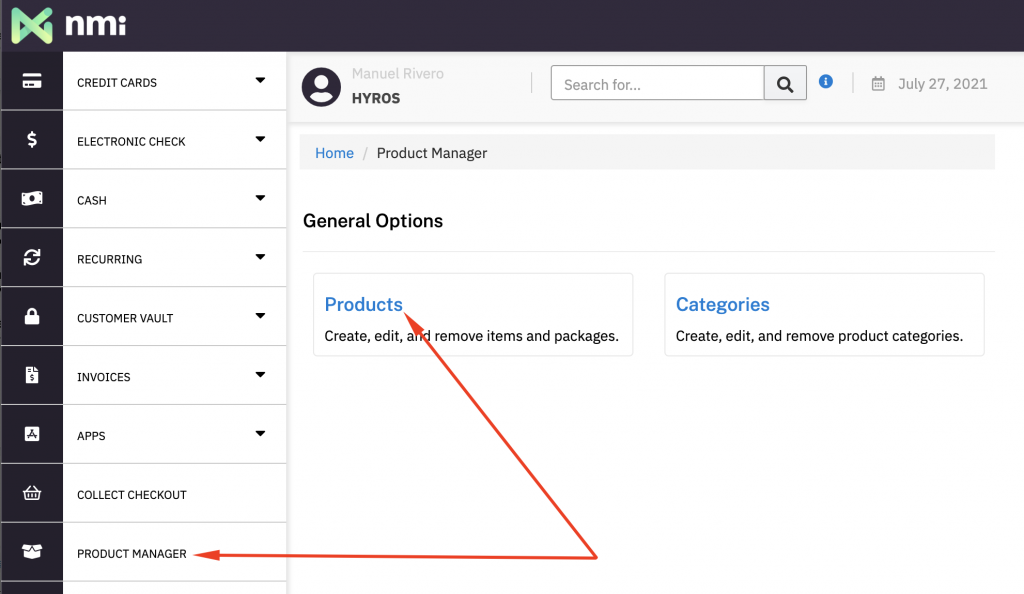
Step 4 – Product creation
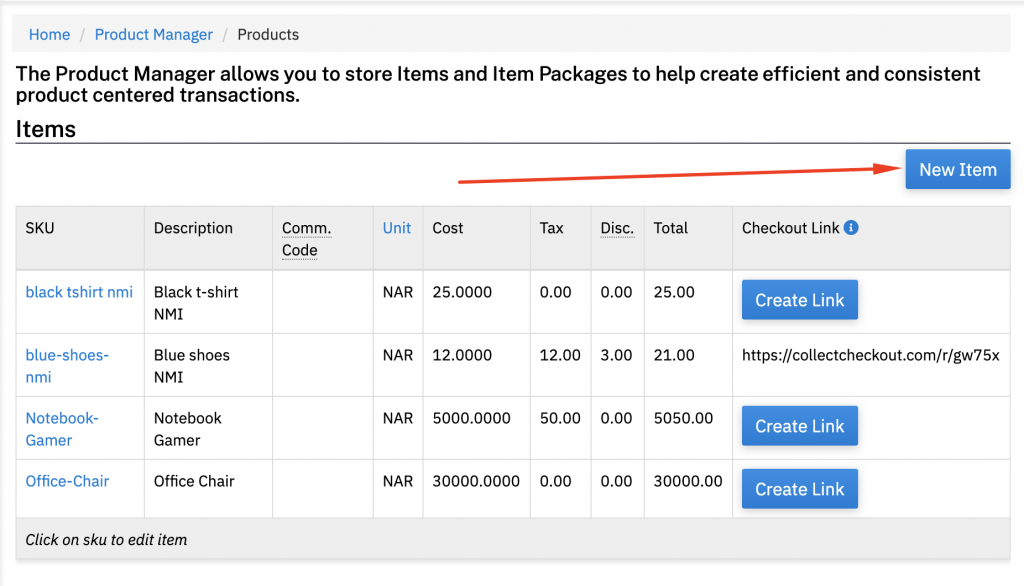
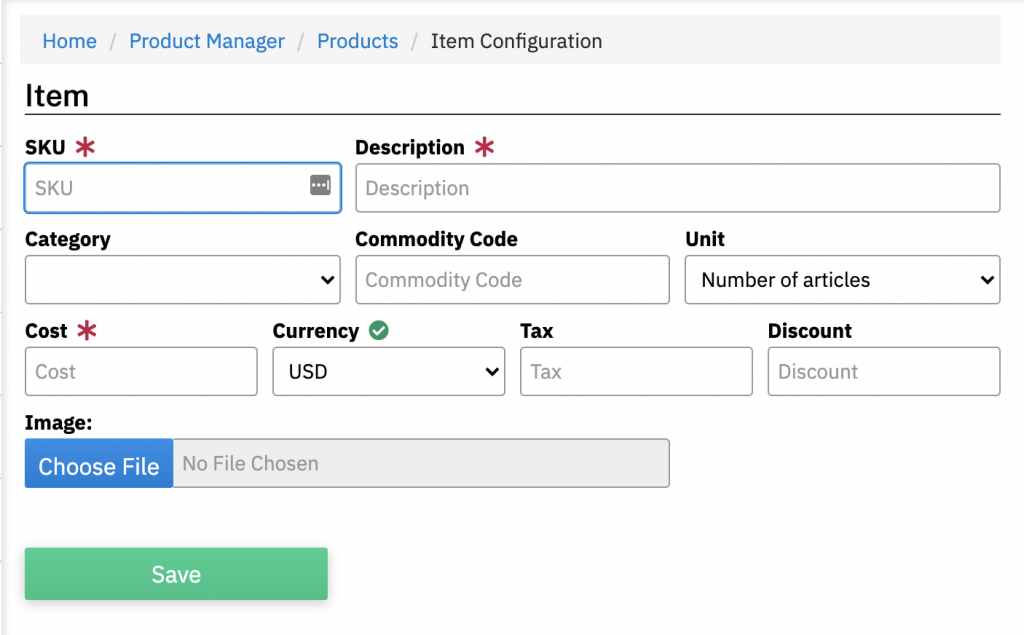
Inside your NMI account go to Product Manager, select Products, and click on the “New Item” button.
A form like the following will be displayed. As you can see, the required fields are cost (price), description (product name), and SKU. You can also fill in the tax, and discounts, which will be processed in Hyros.
Sale and refund creation
1. Sales creation
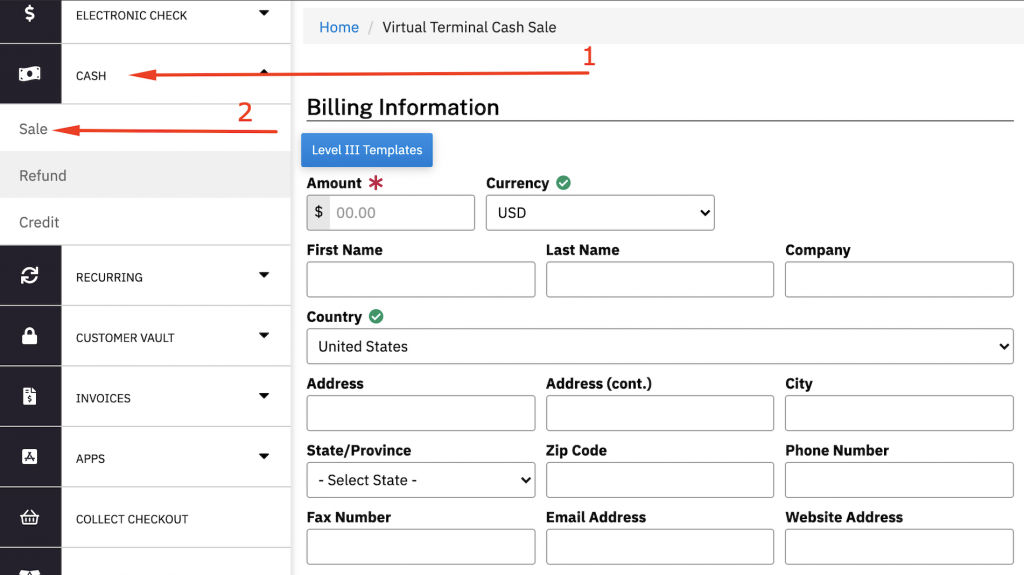
You need to go to CASH inside your NMI account and click Sale.
IMPORTANT! The only required field is the Amount. Please keep in mind that if a sale is generated without an email address, it will not be processed in Hyros, so it is required to fill in the Email as well.
The other fields are optional, but note the following:
If you want to create a sale without associated products, it is enough to fill in the fields mentioned above. In Hyros, a product will be created with the generic name “NMI Integration Generic Product” and with the price of the amount field.
If you want to create sales with associated Products, you must fill in a row in the Products table of the form.
The Discount field is automatically filled in with the sum of the discounts for each Product type. If it is filled in manually, NMI does not take it into consideration and does not apply the discount.
The Discount will be divided among all products because we cannot know to which product exactly this Discount belongs when the event arrives at Hyros.
You could also check “Tax exempt”, in which case, no Sales Tax should be processed in Hyros.
You could also change the Currency of the Order. Note that Hyros will not take into consideration the currency of each Product individually.
If you want, you can fill in the Sales Tax and Shipping fields. Sales Tax and Shipping will be processed as Hard Costs in Hyros.
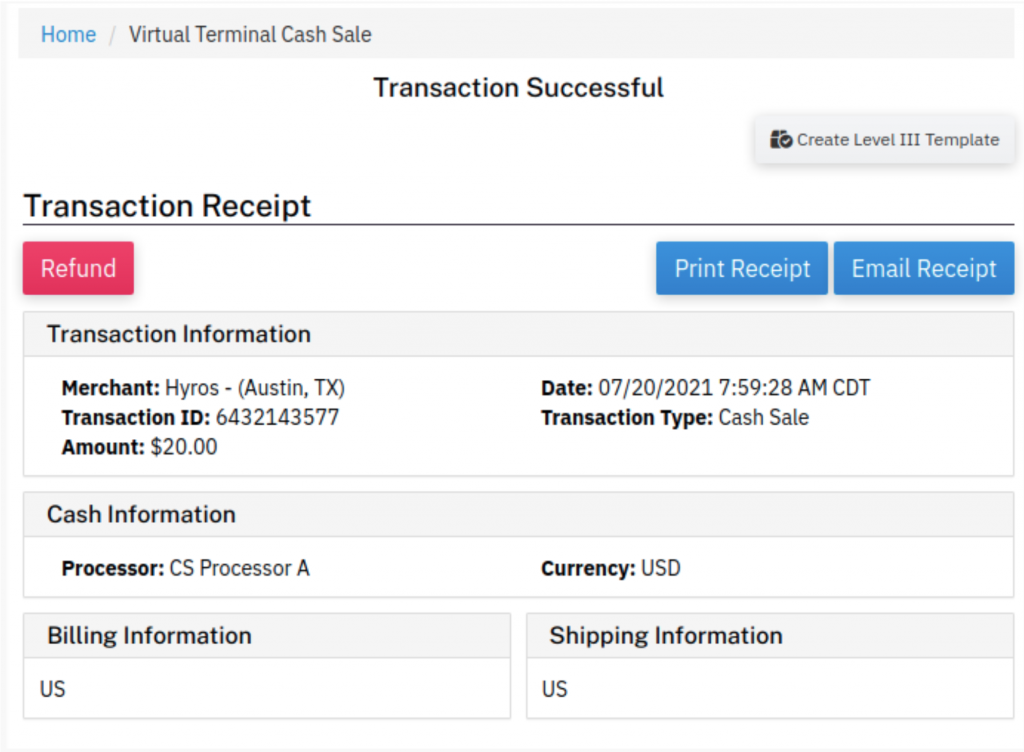
Once the sale has been made, a table like the following will be displayed. Refunds can be made from here, and you can see the Transaction Id, which is needed to make a refund if desired.
2. Refund creation
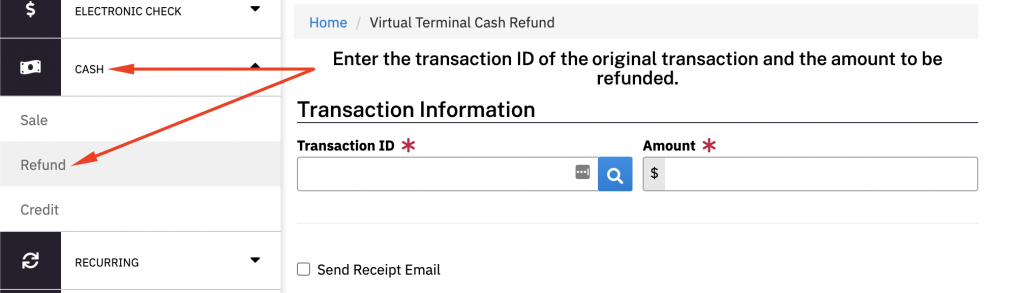
To issue a refund you need to go to CASH and select Refund.
IMPORTANT! Remember that in Hyros the Refund is always for the full amount of the Sale, so the Amount field will not be taken into consideration.
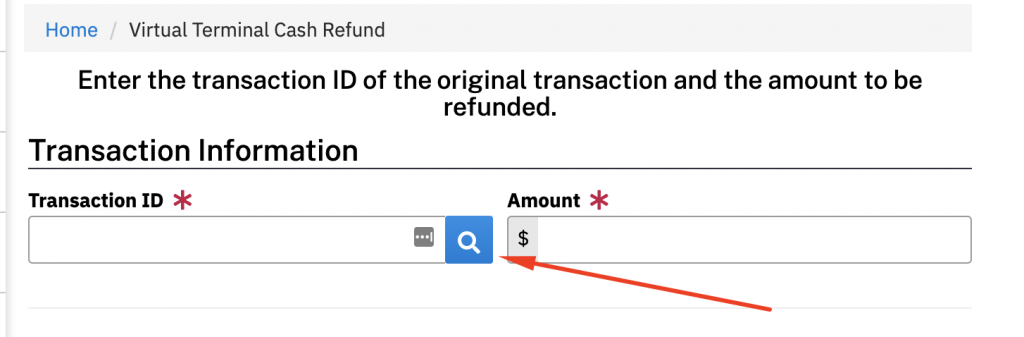
NOTE: In case you do not remember the Transaction Id, you can search for it by clicking on the magnifying glass in the Transaction Id field. The following form will be displayed.
Any field can be filled in to apply a filter. Once any field is completed, and Submit is pressed, a table like the following will be displayed, the Id column is the Transaction Id we are looking for. If you click on any Transaction Id, it will show the details of the order and you will be able to perform the Refund from there.
Samcart Checkout
Samcart Video Set Up Guide
IMPORTANT:Please note that you will only be able to complete the integration if you have the “Grow or Scale” plan or higher. If you’re uncertain about your payment plan, you can verify it by checking whether the Notify URL field (min 0:48) is available for selection. This is where you’ll need to add the webhook in order to finalize the integration.
Here is the code you will need for this set up
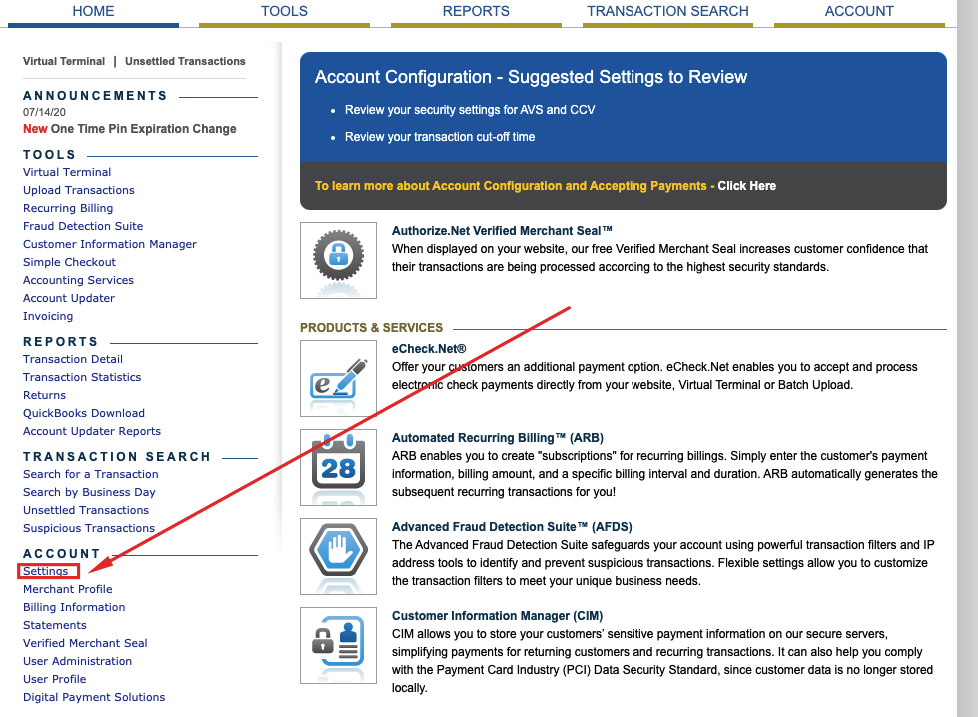
First step, go to the settings area of your Hyros account >
You should see
1- A sale with your test checkout email, click the email.
If there is no sale check that you placed the Samcart webhook correctly.
2- Under IP you should see an IP address.
If there is no confirm that you placed the UNIVERSAL code in the tracking code in the advanced settings area of the product you are trying to track.
IF you see both, move to the next step.
Teachable Checkout Form
To connect teachable follow the video and written text below
Important! Note that some users may not have access to the Liquid/HTML section as shown at min 1:40. If this is the case, contact the Teachable support to activate this section.
2- Once done click configure and copy the webhook that has been created
3- Login into to your teachable account and select the school you wish to track with HYROS
4- Go to SETTINGS –> WEBHOOKS and click NEW WEBHOOK
5- Set the webhook to fire on a NEW TRANSACTION
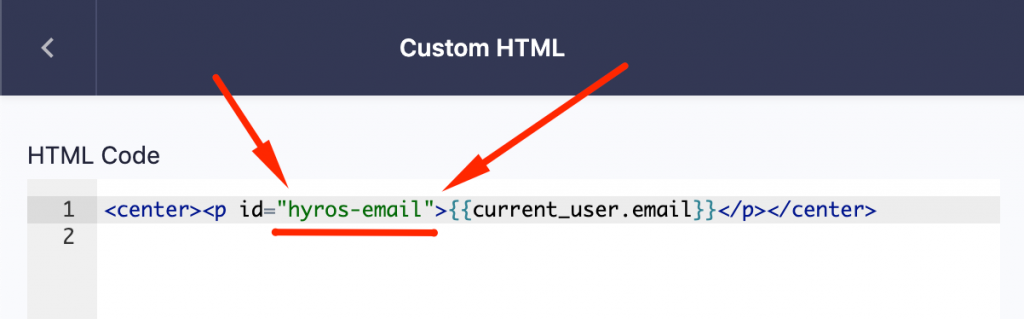
6- Go to the course you wish to track via COURSE and then go to PAGES and then click EDIT on your thank you page
7- Add a HTML block and paste this code in the block : <center><p id="hyros-email">{{current_user.email}}</p></center>
WARNING: When adding this code, please make sure the quotation marks are correct, if the code is pasted anywhere else the quotation marks may be changed automatically and the code will not work. Use these examples as a reference:
Correct code:
Incorrect code, notice the difference in the quotation marks here:
This can be difficult to spot, so let the support team know if you’d like us to confirm.
8- Scroll to the bottom of the thank you page editor and check the box to ad a custom header code. Paste the Universal Code below into the code area (referred to as a WATCHER script in the video):
This will complete the Teachable checkout integration. Repeat this for all schools and course you want to track.
Now Run This Test
Perform a test checkout on your checkout.
You should see
1- A sale with your test checkout email, click the email.
If there is no sale check your Stripe integration.
2- Under IP you should see an IP address.
If there is no IP confirm that you placed the UNIVERSAL code in the custom tracking code area of your products.
IF you see both, move to the next step.
Thrivecart With Paypal and Other Processors
Thrivecart With Paypal Video Set Up Guide
Important! Thrivecart made an update on their end that is not present in the video setup guide. When you get to min 0:47, make sure to disable “Receive results as JSON”. Follow the image below for reference.
Here is the script you will need for this set up
If you are using Thrivecart checkout follow the directions below
You should see
1- A sale with your test checkout email, click the email.
If there is no sale check that you placed the Thrivecart webhook correctly.
2- Under IP you should see an IP address.
If there is no IP confirm that you placed the UNIVERSAL code in the custom tracking area of the product you wish to track.
IF you see both, move to the next step.
Do Not See Your System?
Please follow one of the steps below if you do not see your system in the list above:
In case you have not found your system above please check this list of systems we can integrate with natively from your Hyros account.
If you don’t see your system in the list above you can see if you can connect your system via bridge with either zapier or make.com depending on the availability.
Note
using Zapier or Make.com requires no development skills and is free
3. If you did not find your app listed in Zapier or Make.com, contact in-app support! We are more than likely integrating and haven’t done the setup documentation for the system yet!
Step 6 : Setting up your currency and timezone
Currency Conversions
Hyros allows you to convert the currency that we receive from your payment software and display a currency of your choice easily inside Hyros.
To configure your currency conversion settings, just go inside your true tracking settings HERE, and select the correct currency on your Inbound and Outbound Currency:
Inbound Currency – This refers to the currency that your integrations are using. For example, if sales are shown in USD inside your payment processor account, select USD.
IF you are using multiple currencies for different payment softwares that are integrated with Hyros, you can select the inbound currency for each specific integration inside the Integrations tab. Just click on the integration you wish to use to convert your currency and change the inbound currency. Inbound currencies set on a specific integration will take priority over the inbound currency set inside your true tracking settings.
Outbound Currency – This is the currency that Hyros will show inside your account, and what you will see inside your reports. This NEEDS to match with the currency shown inside your ad accounts, otherwise, the data will not make sense when comparing with Facebook or Google.
At this time we only allow a single outbound currency. Having multiple outbound currencies would cause confusion inside your reports as it would be displaying multiple currencies alongside each other.
If you already have sales inside your account, you can select the option to “Update Sales Prices” to change the currency on your previous sales as well. Please ensure that the inbound currency is correct first before doing this though.
Multiple Currencies from a Single Store or Integration
This is most useful when you have an e-commerce store or any funnel that accepts multiple currencies on the same site. In order to convert these values correctly, you will need to select “Grab currency from event” inside your integration as shown below:
This ensures hyros does not assume that all values are in the inbound currency only. Hyros will instead read the currency from each sale, then convert that currency to the selected Hyros currency.
This is not available for all integrations.
WARNING: Currency Conversion and Your Revenue Cap
As you know, your account is billed depending on revenue tiers. If you go above the cap for your pricing tier, you will need to upgrade your subscription in order to continue to receive data. This is why it is VERY important to configure your inbound currency correctly. For example, if you have your inbound currency set to USD (by default), but you’re actually using pesos, Hyros will assume that number is in USD and you will reach your cap much faster than you should.
For more information on how your billing plans work, please see HERE.
Timezone
Make sure the timezone in your Hyros account matches the timezone in your Ad accounts. Follow the instructions below in the documentation.
Hyros
To match the Hyros timezone with your Ad platforms, follow these steps:
Go to “Settings” and select Profile
Set up timezone from the dropdown and click Save.
2. Facebook
To check the time zone of your Facebook Ad account, follow these steps:
Click on “Ad Account Settings“
Select “Payment Settings“
On the right side scroll down and click on “Edit” inside Business Info area
On the Pop Up Scroll at the bottom and there you will see Timezone
3. Google
To check the time zone of your Google Ad account, follow these steps:
Inside your Google dashboard, go to Settings and click Account Settings
Here you should see the Timezone section
4. Tik-Tok
To check the time zone of your Tik-Tok Ad account, follow these steps:
On your TikTok Ads Manager dashboard, click on your account name in the top-right corner
Click on the “Ad Account Settings“
Under your Basic Information you will find your Time Zone.
5. Twitter
Click/Tap on the arrow next to your account’s name to expand the menu
Click/Tap on “Edit Access to the Account”
Your time zone can be found in light gray characters right below the account number.
Step 7 : Testing And Confirming Your Tracking
Test Your Tracking (NEW AND AUTOMATED USE THIS!!)
At HYROS we have a Chrome extension that will automatically test your tracking set up for you and find errors (if there are any)
We call this extension HSE (HYROS SET UP EXTENSION)
HSE makes it easy for you to test your ads, funnels and their tracking. The extension will pinpoint any errors in your set up and show you how to fix them. This eliminates the troubleshooting time of setting up tracking a TON
Follow the guide below to download and use HSE.
How To Download and Use Our Automated Testing Extension
4- Click on HSE in your toolbar and enter in your API key.
5- Follow the prompts from HSE to test your tracking
NOTE: If HSE finds an error it will link you to an article that will show you how to fix the error!
Set Up Extension not working?
Please simply try clearing the browser’s cache and reloading the app. If that doesn’t work please contact your onboarding team or in-app support.
Testing your Opt in Funnel (OLD, Use Automated Above If Possible)
Video Testing Guide (Use this with the time stamps in the written guide below)
Written Guide With Time Stamps
Pre Test Checks (00:18)
-Ensure you are integrated with the correct Facebook OR Adwords accounts
PART 1 : CHECK ADS AND OPT IN
Step 1 : Ensure all ads have the correct Facebook or Google URL parameters added (Facebook = 01:02) (Google = 04:04)
WARNING : If you launch any new ads make sure the parameters are always updated
Step 2 (02:19) : Create a preview link or test link from Facebook or Adwords
Step 3 : Click the link and opt into your funnel
PERFORM CHECK (05:58): Go to REPORTING–>LEADS.
Confirm that the email has entered the system and has a @TAG with the name of the adset or campaign. (It may take a few minutes to enter the system)
IF the lead has entered the system with the correct @tag then proceed to PART 2
IF the email does not enter the system at all ensure you completed the landing page set up correctly in STEP 2.
-Check that your landing page/opt in has the UNIVERSAL code in the header
-Make sure that your UNIVERSAL code is on the thank you page of the opt in
IF there was no @tag generated and attached to the lead ensure you completed your ad set up correctly in step
-Check that you are integrated
-Then check that your ads have the correct URL parameter.
WARNING : ENSURE you do not confuse FBC_ID (our HYROS parameter) with “FBCLID” (Facebooks automatic parameter)
-Then check that your pages are not redirecting and breaking the parameter
-Repeat PART 1
-Then contact your onboarding rep for help troubleshooting the issue.
PART 2 : TEST A PAYMENT (08:34)
Step 1 : Create a test checkout from the checkout your customers would use using the same email that you used to opt in with.
PERFORM CHECK : To to REPORTING–>SALES. Confirm that the sale has been recorded in the system. You should see your booking email with a new $tag and valued added to it.
IF the sale has entered the system and you can see the checkout landing page AND opt in page under “clicks” then testing is complete. You have completed set up. Tag your onboarding manager to start data monitoring.
If no sale has entered the system go back to STEP 3 : TRACKING PAYMENTS and ensure set up has been done correctly.
-Make sure you have set up the correct pages
-Make sure that the checkout has the UNIVERSAL code is in the header of the checkout page. Then make sure the checkout has been integrated with Hyros.
-If an error is found repeat part 3.
-If you cannot find an error consult your onboarding manager.
Testing Your Funnel – IF Your Initial Landing Page Has A Checkout Form (OLD, Use Automated Above If Possible)
Video Testing Guide (Use This With The Time Stamps In The Written Guide Below)
Pre Test Checks (00:15)
-Ensure you are integrated with the correct Facebook OR Adwords accounts
PART 1 : CHECK ADS
Step 1 : Ensure all ads have the correct Facebook or Google URL parameters added (Facebook = 01:02) (Google = 04:04)
WARNING : If you launch any new ads make sure the parameters are always updated
Step 2 (02:19) : Create a preview link or test link from Facebook or Adwords
PERFORM CHECK (02:15) : Ensure that all ads have the HYROS URL parameter and when clicked that the FBC_ID and GC_ID url parameters are cleanly in the URL
WARNING : ENSURE you do not confuse FBC_ID (our HYROS parameter) with “FBCLID” (Facebooks automatic parameter)
IF every ad has the HYROS URL parameter and he FBC_ID and GC_ID url parameters are cleanly in the URL move to PART 2
IF the HYROS parameter is not clear in the final url make sure you have pasted it correctly in the tracking/url tracking areas on Facebook and Adwords.
Also make sure that you are not sending your ads through redirect links because redirects will drop URL parameters.
Go back to STEP 1 : Setting Up Ads and make sure you have completed this step correctly. If you find an error repeat part 1 above.
If you cannot find the error notify your onboarding manager.
PART 2 : TEST A PAYMENT (05:59)
Step 1 : Create a test checkout from the checkout your customers would use using the same email that you used to opt in with.
PERFORM CHECK : Go to REPORTING–>SALES. Confirm that the sale has been recorded in the system. You should see a sale with your checkout email. Click the email.
A click history that show you landing on our sales/checkout page
You have successfully finished set up. Tag your onboarding manager so they can begin optimizing your data.
If no sale has entered the system go back to STEP 3 : TRACKING PAYMENTS and ensure set up has been done correctly.
Make sure you have set up the correct pages
Make sure that the checkout has the UNIVERSAL code is in the header of the checkout page. Then make sure the checkout has been integrated with Hyros.
If an error is found repeat part 3.
If you cannot find an error consult your onboarding manager.
IF there was no @tag generated and attached to the lead ensure you completed your ad set up correctly in step
Check that you are integrated with the correct Facebook/Google Ads account
Then check that your ads have the correct URL parameter.
Then check that your pages are not redirecting
Ensure your watcher code is correctly installed in the header of the page
If you find an error repeat PART 2
Then contact your onboarding rep for help troubleshooting the issue.
IF there is no click history
Ensure your UNIVERSAL code is correctly installed in the header of the page
If an error is found repeat PART 2
Then contact your onboarding rep for help troubleshooting the issue.
Testing Your Funnel – IF Your Initial Landing Page is a Sales Page Only with NO Checkout form (OLD, Use Automated Above If Possible)
Video Testing Guide (Use This With The Time Stamps In The Written Guide Below)
PART 1 : CHECK ADS
Step 1 : Ensure all ads have the correct Facebook or Google URL parameters added (Facebook = 01:02) (Google = 04:04)
WARNING : If you launch any new ads make sure the parameters are always updated
Step 2 (02:19) : Create a preview link or test link from Facebook or Adwords
PERFORM CHECK (02:15) : Ensure that all ads have the HYROS URL parameter and when clicked that the FBC_ID and GC_ID url parameters are cleanly in the URL
WARNING : ENSURE you do not confuse FBC_ID (our HYROS parameter) with “FBCLID” (Facebooks automatic parameter)
IF every ad has the HYROS URL parameter and he FBC_ID and GC_ID url parameters are cleanly in the URL move to PART 2
IF the HYROS parameter is not clear in the final url make sure you have pasted it correctly in the tracking/url tracking areas on Facebook and Adwords.
Also make sure that you are not sending your ads through redirect links because redirects will drop URL parameters.
Go back to STEP 1 : Setting Up Ads and make sure you have completed this step correctly. If you find an error repeat part 1 above.
If you cannot find the error notify your onboarding manager.
PART 2 : TEST A PAYMENT (05:58)
Step 1 : Go from your sales page/landing page to your checkout page. Create a test checkout from the checkout your customers would use using the same email that you used to opt in with.
PERFORM CHECK : Go to REPORTING–>SALES. Confirm that the sale has been recorded in the system. You should see a sale with your checkout email. Click the email.
A click history that shows you landing on your sales page and THEN your checkout page
You have successfully finished set up. Tag your onboarding manager so they can begin optimizing your data.
If no sale has entered the system go back to STEP 3 : TRACKING PAYMENTS and ensure set up has been done correctly.
Make sure you have set up the correct pages
Make sure that the checkout has the UNIVERSAL code is in the header of the checkout page. Then make sure the checkout has been integrated with Hyros.
If an error is found repeat part 3.
If you cannot find an error consult your onboarding manager.
IF there was no @tag generated and attached to the lead ensure you completed your ad set up correctly in step
Check that you are integrated with the correct Facebook/Google Ads account
Then check that your ads have the correct URL parameter.
Then check that your pages are not redirecting
Ensure your UNIVERSAL code is correctly installed in the header of the page
If you find an error repeat PART 2
Then contact your onboarding rep for help troubleshooting the issue.
IF there is no click history
Ensure your UNIVERSAL code is correctly installed in the header of the sales page and checkout page. This is covered in STEP 2 : SETTING UP THE INITIAL LANDING PAGE and STEP 3 : TRACKING CUSTOMER PAYMENTS
If an error is found repeat PART 2
Then contact your onboarding rep for help troubleshooting the issue.
What I should do next? Now that you’ve completed your setup, we’re ready to learn
how to read and start scaling up your business. Follow this link to get started!