Tracking Leads on your E-Commerce Stores

This guide will show you how to add Hyros tracking to your:

  • Ecommerce site pages
  • Ecommerce site checkout pages
warning

More than one software for your pages?

Please ensure you follow the steps to add tracking to ALL of your pages.
Especially if you have multiple softwares you use for different page types, you will need to ensure the steps are followed for each software.

Step 1 – Copy the Universal Script

For Shopify:

Standard Universal Script for all other Softwares and Shopify add-ons:

Step 2 – Add the Universal Script to your Ecommerce site pages

Shopify

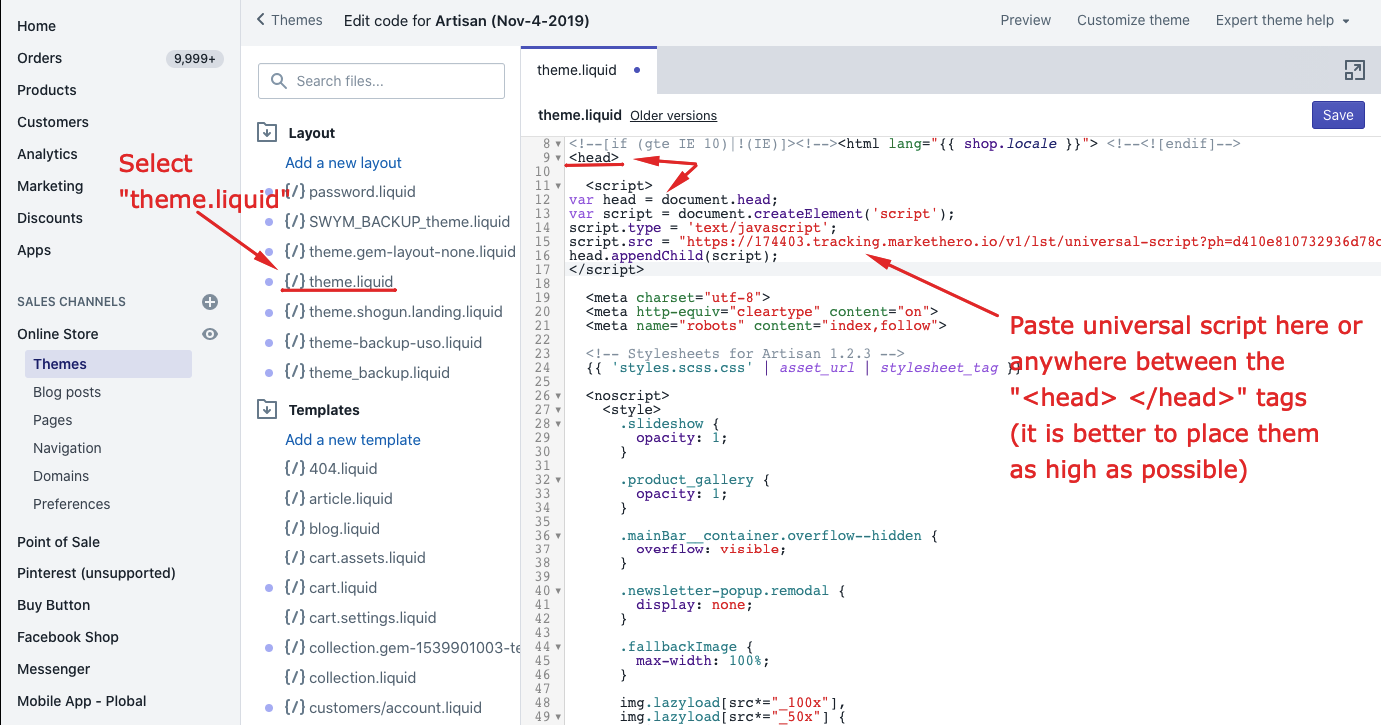
Step 1 – Tracking your site theme

Follow these slides to add the universal script top your theme:

Step 2 – Tracking your order status / post purchase page

Follow the slide below to track your order status page, and if you have one, your post purchase page as well:

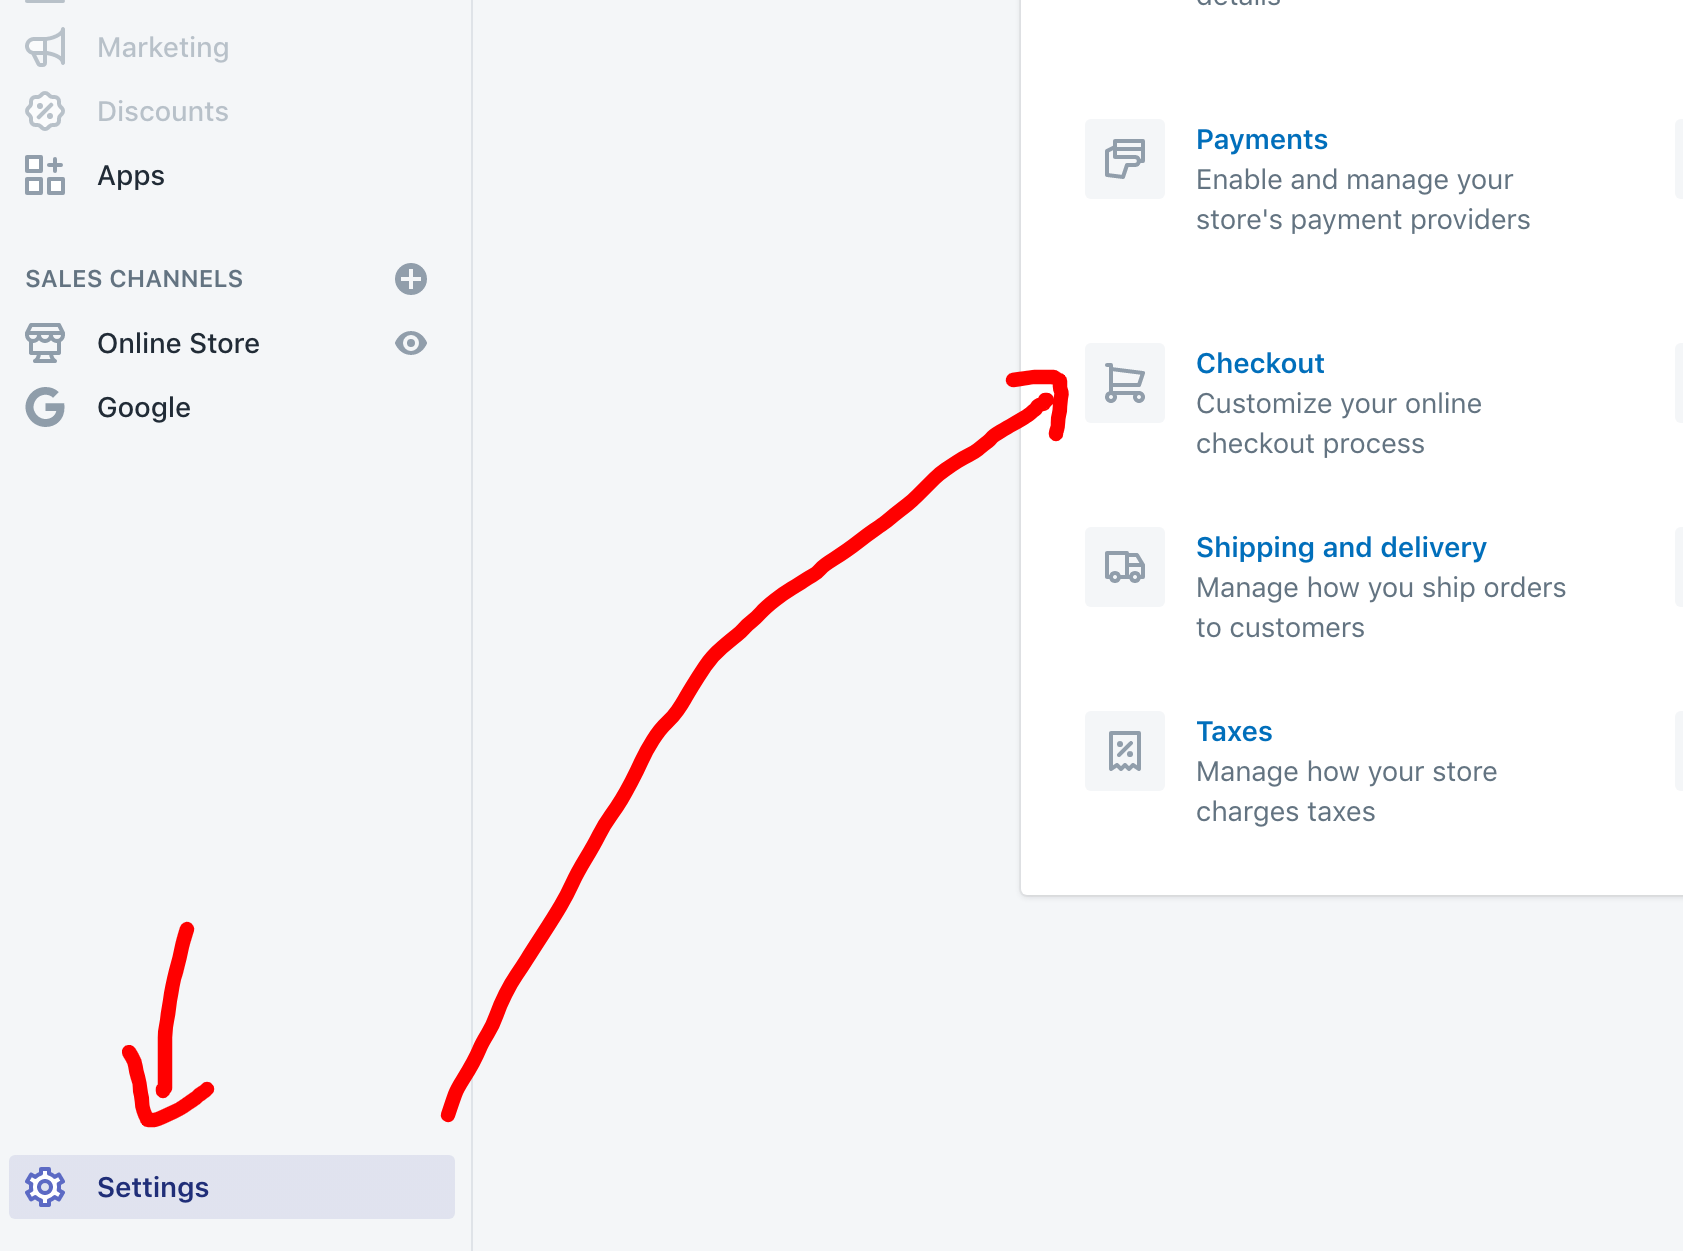
Go to your checkout settings

Go to your checkout settings

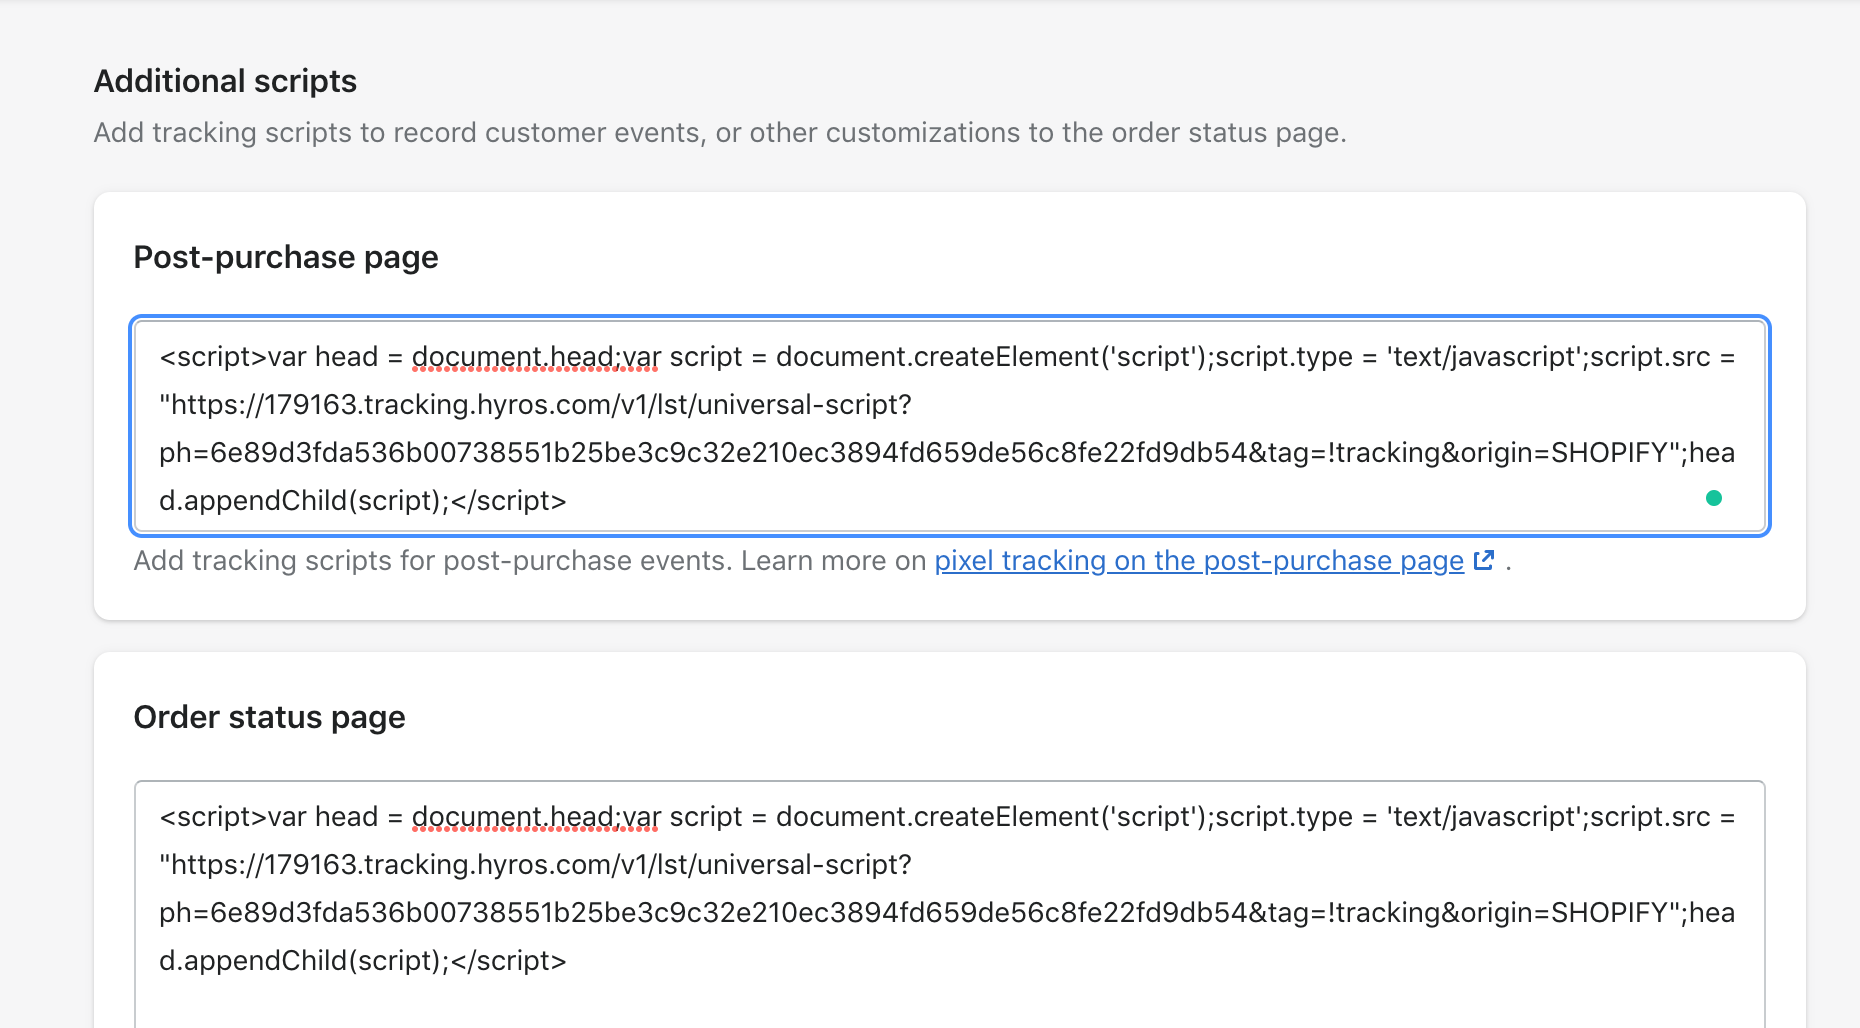
Paste the universal script under both fields

Paste the universal script under both fields

If you do not have a post purchase page field, then just add it to the order status page field

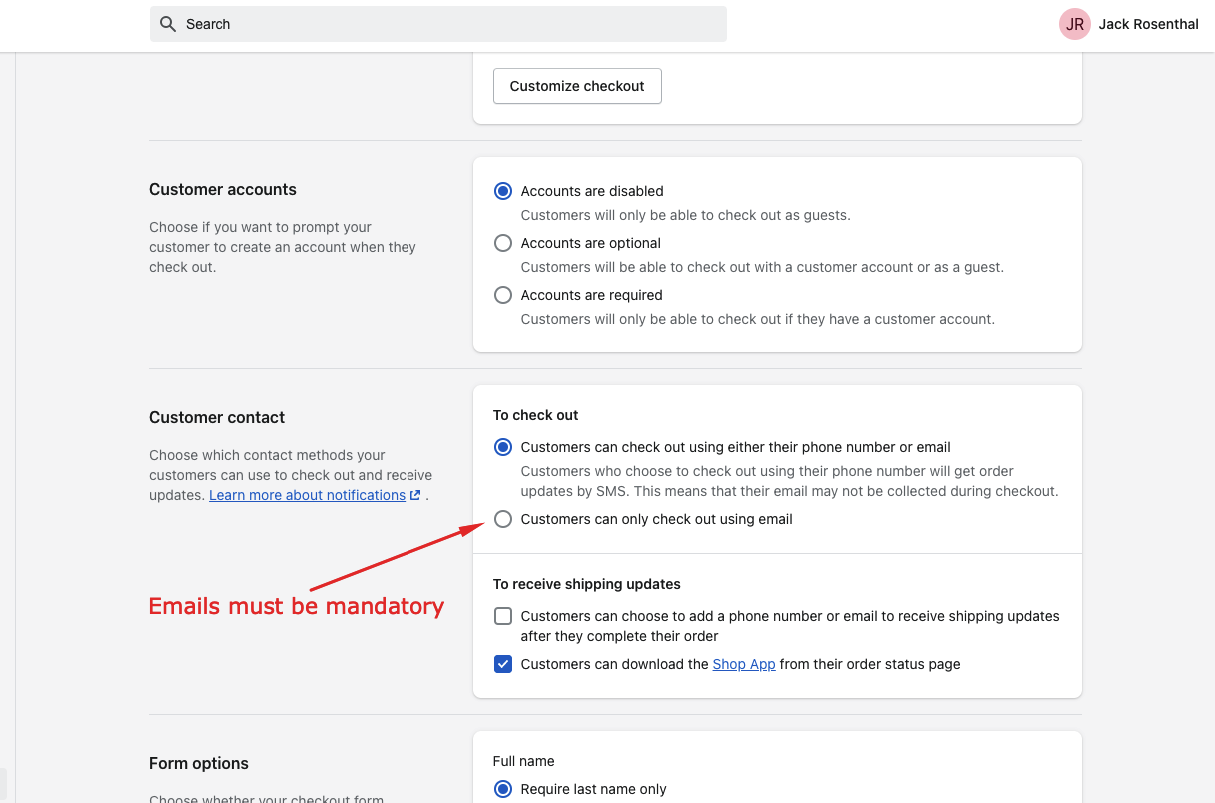
The email must be mandatory

The email must be mandatory

If a customer does not enter an email then we won’t be able to retrieve the sale

Tracking Any Shopify Add-ons

Follow the steps below if you have any Shopify add-ons.

For all add ons you will need the standard universal script from step 1, not the Shopify universal script.

1 – Inside Shopify, go to Apps > Better Cart. Once inside, go to Settings, scroll down to Custom scripts and click the New Custom scripts button:

2 – A pop-up window will appear and you need to select All Pages, in the Name field give it a name such as Hyros, copy the normal Universal script from step 1 (not the Shopify one) and paste it as explained in the image below. Once you’re done hit the Create button.

If you are using Intrecart with Shopify complete the Shopify set up in the step above and then alert your direct onboarding rep. We will complete the Intrecart set up for you.

1 – Copy the normal universal script from step 1 (not the Shopify one)

2 – Go to your pagefly pages and select a page:

3 – Click the custom code Icon on the bottom left, then paste our universal script inside the javascript section.

Please make sure to remove the  tag at the beggining of the Universal Script as well as the at the  tag at the end:

4 – Once you click save, please then save and publish the whole page on the top right. The changes will not take affect until you do this:

5 – Repeat this for all pages on Pagefly.

This concludes the setup, please move on to the next steps.

1 – Copy the standard universal script from step 1 (not the shopify script)

2 – Inside Shopify, go to Apps > Recurring Billing by Recharge. Once inside, go to the checkout settings here:

3 – Scroll down and enable javascript on page 1 of the checkout, then paste the universal script:

If you do not see the option to enable javascript above: On some versions of Recharge this option is not available. In order to complete this step you must reach out to Recharge support to request that they enable this for you manually.

4 – Scroll down and do exactly the same for the thank you page.

Please take in mind that this does not work if you don’t have a Recharge checkout page.

By default, we will be updating the shopify order to include upsell/recurring payments via Recharge and other ad ons such as zipify, so you won’t need to do anything. If you are experiences issues with upsell payments please reach out to the support team.

This will complete your Shopify set up. Move to the next step in this set up document!

First copy the standard universal script from step 1 (not the Shopify one)

Then go to the Product Recommendation Quiz add-on, select the quiz you want to track and click “edit”. In the page builder section, find the question that asks the lead to enter their email and select the edit settings Icon.

Click Add Custom Javascript and paste the script, WITHOUT the “” tags at either end of the code, here as shown:

Then click publish.

Now Hyros should be able to track any email entered in that quiz.

You can move on to the next steps.

1 – Copy the standard universal script from step 1 (not the Shopify one)

2 – Then inside your Zipify Pages account go to “settings” and “global scripts”, Click “add new” and to add the script on each section you have available:

3 – Adjust the script as shown below:

This concludes the set-up.

Woocommerce

To track your woocommerce site, add the universal script in your theme header code. Normally this is in appearance -> theme editor -> Theme header.

You can also use different add-ons that will enable you to install tracking code without editing the theme.

Digistore

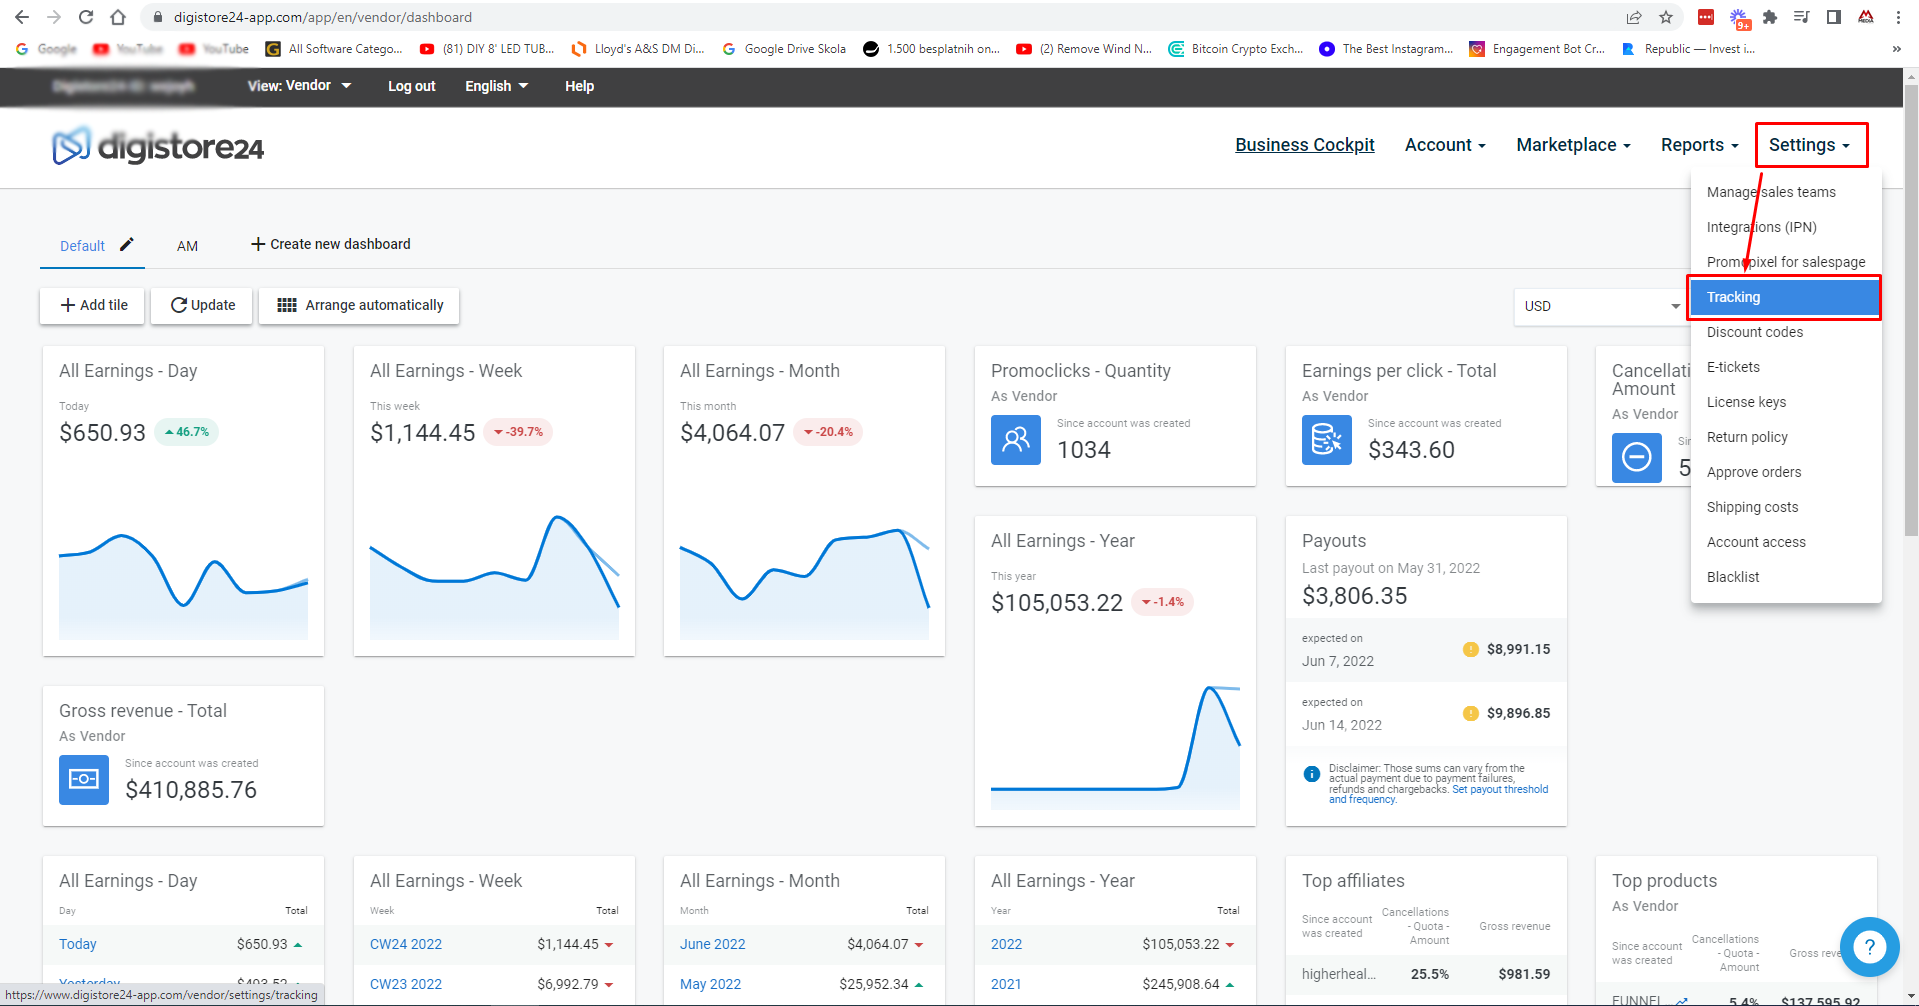
Go to "settings" and then "tracking"

Go to “settings” and then “tracking”

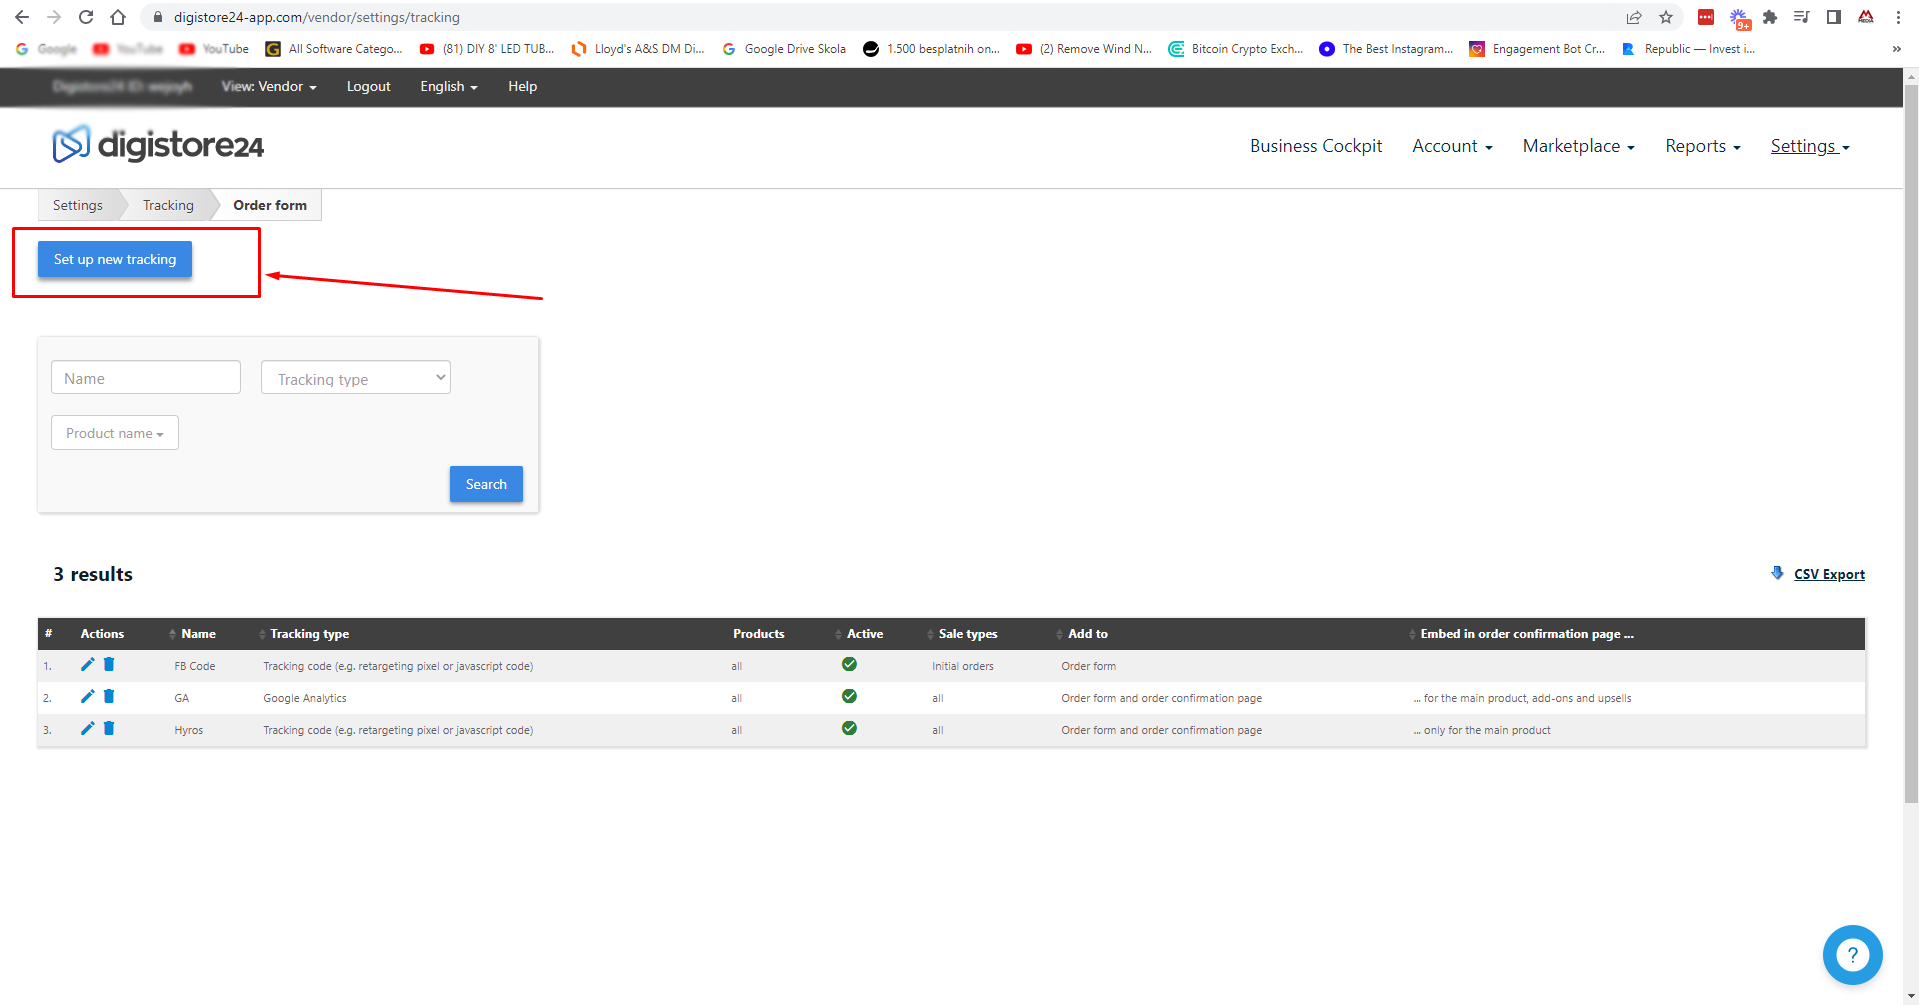
Click "set up new tracking"

Click “set up new tracking”

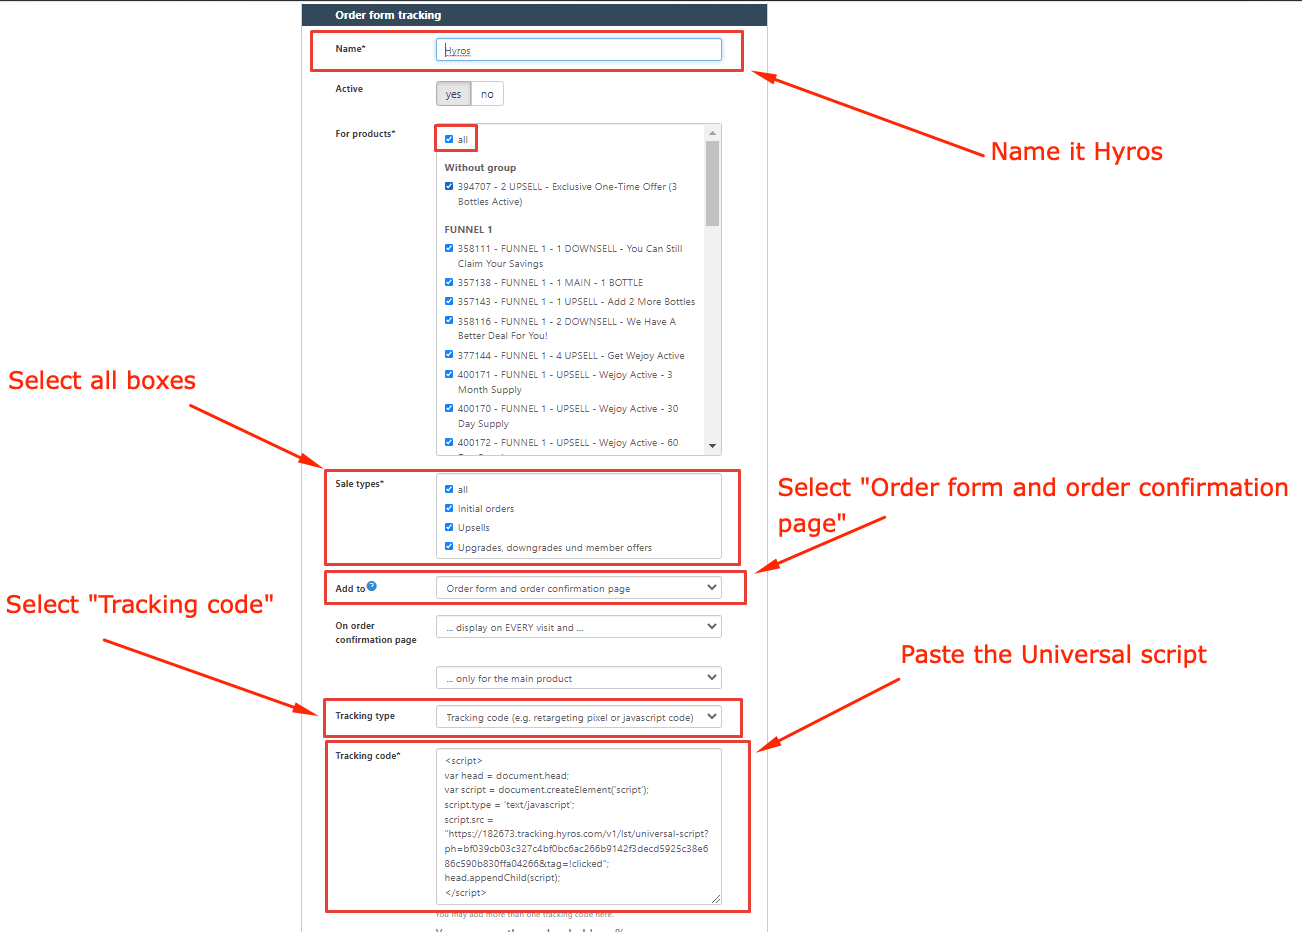
Follow the instructions

Follow the instructions

Important! Once you have finished following the above steps, and before saving the entire configuration, you will need to send an email to Digistore24 support (code@digistore24.com) and include the Universal script for review and confirmation.

Once you receive confirmation from Digistore24 support, you will be able to save your tracking configuration and the integration will be completed.

BigCommerce

To track your BigCommerce Site, go to your account. Select Storefront->Script Manager->Create Script. Inside Create Script section, follow these next steps:

  • Fill in “Name of the script” and “Description”;
  • Set “Location on page” to header;
  • Select All pages for “Select pages where script will be added”;
  • Script category – Targeting Advertising;

Save the Script and you are finished with this step.

SquareSpace

Step 1 – Tracking your store pages

Step 2 – Tracking the purchase email on the order confirmation page

Squarespace does not allow you to add scripts directly to their checkout, so instead you must follow these steps:

Inside your Squarespace account you need to install the below code into the order confirmation page:

<div id=“hyros-email”> {customerEmailAddress} </div>

Inside your Squarespace account follow the steps in the slide below:
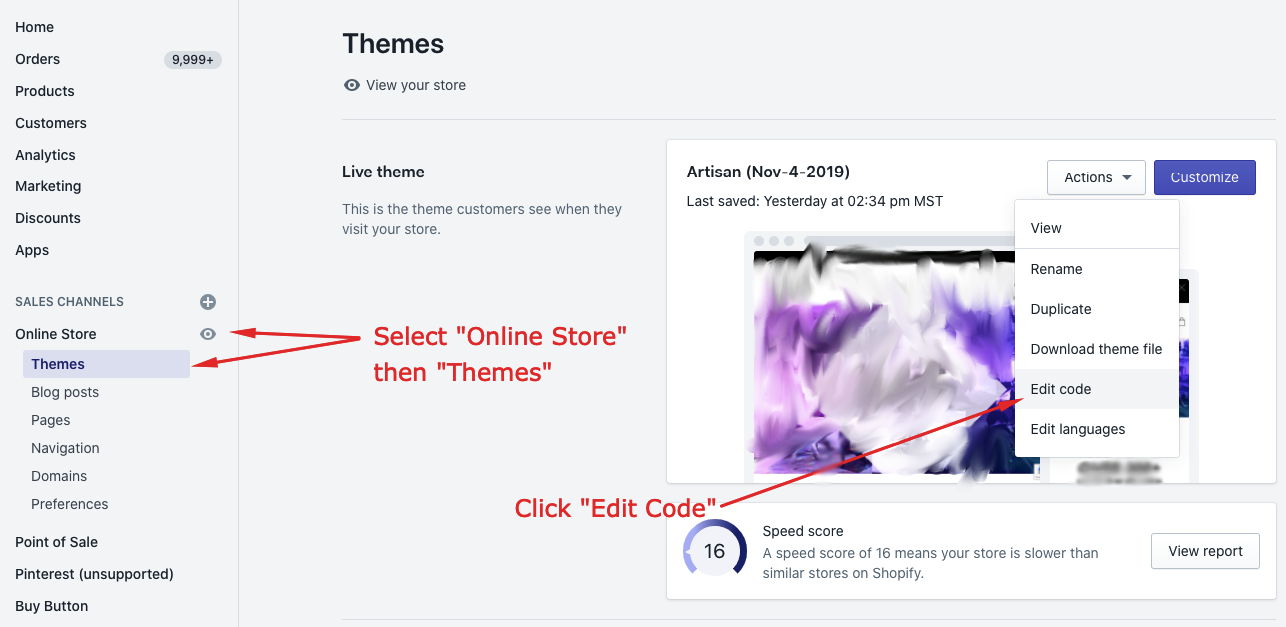
Scroll to the bottom and find the "Order Confirmation Page" and paste the script in the field as shown

Scroll to the bottom and find the “Order Confirmation Page” and paste the script in the field as shown

Other Page Types To Track