Setting Up Call Tracking
Tracking Calls Booked via Appointment Setters (all platforms)
Video guide:
Please see the guide HERE to send call events via zapier.
Acuity
- Please ensure that you have placed the universal code on your call booking and call thank you pages (you should have done this in the last step of the initial setup).
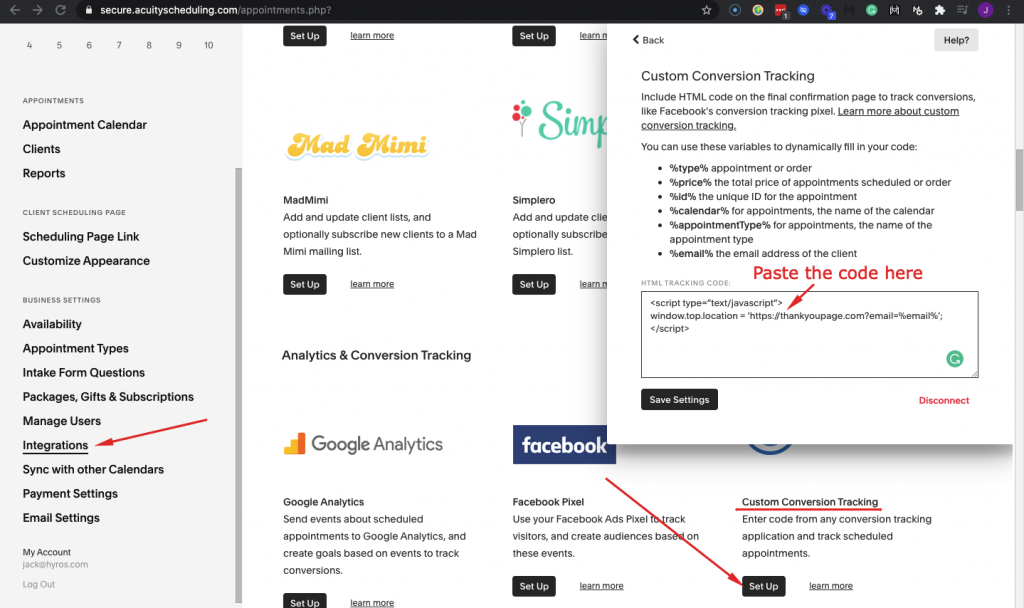
2.Login into your Acuity dashboard and go to https://secure.acuityscheduling.com/preferences.php?action=integrations
3. Pick CUSTOM CONVERSION tracking from the list of integration. A code input box should appear
4. Alter the URL of the page in the code below to your thank you page. Then paste it in the code input box that appeared.
<script type="text/javascript">
window.top.location = 'https://yoururl.com?email=%email%';
</script>
BE SURE TO REPLACE THE yoururls.com with your actual thank you page URL.
Here is what you should see inside Acuity:
Click here if you have multiple acuity booking forms and you want to redirect each one to a unique thank you page
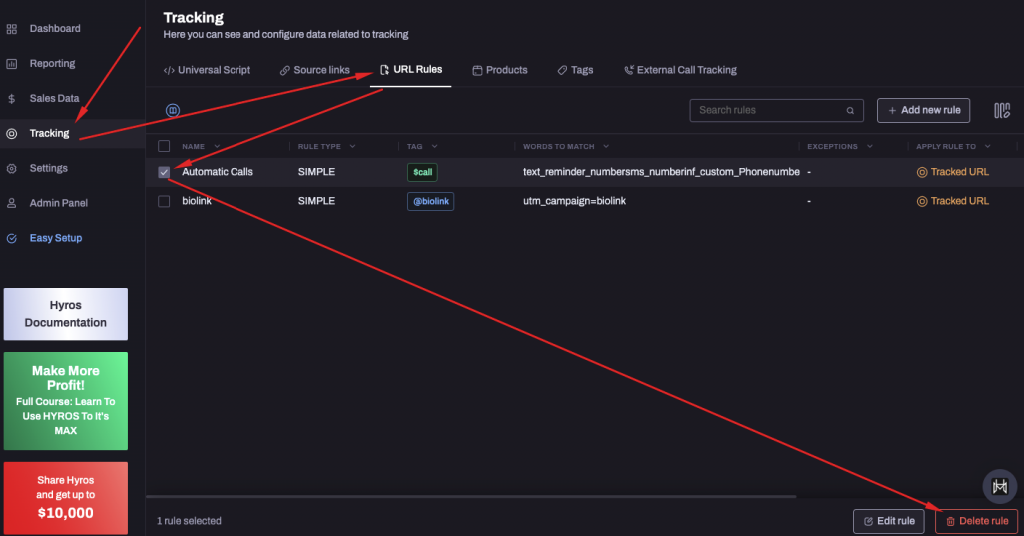
5.Then in Hyros, remove the “Automatic Calls” URL rule by going to your URL rules settings in your tracking tab as shown here:
6.Finally, please integrate with Acuity by going to the Acuity integration in your integration settings and following the prompts to log in and connect Acuity with Hyros.
Click here if you do NOT want to track all your call events
Click here if you do NOT want to track sale events with Acuity
This integration will send call data to Hyros in a more accurate manner than the URL rules. Please make sure you have removed the URL rule to track calls as per step 5, otherwise you will be tracking duplicate calls.
This will complete the Acuity set up.
NEXT RUN THIS TEST
1. Opt into your call funnel
2. Wait 1-2 minutes after opting in ensure that your email has entered Hyros in your LEADS section
3. Next book a call on your call booking page and make sure you are redirected to the thank you page you set in step 4 with the email in the URL.
It should look something like this:

If you see something wrong such as no email in the URL, or the redirect does not happen at all and you remain on the call booking page, please see the drop downs below:
Acuity does not redirect after completing the booking form
I don’t see the email on the thank you page
4. Wait 1-2 minutes, then check your CALLS section to ensure that your call has been tracked.
5. Click your email and ensure the $call tag has been applied
If you see your email enter the system and have a $call tag attached to it then you have completed set up and are ready to move to the next step.
If you do not ensure your Universal code is on all pages in the header and try again.
Appointment Core
1. Ensure you have placed your UNIVERSAL code in the header of your call booking and call thank you page.
2. Use this help doc to pass your booking information in the URL of your thank you page redirect.
3.The UNIVERSAL code will grab the data sent in the URL and use that to create a booking conversion.
4 : Perform a test booking on your call form.
Wait 1-2 minutes, then check your <a href=”https://app.hyros.com/#/mh/finance/customers/calls” target=”_blank” rel=”noopener”>CALLS</a> section to ensure that your call has been tracked.
Click your email and ensure the $call tag has been applied. Also ensure the lead has a phone number and IP.
If you see your email enter the system and have a $call tag attached to it then you have completed set up and are ready to move to the next step.
If you do not ensure your Universal code is on your thank you page and your Appointment Core redirect is sending the the phone number and email in the thank you page URL.
Calendly
First, please ensure that you have placed the Universal code (seen in previous step) on your call booking and call thank you pages.
Calendly Video Set Up Guide:
WARNING : Calendly forms MUST have the “phone number” submission form active to work with HYROS.
Written Guide
If you are using Calendly as your call scheduling software follow these simple steps
- Go to https://calendly.com/event_types/
- Select the event type you wish to track
- Go to the “Confirmation Page” section and check the “Pass event details to your redirect page” checkbox.
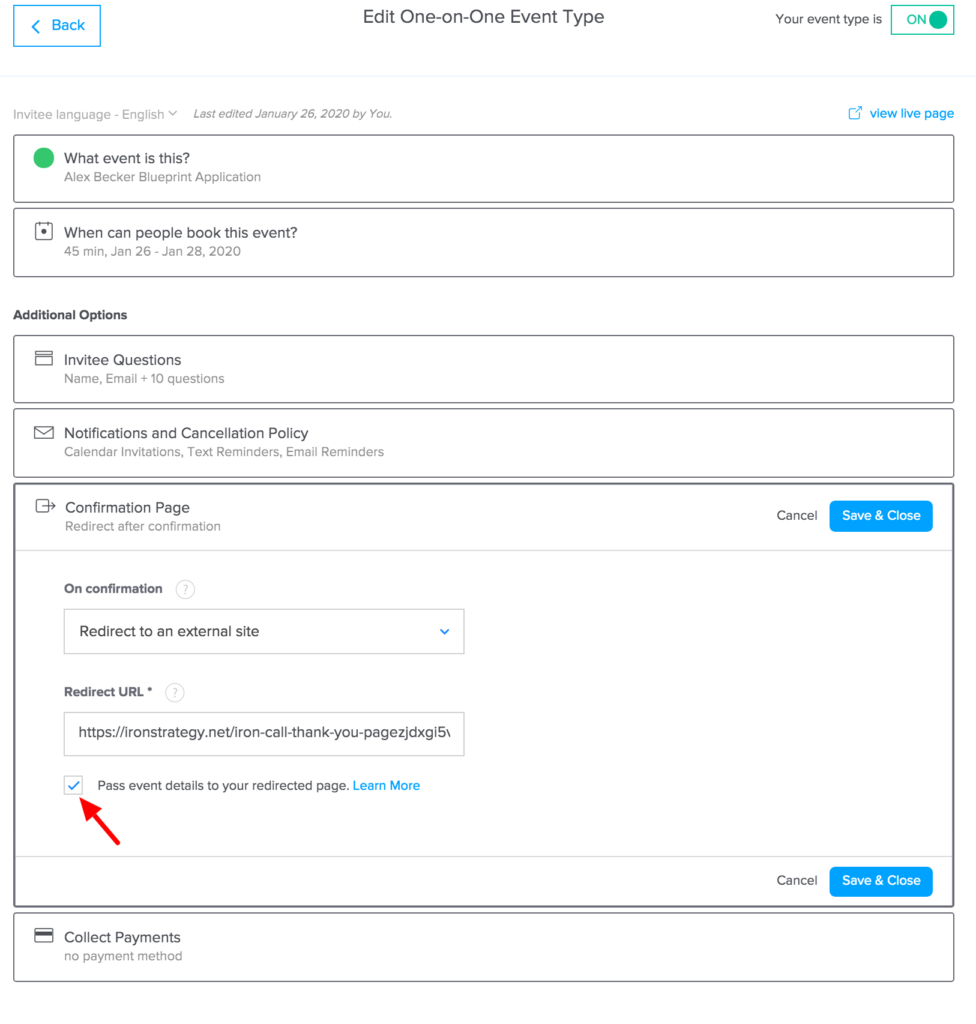
Once completed this will pass the email and phone number to your thank you page so we can track them.
4. Next go to your URL rules, you should see a rule already created which we use to automatically track a $call. Please delete this rule.
We do not use this for Calendly, because we use a direct integration instead for optimized accuracy. If you have the rule active AND the Calendly integration active at the same time, you will receive duplicate call events.
5. Integrate with Calendly inside of your integration settings.
This will complete the call tracking set up.
———————————————–
NEXT RUN THIS TEST
1. Opt into your call funnel
2. Wait 1-2 minutes after opting in ensure that your email has entered Hyros in your LEADS section
3. Next book a call on your call booking page and make sure you complete the book as are redirected. Use a different email than the one you opted in with in step
4. Wait 1-2 minutes, then check your CALLS section to ensure that your call has been tracked. If asked click “INDEX INFORMATION” on the call section.
5. Click your email and ensure the $call tag has been applied
If you see your email enter the system and have a $call tag attached to it then you have completed set up and are ready to move to the next step.
If you do not, use the troubleshooting guide below.
———————————————–
Trouble Shooting Calendly
–IF you do not see the email enter the system at all ensure that your UNIVERSAL code is in the header of your booking page and call booking thank you page.
THEN confirm that you have checked the “Pass event details to your redirect page” checkbox under your events CONFIRMATION page (seen in step 3 above)
THEN confirm you have done this to the right event in Calendly.
THEN redo the test above. If you see the email come in with the $call tag move to the next step.
IF you do not see the $call tag make sure you are collecting the phone number on your Calendly form.
THEN check if you have integrated with Calendly inside your Hyros account.
THEN redo the test above. If you see the email come in with the $call tag move to the next step.
IF it fails after the two test above contact support via chat in the lower right hand corner and say “My calls are not showing in the system”
CallRail
Please ensure that you have placed the universal code on your call booking and call thank you pages.
Step 1 – Create the integration inside Hyros
1. Go into settings -> integrations -> select the CallRail Integration.
2. Click “Create New Integration”.
3. Create a name for the integration, such as “CallRail”.
4. Then click the “Configure” button and copy the Webhook URL that you will use in the following steps.
Step 2 – Add the Webhook
1. Go to your CallRail account, click Analytics (step 1), then click Settings (step 2) and select Webhooks (step 3)
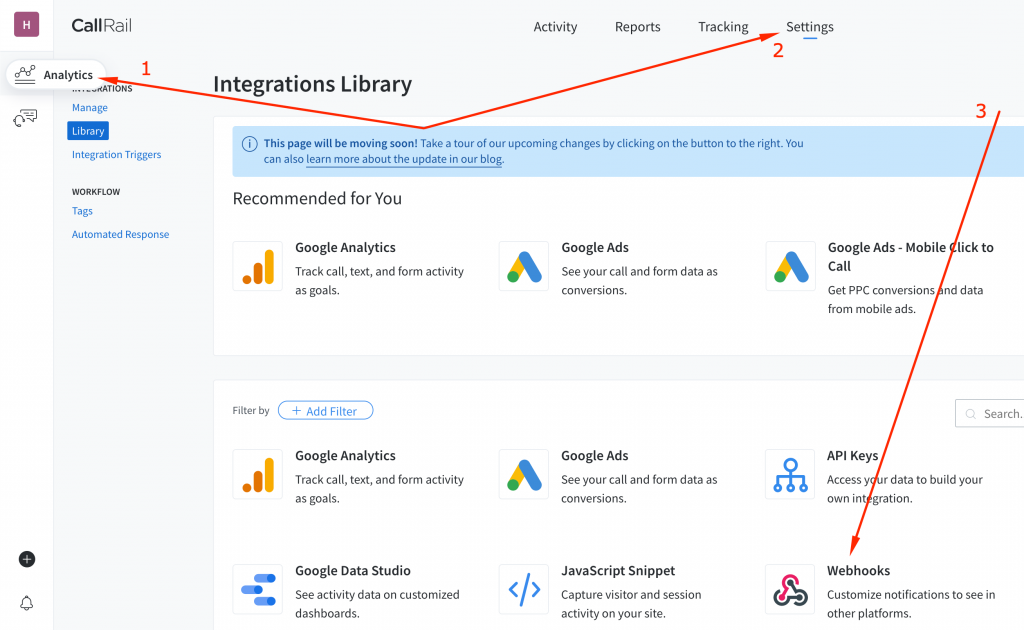
2. Once in Webhooks, paste the webhook you just copied earlier into the Post-Call and Form Submission fields.
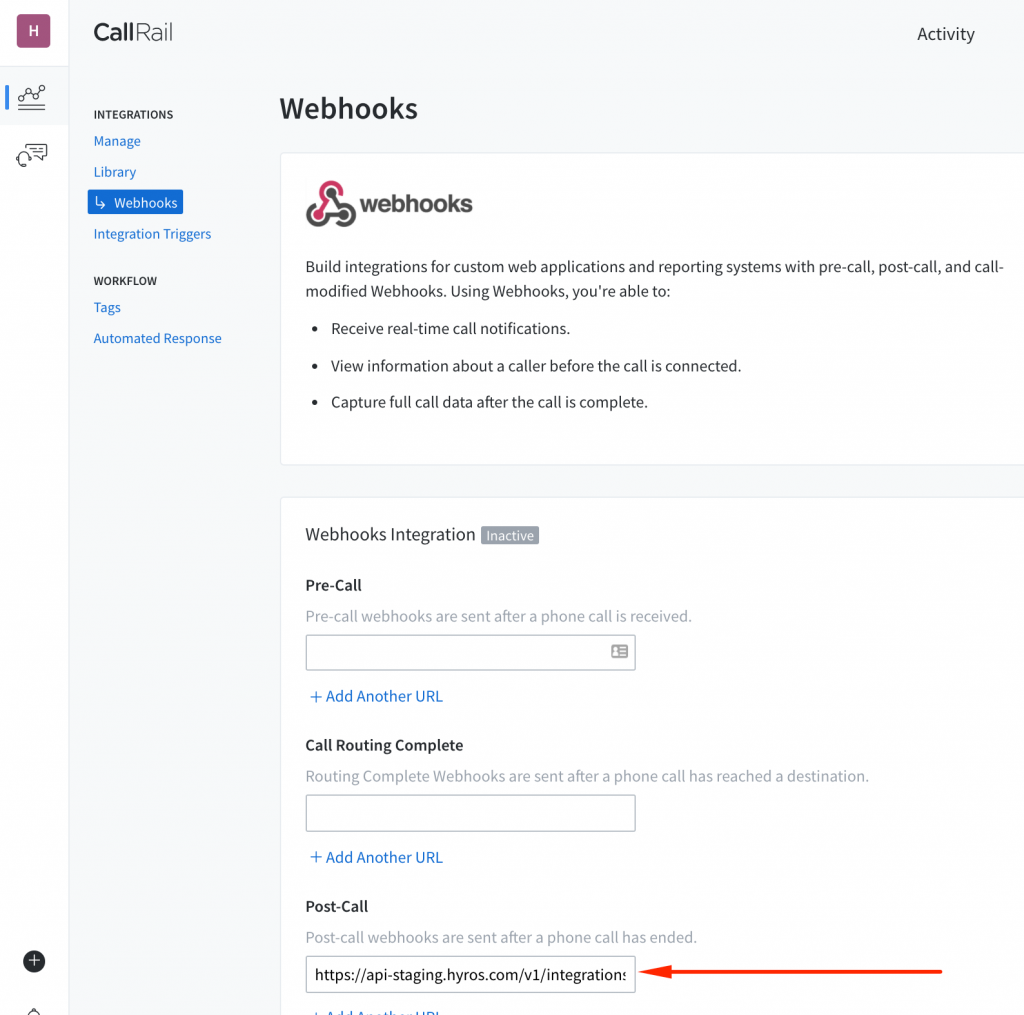
3.Save changes.
That concludes the CallRail integration.
NOTE: Please keep in mind that every call answered is considered a Call sale in Hyros.
What if the Lead does not enter an email?
In some cases with CallRail, leads may not enter an email when booking a call, but just a phone number. Although normally Hyros needs an email to track a call, in this specific case if the email is not available we can still track the call using the phone number only as long as you have integrated correctly following the steps mentioned above.
Inside Hyros you will still see an email, as all tags must be attributed to an email inside the app, however it will be a customized email based on the phone number of the lead, should no email be present.
For example, if a lead’s number is 1234567, then the call sent from CallRail will be shown inside Hyros attributed to the lead email “1234567@callrail.com”.
GoHighLevel
First, either create a new calendar or edit one by going to settings -> calendar as shown below:
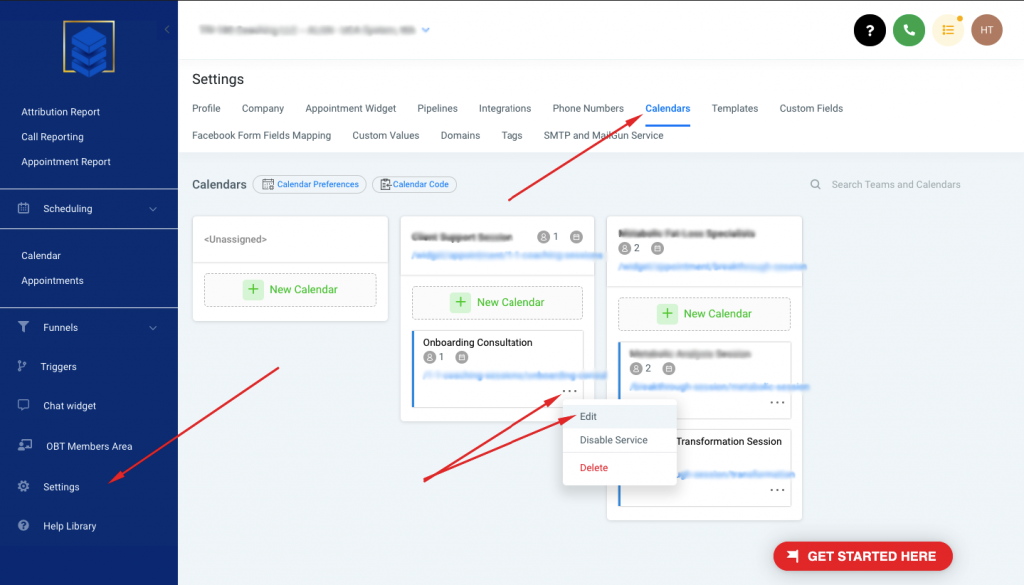
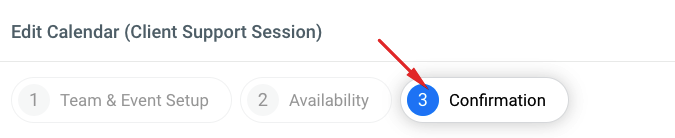
When editing your calendar, go to confirmation settings and then scroll down.
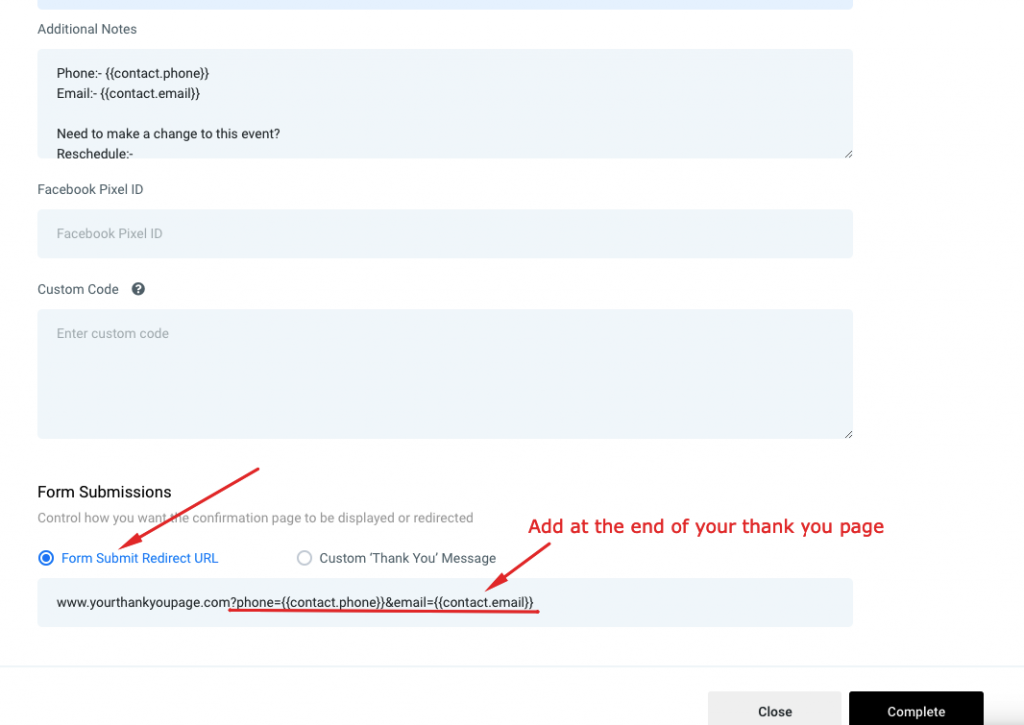
Under the “form submissions” you must select “form submit redirect URL”. This will NOT work if you do not redirect the user upon submission.
Then insert your thank you page URL, and copy the following parameter and paste it at the end:
?phone={{contact.phone}}&email={{contact.email}}
See an example below:
Lastly, when embedding your scheduler, please follow these steps:
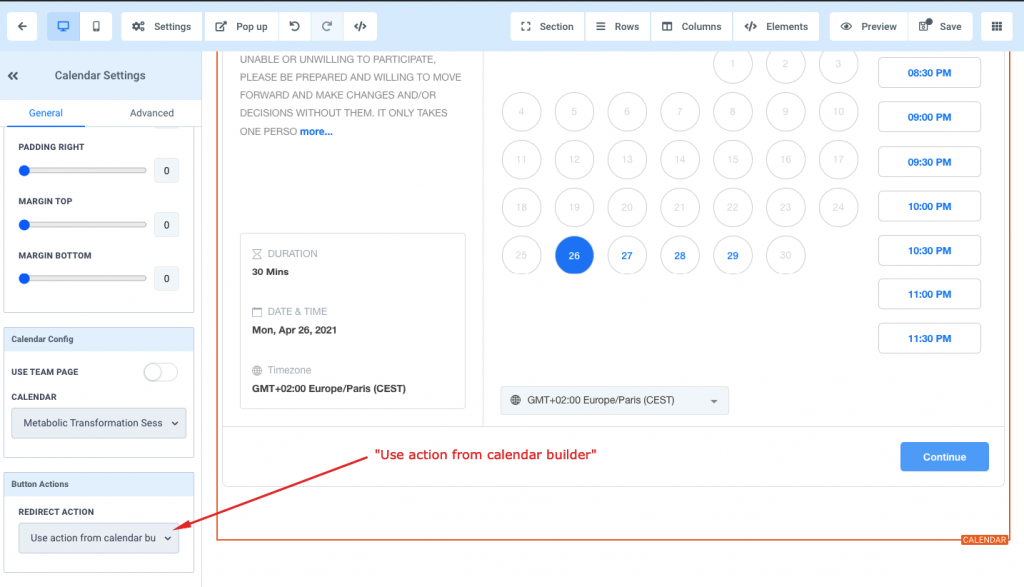
1) Ensure that the Button action for the calendar is “Use action from calendar builder”:
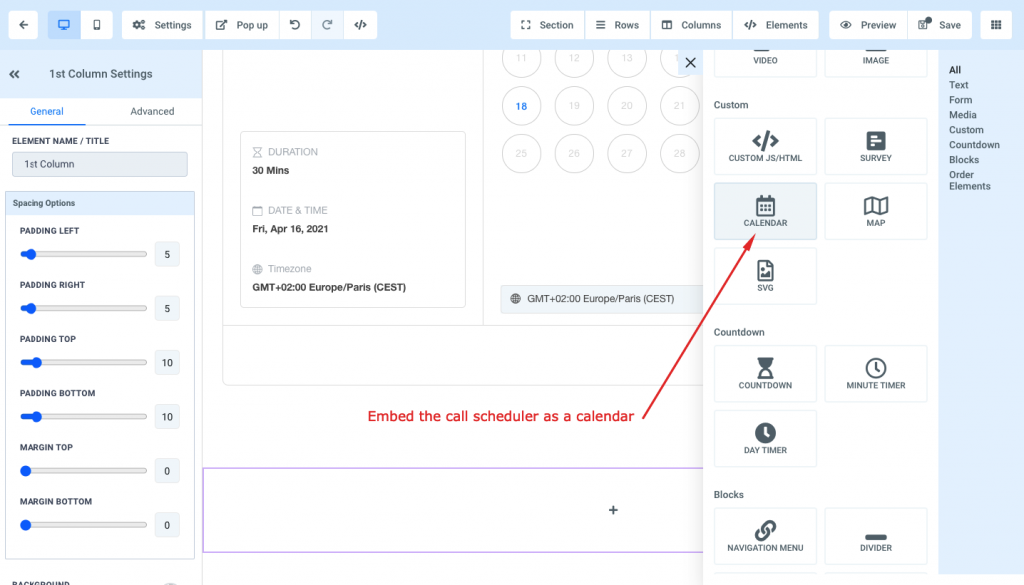
2) Embed it on your tracked funnel page as a calendar and not an iframe/Custom JS/HTML. This is not mandatory to track the call but is recommended:
3) Run a Test Call
Simply go through your funnel as if you were a user. Upon booking a call and being sent to the thank you page, you should see the phone number and email inside the URL. It should look something like this:
www.yourthankyoupage.com?phone=123456789&email=john@doe.com
After a few minutes, you should also see the call listed with the email inside the calls tab in your hyros account.
If you do not see this, please contact the support team for further assistance.
SavvyCal
First of all, please copy this universal script and ensure it is in he code of all of your funnel pages, including the thank you page that you direct leads to AFTER they book a call:
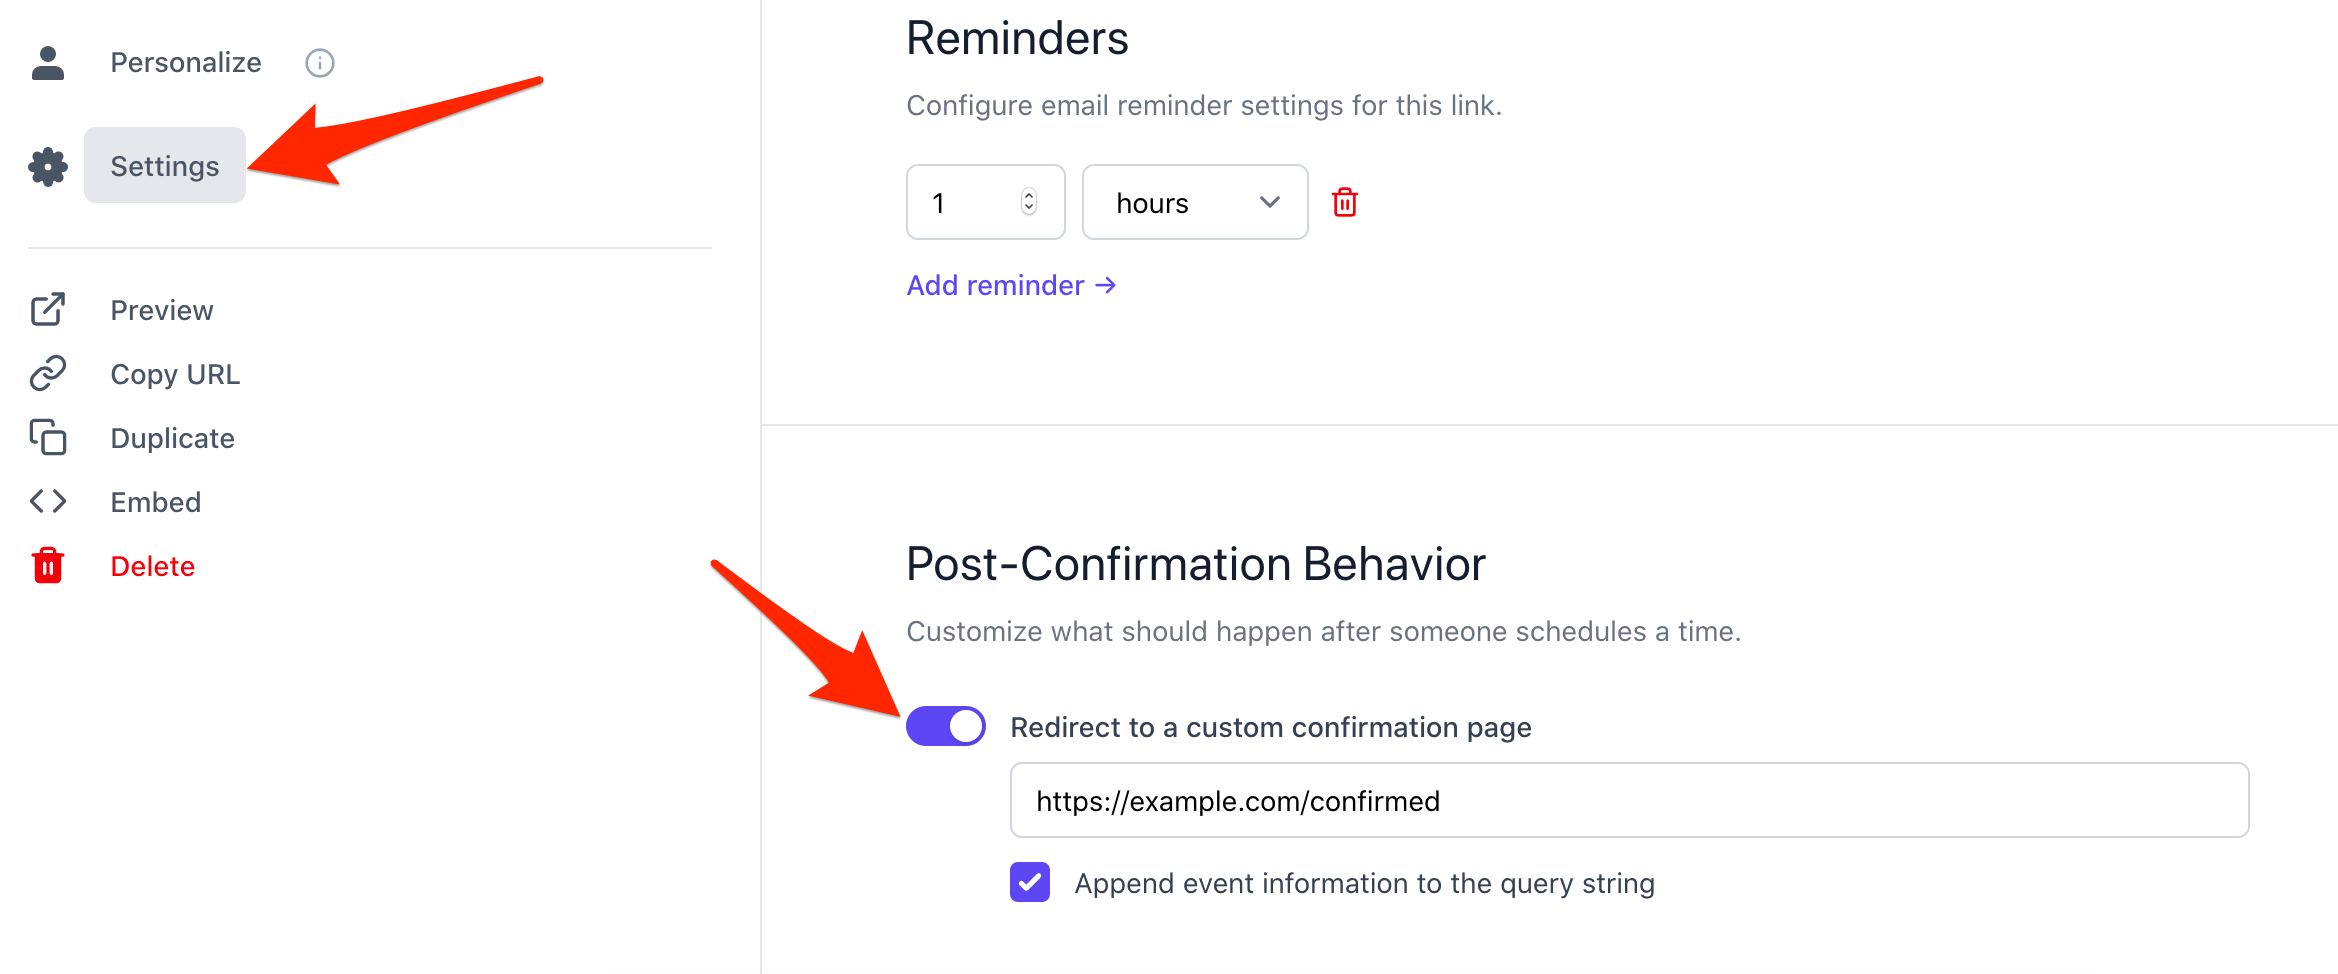
Next, inside SavvyCal go to the link editor. Inside Settings g to “Post-Confirmation Behaviour” and toggle on “Redirect to a custom page”.
Finally make sure “Append event Confirmation Query string” is turned on below the redirect URL:
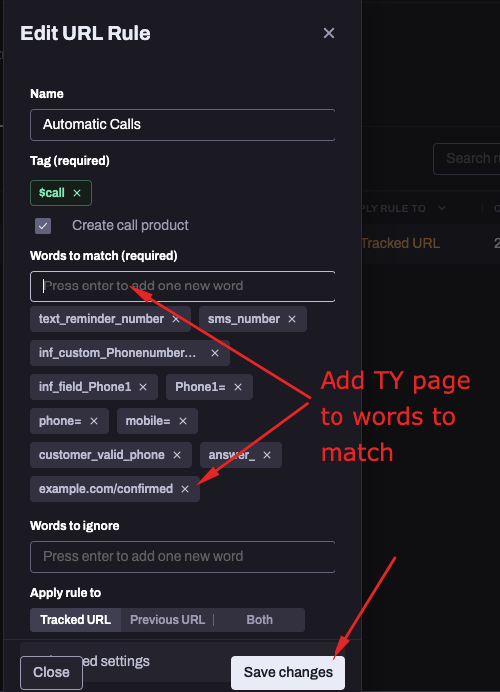
Once that is done, go to the URL rule settings inside Hyros and edit the “Automatic Calls” rule as shown here:

The only thing you need to do is add the thank you page URL (the page that you will redirect users to after they book a call) to the “words to match” field and click enter, then save:
Once you have created that rule, you have completed the setup. You can test your call tracking by booking a call as if you were a lead. You should then see a call inside of Hyros.
If for some reason you do not see a call please make sure you have followed all of the steps correctly, and if you can not find the issue please reach out to the support team.
Schedule Once / Oncehub
Please ensure that you have placed the universal code on your call booking and call thank you pages:
Then, for Oncehub you have 2 options depending on what plan you are on inside Oncehub. If possible we recommend the Native setup for optimized call tracking accuracy:
Native Setup (Growth Plan and above)
If you do not have the appropriate plan, please scroll down until you see the “standard setup” below and follow those steps instead.
follow these 3 steps to ensure your call tracking is working
Step 1 – Add the Redirect inside Oncehub
Step 2 – Integrate with Oncehub for Call Tracking and remove automated Call Tracking Rule
Step 3 – Test your Call Tracking
Trouble Shooting Schedule Once
–IF you do not see the email enter the system at all ensure that your UNIVERSAL code is in the header of your booking page and call booking thank you page.
THEN confirm that you have checked the ““Send booking confirmation to redirect page” checkbox under “booking form and redirects” for the event type you want to track.
THEN confirm you have done this to the right event in Schedule Once.
THEN redo the test above. If you see the email come in move to the next step.
-IF you do not see the $call tag make sure you have integrated using the correct API key from the correct Oncehub account
THEN redo the test above. If you see the $call move to the next step.
IF it fails after the two test above contact support via chat in the lower right hand corner and say “My calls are not showing in the system”
Standard Setup (Free Plan)
If you have already completed the Native Setup above, please ignore this and move on to the next steps.
Written Guide
If you are using Schedule Once as your call scheduling software follow these simple steps
1- Log into ScheduleOnce and go to to SET UP (https://app.oncehub.com/scheduleonce/Setup.aspx#/)
2- Access the event type that you want to track.
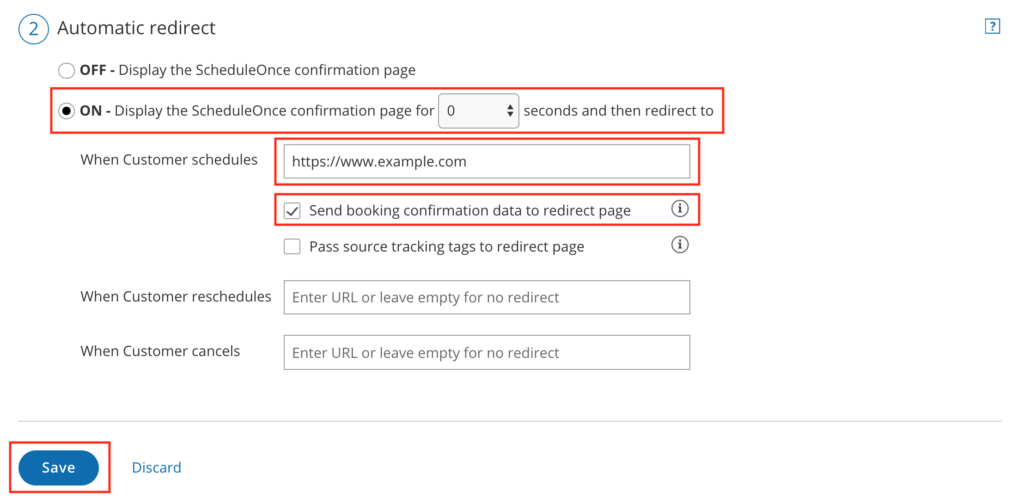
3- Go to “booking form and redirects”. Scroll to the bottom on the page and check off “Send booking confirmation to redirect page”
4- Ensure you are redirecting to a thank you page
5- Ensure this is done on every “event type” you would like to track.
This will complete call tracking set up.
———————————————–
NEXT RUN THIS TEST
1. Opt into your call funnel
2. Wait 1-2 minutes after opting in ensure that your email has entered Hyros in your LEADS section
3. Next book a call on your call booking page and make sure you complete the book as are redirected.
4. Wait 1-2 minutes, then check your CALLS section to ensure that your call has been tracked. If asked click “INDEX INFORMATION” on the call section.
5. Click your email and ensure the $call tag has been applied
If you see your email enter the system and have a $call tag attached to it then you have completed set up and are ready to move to the next step.
If you do not use the troubleshooting guide below.
———————————————–
Trouble Shooting Schedule Once
–IF you do not see the email enter the system at all ensure that your UNIVERSAL code is in the header of your booking page and call booking thank you page.
THEN confirm that you have checked the ““Send booking confirmation to redirect page” checkbox under “booking form and redirects” for the event type you want to track.
THEN confirm you have done this to the right event in Schedule Once.
THEN redo the test above. If you see the email come in with the $call tag move to the next step.
-IF you do not see the $call tag make sure you are collecting the phone number on your Schedule Once form
THEN redo the test above. If you see the $call move to the next step.
IF it fails after the two test above contact support via chat in the lower right hand corner and say “My calls are not showing in the system”
YouCanBook.Me
Please ensure that you have placed the universal code on your call booking and call thank you pages.
Here is the parameter to ad to your redirect url : ?name={FNAME}&email={EMAIL}&phone={Q3}
BE SURE to change {Q3} to match the title on the form section you use to collect the booking phone number.
Written Guide
If you are using YouCanBook.Me as your call scheduling software follow these simple steps
1- Log into Youcanbook.me and click Edit Settings on the booking form you would like to track.
2- Go to “After Booking” and ad this parameter to your redirect thank you page URL.
?name={FNAME}&email={EMAIL}&phone={Q3}
3- Change the Q3 in the parameter to match the title of the section of your form where you collect the booking email.
4- Ensure you are redirecting to a thank you page with the UNIVERSAL code in the header.
This will complete call tracking set up.
NEXT RUN THIS TEST
1. Opt into your call funnel
2. Wait 1-2 minutes after opting in ensure that your email has entered Hyros in your LEADS section
3. Next book a call on your call booking page and make sure you complete the book as are redirected.
4. Wait 1-2 minutes, then check your CALLS section to ensure that your call has been tracked.
5. Click your email and ensure the $call tag has been applied. Also ensure the lead has a phone number and IP.
If you see your email enter the system and have a $call tag attached to it then you have completed set up and are ready to move to the next step.
If you do not ensure your Universal code is on your thank you page and your YouCanBook.me redirect is properly formatted and showing the phone number after booking in the URL.